半导体行业通信标准-SECS / GEM

  • 第一章 介绍

  • 第二章 GEM 收集事件

  • 第三章 数据轮询

  • 第四章 GEM 工厂应用支持

  • 第五章 报警

  • 第六章 配方管理

  • 第七章 文档

  • 第八章 设备终端服务

  • 第九章 用户界面

  • 第十章 GEM消息假脱机功能

  • 第十一章 协议层

  • 第十二章 消息日志

  • 第十三章GEM 控制状态

  • 第十四章 总结


第一章 介绍

SECS/GEM指的是一组用于管理制造设备和工厂主机系统之间通信的半导体行业标准。消息层标准SEMI E5 SECS-II定义了一个通用的消息结构和一个包含许多标准化消息的库。协议层标准SEMI E37高速消息服务(HSMS)定义了使用TCP/IP传输SECS-II消息的二进制结构。SEMI E30 GEM定义了一组最低要求、附加(可选)功能、用例和部分SECS-II消息的用户场景。

SECS/GEM是在设备上实现的,工厂使用它来实现命令和控制功能。由于它是一个行业标准,任何符合SECS/GEM的主机软件都可以与任何符合SECS/GEM设备进行通信。该标准在设备上全面实施后,工厂软件可通过其SECS/GEM接口对设备进行全面控制和监控。这些标准为设备制造商和工厂提供了许多好处。本文重点介绍了其中的几个好处。

SECS/GEM降低了设备集成成本

工厂通常由跨国企业拥有和经营,这些企业从各种设备制造商购买设备。尽管每种设备的控制软件都不一样,但要求工厂对设备进行整合,使设备协调运行。虽然可以独立地将每个设备与定制的软件集成在一起,但是这样做既不节约成本,也不节省时间。

设备制造商的情况也类似,他们的产品销往全球各地的不同工厂。每个工厂的数据收集和应用软件都是不同的。设备制造商需要帮助工厂整合采购的设备。虽然为每个工厂开发定制的集成解决方案是可能的,但这仍然不是成本有效的。每当工厂要求定制集成特性时,这些成本就会转嫁到工厂本身。

定制化软件,无论是由设备制造商还是工厂开发的,创建和维护起来都很昂贵,而且往往质量低于预期。相比之下,SECS/GEM标准定义了如何在任何制造设备上创建标准化接口。设备制造商受益于为所有客户开发一个接口。工厂通过为他们购买的所有设备重用相同的集成软件而获益。工厂和设备制造商对该软件和技术的重用提高了软件质量,降低了成本,并允许更多的功能。设备制造商和工厂不仅可以在所需的最低需求功能上投资,还可以实现在其他方面无法负担的高级功能。如果他们只需要支持SECS/GEM,那么设备制造商就可以发布更多的数据,支持更先进的控制。反过来,工厂可以利用这些额外的数据来提高产品质量和生产率。

SECS/GEM适用于所有制造设备

因为SECS/GEM被划分为基本需求和附加功能,它可以在任何制造设备上实现,而不考虑其大小和复杂性。额外的功能是可选的,因为它们并不总是被需要的。例如,一些设备没有配方,因此不需要实现配方管理这项附加功能。

SECS/GEM也可以很好地根据设备数据的大小进行规模的缩放。例如,一个非常简单的设备或设备可能会发布10个不同的采集事件,而一个复杂的设备可能会发布5000个不同的采集事件; 然而,两者都可以使用相同的SECS/GEM技术。

使用SECS/GEM接口可以支持无数的应用程序

SECS/GEM使得设备上发生的一切都可以被追踪到。支持任何远程控制功能和系统配置。设备发布的数据越多,工厂可以实现的软件应用程序就越多。SECS/GEM接口使统计工艺控制、故障排除、预测性维护、前馈/反馈工艺控制、设备利用率、材料跟踪、配方验证以及更多应用程序的实现成为可能。这些应用程序通常减少了对设备上人机操作界面的需要,从而减少了工厂中操作员的数量。配方管理允许工厂最小化报废材料。例如,使用SECS/GEM接口将黄金配方存储在工厂的中央存储器,并确保在材料上使用正确的配方。

SECS/GEM非常有效地使用网络带宽

有几个特性使SECS/GEM自然高效。首先,每个SECS/GEM接口都充当消息代理。由于代理在设备上运行,未订阅的数据不会在网络上发布。如果主机软件要接收警报、收集事件或跟踪数据消息,必须先订阅。由于每个对警报、收集事件和跟踪数据的订阅都是单独管理的,因此设备可以实现单个SECS/GEM接口,该接口发布所有工厂应用程序请求的所有警报、收集事件和跟踪数据,而不会因为不必要的数据浪费网络带宽。此外,当主机订阅跟踪数据时,它可以指定数据收集速率,这使得SECS/GEM比以硬编码速率发布数据的协议更有效和有用。

另外,所有SECS/GEM消息总是以高效率的二进制格式传输。这比ASCII格式的协议使用更少的带宽。尽管使用二进制格式,SECS/GEM消息也很容易和标准的XML符号进行互转。

SECS/GEM获得业界的大力支持

多年来,SECS/GEM一直是半导体行业工厂/设备通信和控制系统的支柱。这意味着今天所有的半导体制造完全依赖于SECS/GEM通信。自90年代末以来,300mm半导体工厂一直在以SECS/GEM通信为基础的全自动化运行——像台积电、三星、美光、英特尔、东芝等大公司在每个工厂7*24小时的使用SECS/GEM。平板显示器、高亮度LED和光伏等其他行业也正式开始使用SECS/GEM,因为它们认识到SECS/GEM特性可以应用于任何制造设备,以支持关键任务的应用。

SECS/GEM是自描述的

虽然该标准要求GEM文档随设备一起提供,但是SECS/GEM仍支持多种方法让主机软件自动适应设备的SECS/GEM接口。主机软件可以通过一些消息请求可用报警、状态变量以及设备常量的列表,对于较新的SECS/GEM实现,主机软件还可以请求可用采集事件和数据变量的列表。这些消息使得SECS/GEM接口即插即用。此外,设备制造商还可以提供一个标准化的提供SECS/GEM接口及其特性的完整描述的XML文件。

总结

对于工厂和设备制造商来说,使用SECS/GEM技术有许多好处,以上只是其中的一部分。SECS/GEM是当今可用的成熟技术。

第二章 GEM 收集事件

在开始我们的SECS/GEM系列之前,让我们先来解释GEM标准的一个关键特性,即Collection Events。我们将从解释它们如何工作开始,然后进一步说明为什么它们在从制造设备收集数据方面如此有效。

什么是收集事件?

“收集事件”名称中的两个单词是描述性的。

如“事件”一词所示,收集事件是通知。它的目的是在设备上发生感兴趣的事情时通知主机。“主机”是指连接到设备GEM接口的工厂客户端软件。例如,收集事件可以在物料到达时报告,耗材不足时报告,出现硬件问题时报告,摄像机对物料进行检查时报告,物料准备取出时报告,燃烧室达到目标真空压力时报告,加工完成时报告等等。设备可以使用收集事件特性来报告任何感兴趣的事件。创建GEM接口的人准确地定义了主机可以使用哪些收集事件;因此,不同设备类型的可用收集事件集是不同的。

收集事件功能也能够将数据与收集事件消息一起发布。这是一种非常有效的数据收集形式,在消息可用时异步提供信息。例如,当物料到达时报告的收集事件也可以报告到达物料的条码和位置。GEM接口中有三种类型的数据; 关于收集事件的数据(称为数据变量)、关于状态的信息(称为状态变量)和设备设置信息(称为设备常量)。无论谁创建GEM接口,都将准确地定义每个收集事件将提供哪些信息。因此,不同设备类型的收集事件的可用信息集是不同的。只有在主机设置报表时,设备才会将可用数据发送到主机。

综上所述,收集事件不仅可以告诉主机发生了什么事情,还可以提供关于发生了什么事情以及设备状态的更详细的信息。

一个小的类比


打个比方,把工厂想象成老板,把他们购买的设备想象成员工。有许多不同的管理风格,就像有不同类型的工厂和运行工厂的风格一样。你不想被迫按照别人的工厂的方式经营自己的工厂。你想按你自己的方式去做。

此外,每个员工都是独特的,需要独特的关注度。每个员工都在做独特的事情。一般来说,所有的管理者都想知道员工的基本情况以及他们的员工在做什么。他们想要知道员工什么时候开始一个项目,什么时候完成一个项目。有些员工即使在极少的监督和汇报下也非常高效。一些员工需要大量的监督和报告。GEM允许工厂以独特的方式处理每台设备。具体来说,GEM收集事件为设备提供了一种报告其正在做什么的方式。

主机必须为报告建立规则,并适当地调整规则。例如,有时经理并不关心员工什么时候去洗手间。对于某些员工,经理可能想知道。在GEM接口中,主机可以选择哪些通知会发生,哪些不会发生。

有时经理只需要知道员工什么时候来,什么时候走,什么时候休息,什么时候下班。有时经理需要更多的细节,比如你完成了什么项目,花了多长时间,项目的关键结果。类似同样的,GEM允许主机不仅仅跟踪事件发生的时间,还要提供关于活动的详细信息。GEM报告非常有效地满足了这一需求。

为什么需要这个功能?

简单地说,收集事件允许您实时跟踪设备在做什么。如果一家工厂想要进行某种程度的智能制造,或者只是想提高生产率,那么首先需要的是能够跟踪设备在做什么。收集事件提供了这一点。您可以跟踪设备利用率、材料移动、处理里程碑、活动周期计数,以便进行预测性维护、消耗品使用,以及与发布的收集事件相关的任何其他内容。这些信息的应用是无止境的。

有时,收集事件还用于实现以下场景:设备在继续或获得继续的许可之前需要来自主机的信息。当设备准备好接受主机指令或权限时,可以通过收集事件通知主机。

收集事件通知如何工作?

设备的GEM接口可以发布许多不同的收集事件。通常情况下,主机不希望一次得到所有这些信息的通知,也不需要这样做。收集事件以两种方式使用发布/订阅设计模式。

基本的发布/订阅通知

主机订阅特定的收集事件,以便在事件发生时接收通知。订阅允许主机启用或禁用GEM接口中可用的每个收集事件的报告。设备在会该收集事件发生时发布它们。

事件报告发布/订阅数据收集

默认情况下,收集事件消息不包含任何数据。订阅还允许主机决定在每个启用的收集事件的消息中包含哪些数据。主机定义报表并将报表链接到收集事件;从而订阅数据。每个收集事件可以有不同的报告。还可以多个收集事件共享一个报表。报表里可以包含与收集事件关联的任何数据变量、任何状态变量和任何设备常量。设备会在发布收集事件是将请求的数据一并带出。

识别

设备发布的每个收集事件都有一个惟一的ID号进行标识。主机软件在启用或禁用收集事件时使用ID号。设备在发送收集事件消息时使用ID号。每个可用的数据变量、状态变量和设备常量都有一个惟一的ID号。当主机定义报表时,它也需要为报表分配惟一的ID号。
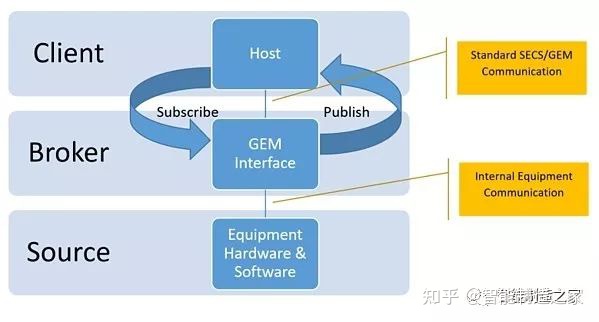
代理

代理构建在设备的GEM接口中,负责处理所有收集事件发布/订阅。它是设备系统的一部分。主机(客户端)和GEM接口之间的通信使用SECS/GEM通信进行标准化。GEM接口与设备的其余硬件和软件(设备收集事件和数据的源)之间的通信可以是任何适当的技术,只要GEM接口功能正常并且性能足够好就可以了。

这意味着消息只会在主机订阅之后才从设备发送到主机。将代理作为设备和GEM接口的一部分可以使GEM接口变得非常有效,并且比使用外部代理的协议使用更少的带宽,因为在外部代理中,所有消息和数据都必须一直发送到代理。


持久性

收集事件订阅持久化在GEM接口中。因此,如果主机断开并重新连接,或者设备重新启动,GEM接口仍旧记得所有订阅的设置。

GEM使用哪些消息?

下面是与收集事件相关的每个主要消息的摘要。注意,“S”表示“流”,“F”表示“函数”。流和函数号一起惟一地标识一个消息。

消息编号方向描述
S2F37主机->设备启用或禁用一组收集事件的报告。 空列表将启用或禁用所有收集事件的报告。在描述GEM接口时,启用所有收集事件报告非常有用。在启用所需收集事件的报告之前,禁用所有收集事件是非常有用的。
S2F33主机->设备定义一个或多个报告。 空列表将删除所有报告以及指向收集事件的报告链接。当试图重置订阅或首次连接到GEM接口并覆盖默认订阅时,删除所有报告功能非常有用。
S2F35主机->设备将一个或多个报告链接到一组收集事件。 如果报表已链接到一个收集事件,则必须移除链接,然后在一条消息中链接所有收集事件。空列表将从收集事件中删除报表链接。
S1F23主机->设备请求获取可用收集事件列表以及每个收集事件的可用数据列表。
S6F11设备->主机收集事件消息。 如果没有链接任何报告,则消息将只包含收集事件的ID。如果一个或多个报告链接到集合事件,则消息中将包含每个链接报告的报告数据。

关乎收集事件的常见问题

收集事件需要多少带宽?

这取决于几个因素。

  1. 主机启用的收集事件的数量。

  2. 连接到收集事件的数据报告的大小。

  3. 设备触发启用的收集事件的频率。这取决于收集事件的含义。

收集事件触发的速度有多快?

GEM标准使用标准通信硬件,并不限制收集事件的频率。换句话说,通过改进硬件,可以加快收集事件的速度。

GEM支持两种协议:SECS-I和HSMS。SECS-I基于RS-232串行通信,因此目前很少使用。这样的实现无法非常快地触发收集事件。

HSMS基于网络通信。由于串行通信很慢,所以目前大多数GEM实现都使用HSMS。GEM可以非常有效地使用TCP/IP。收集事件的可能频率取决于网络硬件的速度、设备计算机性能和主机性能。与大多数协议一样,使用消息通常比生成消息需要更多的计算机资源。

生成收集事件的速度还取决于链接到收集事件的数据报告。例如,如果数据报告很大,比如10mb,这将影响性能。

为什么我无法收到收集事件消息?

主机无法收到收集事件消息的可能原因有几个。

  1. 主机和设备必须使用成功的S1F13/S1F14交换建立GEM通信。

  2. GEM控制状态必须在线。它不能处于主机-脱机或设备-脱机状态。

  3. GEM Spooling 必须是非活跃的。在Spooling已经活跃时时禁用该功能并不会使Spooling变为活跃。如果不需要Spooling消息,则需要使用消息S6F23清除Spooling内容。如果需要假脱机消息,那么使用S6F23逐个获取它们,直到Spooling机状态变为非活跃状态。

  4. 必须启用收集事件。使用S1F3检查“EventsEnabled”状态变量以确认收集事件已启用。使用消息S2F37启用收集事件。

  5. 需要发生收集事件活动。例如,如果材料没有实际到达,那么当材料到达时将永远不会发生收集事件报告。如果活动发生且满足上述条件,则设备GEM接口存在缺陷。

如果设备的GEM接口没有发布我需要的收集事件,该怎么办?

请设备供应商添加所需的收集事件。设备供应商很难准确预测工厂需要的所有收集事件。设备供应商需要升级其在工厂中的GEM接口软件。

当链接到收集事件时,数据报告的大小是多少?

GEM允许单个数据变量值或状态变量的值为任意数据类型的数组或结构体,包括浮点数、字符串或整数。单个数组的大小限制为16.777215 MB,消息的总大小限制为4.294967295 GB。

第三章 数据轮询

GEM是一种工业标准,它定义了工艺设备和工厂主机软件之间, 为了达到监视和控制目的所建立通信的标准方法。通过连接GEM设备,工厂可以立即体验到运营效益。工厂主机可以通过多种方式收集数据。之前的一篇博客文章讨论了使用收集事件报告收集数据,其中数据基于设备状态的变化被推送到主机。除了事件报告之外,工厂主机通常还需要轮询设备的当前数据值。数据值可以由主机直接请求,也可以在跟踪报告中定期采样。这就是所谓的数据轮询,也是今天讨论的主题。

数据的类型

GEM接口中有三种类型的数据:

数据变量(DV) —— 设备事件发生时可以收集的数据项。此数据只保证在事件上下文中有效。例如,GEM接口可能提供一个名为PPChanged的事件(当配方发生更改时触发)。该接口还可以提供一个名为changed recipe的数据变量。此数据变量(DV)的值仅在PPChanged事件的上下文中有效。在其他的时间轮询该值可能会有无效或意外的数据。

状态变量(SV) —— 包含设备信息的数据项。该数据保证在任何时候都是有效的。例如,该设备可能在流程模块中有一个温度传感器。GEM接口可以提供模块温度状态变量。主机可以在任何时候请求这个状态变量(SV)的值,并期望这个值是准确的。

设备常数(EC) —— 包含设备设置的数据项。设备常数决定设备的行为。例如,GEM接口可能有一个名为MaxSimultaneousTraces的设备常量(EC),该常量指定可以同时从主机请求的最大跟踪数。设备常数的值总是保证是有效的和最新的。

数据属性

上面列出的三种数据类型都有一些类似的有助于定义数据的属性。设备供应商需要在GEM手册中提供这些属性,以便工厂主机能够与数据进行交互。一些重要的数据属性有:

ID —— 在该GEM接口中唯一的数字ID。这些ID可以按数据类型分为SVID(状态变量ID), DVID(数据变量ID)和ECID(设备常量ID)。

名称 —— 数据项的可读名称。
格式 —— 数据项的数据类型。

数据格式可以是简单类型(数字、ASCII、布尔值),也可以是复杂类型(数组、列表、结构)。例如,数字类型可以是I1、I2、I4、I8(不同字节长度的带符号整数类型)、U1、U2、U4、U8(无符号整数类型)和F4或F8(浮点类型)。列表和数组类型会在数据项中包含多个值。例如,图像数据通常采用字节数组作为数据格式。

结构类型包含特定类型的数据。例如,一个变量可以表示一个Slot map,其中包含Carrier信息,Slot列表和晶圆的存放信息。

值 —— 数据项的实际值。数据值采用精确、高效、自描述的二进制格式,从而主机知道如何解释数据。数据格式允许更有效地收集更多的数据。

收集事件(CE)和警报也有ID和名称。这些内容将在其他博客文章中讨论,但是了解本文的提到的这些属性非常重要,因为这些属性也可以被Host所查询。

数据轮询

如前所述,工厂主机经常通过它所定义的跟踪报告和事件报告定期获得数据。GEM还为工厂主机提供了一种可以根据他的需要去轮询设备数据的方法。

状态变量

主机可以在任何时候通过发送一条包含状态变量ID(SVID)列表的消息来查询这些状态变量(SV)的当前值。如果该列表的长度为1,则只返回单个状态变量(SV)的值。如果列表的长度为零,则返回GEM接口中定义的所有状态变量(SV)的值。这些值会包含在在设备回复的S1F4消息中。

主机还可以通过向设备发送S1F11消息向设备请求状态变量(SV)名称列表。上面提到的列表规则也适用于此消息。返回消息将包含每个状态变量(SV)的条目,包括状态变量ID(SVID)、名称和单位。

设备常量

状态变量(SV)的工作方式类似,主机还可以通过发送一条S2F13消息来查询GEM接口中定义的设备常量的值。这些值会包含在在设备回复的S2F14消息中。

与状态变量(SV)类似,可以使用S2F29消息查询设备常量的名称列表。

数据变量

由于数据变量只在集合事件的上下文中有效,因此没有轮询数据变量值的方法。数据变量的值只能在收集事件报告中上报给主机。

其他

除了上面讨论的数据轮询方法外,还可以通过轮询从设备获取以下信息:

收集事件(CE) —— 主机可以查询GEM接口上可用的收集事件,以及与每个CE关联的DVs。这些是使用S1F23消息请求的。
警报 —— 主机可以通过发送一个列有所期望的警报ID列表的S5F5消息来查询设备上有哪些警报是可用的。返回的消息将列出与ALID关联的警报ID和警报文本。每个GEM接口都需要有两个状态变量。AlarmEnabled包含设备上所有启用警报的ID列表。AlarmsSet包含设备商所有当前处于设置状态的警报ID。由于这些值是状态变量,所以主机可以在任何时候查询它们的值。
MDLN和SOFTREV —— 对S1F1(你在吗?)消息的回复将包含设备模型类型(MDLN)和软件修订版本(SOFTREV)。
DateTime ——主机可以使用S2F17消息请求设备的日期和时间,也可以使用S2F31消息同步设备的时间。GEM要求设备维护一个包含当前时间的时钟状态变量。允许主机查询和同步时间使得可以对系统上几乎同时发生的事件进行排序。

跟踪数据收集

跟踪数据收集提供了一种定期采样数据的方法。这种基于时间的数据收集方法对于跟踪一段时间内的数据变化趋势或重复的应用,或者监视连续的数据非常有用。在创建跟踪的定义时,主机需要提供以下内容:

采样周期 —— 样本之间的时间。以百分之一秒为最小单位,因此可以使用跟踪非常快速地收集数据。能够支持10赫兹的采样间隔数据的设备很常见。
数据组大小 —— 跟踪报告中包含的样本数量。
状态变量 —— 跟踪报告中包含的状态变量列表。
总样本数 —— 在跟踪的整个生命周期内要采集的样本数量。
跟踪请求ID —— 跟踪请求的标识符(GEM只允许整数类型的跟踪ID)。

主机使用S2F23消息定义跟踪请求。跟踪报告使用S6F1消息从设备发送到主机。

跟踪报告样本

假设一个设备正在处理一个晶圆片,这个过程需要5分钟。重要的是要保持卡盘温度在一定的可接受范围内,并确保腔室压力保持在指定的水平以下。每隔15秒采样一次这些状态变量值就足够了,但是我们可以创建数据组,实现每分钟只接收一次报告。主机可以发送一条包含如下跟踪配置的S2F23消息:

跟踪ID : 100 (ID必须是整数)
采样周期 : 00001500(每15秒采样一次)
总样本:75个(每15秒采样5英寸)
数据组大小: 4
SVID列表 :
300(包含卡盘温度信息的状态变量的ID)
301(包含室压信息的状态变量ID)

一分钟后,第一个跟踪报告将来自设备发出的的S6F1消息。这条消息将包含以下信息:

100(跟踪ID)
4(最后一个样本号)
2018-01-22T14:20:34.8(日期格式取决于时间格式设备常数)
状态变量列表:(长度为8 : 2 个状态变量,数据组大小为4)

219.96(第一次采样卡盘温度)
0.0112(第一次采样压力)
219.97(第二次采样卡盘温度)
0.0122(第二次采样压力)
219.97(第三次采样卡盘温度)
0.0120(第三次采样压力)
219.96(第四次采样卡盘温度)
0.0119(第四次采样压力)

再过一分钟,跟踪报告可能如下所示:

100(跟踪ID)
8(最后一个样本号)
2018-01-22T14:21:34.8(日期时间显示比第一个跟踪晚一分钟)
状态变量列表 : (长度为8: 2 个状态,数据组大小为4)

219.96(第五次采样卡盘温度)
0.0112(第五次采样压力)
219.97(第六次采样卡盘温度)
0.0122(第六次采样压力)
220.01(第七次采样卡盘温度)
0.0120(第七次采样压力)
220.00(第八次采样卡盘温度)
0.0119(第八次采样压力)

以一分钟为间隔,后续还将收到三份报告。主机可以检查报告中返回的值,并在值超出预期范围时做出相应的处理。

结论

如果主机想在特定的时间点检查一个值,它可以使用S1F3轮询状态数据。如果希望在给定的时间内连续收集数据,则可以设置跟踪报告。

使用本博客中概述的数据采样方法,将允许主机应用程序在需要时轮询所需的数据。GEM提供了从设备请求数据的灵活性,允许主机在给定的时间点查询值,或者使用跟踪定期采样样。

第四章 GEM 工厂应用支持

工厂如何处理这些数据?

与本系列中其他涉及SEMI E30 GEM(通用设备模型)标准的特定特性和功能的文章不同,本篇博客阐述了许多使用设备上收集到的数据的工厂应用程序。

此外,由于我们经常听到这样的问题:“工厂实际如何使用哪些希望我们提供的各种类型的设备信息?”这篇文章将总结出支持这些应用程序所需的具体数据。这个列表并没有涵盖所有的内容,但是应该可以让您了解由GEM数据收集支持其目标的工厂受益者。下图说明了关键性能指标(kpi)、负责优化它们的受益者、用于实现此目的的应用程序以及这些应用程序所需的数据之间的关系。


分享这类信息最有效的方式是表格形式。在一组相关的应用程序中(例如,调度、预防性维护),应用程序通常按照复杂性递增的顺序列出,这也是工厂应用程序开发人员实现的可能顺序。

工厂应用需要的设备数据
OEE(设备总体效率)足够对所有时间段设备状态进行分类的转换事件和状态代码。
Intra-equipment material flow设备内部物料流物料跟踪时间,物料位置状态指示和状态变化时间。
Process execution tracking工艺执行跟踪所有工艺模块的开始/结束事件;所有支持多步骤配方的工艺模块里每个步骤的指示和步骤变化时间
WTW (wait time waste) analysis等待时间损耗分析设备内部物料流和工艺执行跟踪应用程序所需要的事件以及划分所有时间段物料状态所需要的上下文数据的组合。参见SEMI E168产品时间管理标准作进一步解释)
Time-based PM (PreventiveMaintenance)基于时间的预防性保养现场可替换部件级别的使用次数。
Usage-based PM基于用法的预防性保养每个可替换部件使用参数及累计值,比如状态内市场,执行次数,流体流量,耗材流量,功耗等等。
Condition-based PM基于条件的预防性保养每个可替换部件的有意义的健康指标
FDC (错误检测分类)特定错误模块所要求的设备/工艺参数及上下文信息(这里想要做到完整比较困难,因为多数FDC系统都有)
Automated equipment interdiction自动设备停止远程停止命令(例如当FDC应用感知到以及存在或者将要发生的错误时)
Equipment configurationMonitoring设备配置监控重要设备常量的矢量,包括期望值和可接受范围。如果值是依赖于设置的期望值和可接受范围会有多套。这套系统是为了能够捕获因为操作人员手工修改参数导致的人为错误。
Component fingerprinting组件识别设备关键机制的性能参数,包括传感器/驱动器级别的命令/响应信号。
Static job scheduling静态作业调度每个产品/配方组合的计划和执行时间,以及当前计划的信息。
Real-time job dispatching实时作业分配预估当前作业完成时间;预估设备上所有排队等待的物料的完成时间。
Factory cycle time optimization工厂周期优化物料缓存内容,作业队列信息
Operator notification操作员通知非自动化/半自动化环境下一些操作员频繁操作的通知代码,比如加载/卸载物料, 选择/确定配方,一旦设备卡住提供的一些手动协助等等。
Real-time dashboard实时仪表盘设备/部件生产状态指标
Equipment failure analysis设备失败分析有意义的报警/错误代码,或者最近的历史记录/数据
Run-to-run process control批次工艺控制配方可调整参数识别以及远程更新这些参数的命令。

在某种程度上,在上面的表中描述的应用程序数据可以跨设备类型进行标准化,这样的话就有可能创建通用的工厂的应用程序, 只需要一个从供方定义的GEM ID (收集事件id、状态/数据变量,常量,设备等)到通用应用方的对应列表。但是这是另一个关于GEM上下文中“即插即用”概念的主题。

我们希望这个解释能够帮助您理解设备信息对于使用它的工厂是多么有价值,从而明白在您将来设计的GEM接口中提供一组丰富的事件、变量和其他详细信息是多么重要。

第五章 报警

以前的文章已经讨论了允许通过GEM接口收集数据的功能,以便在最近的文章中描述的工厂应用程序能够分析这些数据。在这篇文章中,我们将回到对SEMI E30 GEM(通用设备模型)标准的特定特性和功能的讨论,特别是对设备错误情况的管理。

在一个完美的世界里,一切都按计划进行,但在现实中,事情总是会出错。成功的秘诀是能够知道什么时候出了问题,然后做出适当的反应。

就像家庭报警系统一样,半导体晶圆厂也想知道什么时候发生了不好的事情。他们想防止正在加工的材料被报废。报警管理使设备能够在出错时通知主机,并提供出错信息。GEM标准将报警管理定义为设备能够通知主机对设备上发生的报警情况和对报警情况进行管理的能力。

在GEM中,一个报警可以是指设备上的任何可能危及正在加工的人员、设备或材料的异常情况。例如,如果技术人员打开一个盖板来替换组件,设备应该发出报警,通知主机在当前状态下操作设备是不安全的。另一个例子可能是,如果一个设备需要高温进行加工,但是传感器检测到低温条件,它应该触发报警,因为在这些条件下运行过程可能会损坏正在加工的材料。当出现报警情况时,设备制造商也有责任制止设备上的不安全活动。设备制造商最清楚设备上需要什么样的特殊报警,以确保人员、设备和材料的安全。

通常,在报警条件发生时,能得到更多的设备中的状况信息是有用的。向传达额外的信息是非常有价值的,但是没法通过正常的报警报告发送/确认消息。为了提供一种途径获取额外信息,GEM要求为设备上每种可能的报警条件定义两个收集事件——一个事件用于设置报警,另一个事件用于清除报警。这些收集事件使得GEM事件数据收集机制可以被用于在报警更改状态时向主机发送额外的相关信息。

除了提供报警状态更改的时间外,设备上的报警管理必须允许主机获取所有报警id和相关报警文本的列表。主机还必须能够启用/禁用设备上的单个报警的报告,并查询设备以获得当前启用报告的报警列表。

报警的状态图不是很令人兴奋,但是它满足了一个至关重要的需求。下图为报警状态图:


GEM报警只有两种状态: 每个报警要么处于设置状态,要么处于清除状态。它简单但是有效。

报警管理不是复杂的事情,但通过有效地使用报警管理,晶圆厂可以仔细的监控其工艺设备的健康状况,并将其对生产良率的负面影响降到最低。

第六章 配方管理

在几篇SECS/GEM系列博客文章(包括收集事件、数据轮询和警报)之后,我们现在讨论GEM特性的特性和优点,称为配方管理。我们将介绍配方的定义, 配方管理是什么意思,,以及为什么需要这个功能!

什么是配方?

配方是一组描述设备应如何处理其材料的指令。配方内容由设备供应商定义。

什么是配方管理?

配方管理允许工厂主机在设备之间传输配方。它还要求设备在设备上的配方发生变化时通知工厂主机。

为什么需要这个特性?

几乎所有的半导体工厂都需要这个特性来确保配方的完整性并支持可追溯性。主机将设备上已批准的配方上传并保存下来供以后使用,以确保菜谱不会被更改。为了可跟踪性,配方通常与工艺数据一起保存。

配方管理是如何工作的?

配方通过SECS消息在主机和设备之间传递。有几组SECS消息被用于这个功能。E30 GEM列举了格式化、非格式化和大型配方的消息集。这里将不讨论大型配方的消息集。

当操作人员在设备上修改配方时,设备还需要通知主机。生成的PPChange收集事件还需要伴有两个数据变量:载有被更改的配方ID的变量PPChangeName以及载有包含更改类型(创建、删除和编辑)的变量PPChangeStatus。当配方被传到设备上时,设备应对内容进行验证。如果配方无效,则应该生成一个PPVerificationFailed的收集事件,伴有包含验证失败信息的PPError数据变量,以将问题通知主机。如果验证失败,该配方将不被使用。

识别

每个配方都由一个名为process program ID或PPID的ASCII名称标识。工厂主机和设备GEM接口在配方操作中使用该名称。

持续性

在GEM 接口中, 配方是持续性的。如果主机断开并重新连接,或者设备重新启动,GEM接口仍将记得配方。此外,大多数工厂主机会将配方保存在工厂端。

使用哪些消息?

下面是与集合事件相关的每个主要消息的总结。注意,“S”表示“流”,“F”表示“函数”。S和F一起唯一地标识消息。

所有配方

消息编号方向描述
S7F17主机 -> 设备从设备上删除一个配方。空列表将删除设备上的所有配方。
S7F19主机 -> 设备请求设备上所有可用的配方列表

非格式化配方

消息编号方向描述
S7F1主机 <- 设备设备要求上传一个配方
S7F3主机 <- 设备设备上传一个配方到主机
S7F5主机 <- 设备设备请求从主机获取一个配方
S7F1主机 -> 设备主机要求下传一个配方到设备
S7F3主机 -> 设备主机下传一个配方到设备
S7F5主机 -> 设备主机请求从设备获取一个配方

格式化配方

消息编号方向描述
S7F1主机 <- 设备设备要求上传一个配方
S7F23主机 <- 设备设备上传一个配方到主机
S7F25主机 <- 设备设备请求从主机获取一个配方
S7F1主机 -> 设备主机要求下传一个配方到设备
S7F3主机 -> 设备主机下传一个配方到设备
S7F5主机 -> 设备主机请求从设备获取一个配方
S7F29主机 <- 设备设备请求发送配方验证结果
S7F27主机 <- 设备设备发送配方验证结果

有关配方管理的常见问题

可以传送一个多大的配方?

对于未格式化的菜谱消息,菜谱要么是单个ASCII字符串,要么是二进制数组值。单个数组值被限制为16.777215 MB。

格式化的配方消息,将配方分解为一个项目列表。单个数组值被限制为16.777215 MB。消息的总大小被限制为4.294967295 GB。

第七章 文档

正如SECS/GEM系列的特性和优点的第一篇文章所指出的,SECS/GEM标准定义了一个可以在任何设备上使用的标准化接口。GEM接口通过状态变量、数据变量、收集事件、警报、数据格式、错误代码、SECS-II消息和其他可选的GEM功能公开设备的功能。GEM标准要求每台设备都附带文档; 确保工厂拥有使用设备GEM接口所需的信息。该文档通常称为GEM手册。

GEM手册可以以多种形式分发。目前,大多数GEM手册都是以Word、Excel或PDF文档的形式提供的。GEM手册中的大量信息被用于做出购买决策、开发主机软件和测试设备。对于一个功能完整的GEM接口,GEM手册必须包含以下主题: 状态模型、场景、数据收集、警报管理、远程控制、设备常量、流程配方管理、物料移动、终端服务、错误消息、时钟、假脱机、控制、支持的SECS-II消息、GEM遵从性声明和数据项格式。为了使这篇文章保持一个合理的长度,我们将只讨论一些必要的主题。

GEM遵从性声明

遵从性声明是要审阅的第一个主题之一。它是一种快速、简单地了解设备接口特性的方法。制造商需要标记在设备上实现了哪些GEM功能,以及这些功能是否以符合GEM标准的方式实现。


状态模型

状态模型是GEM的基本功能,因此可以在每个设备上实现。该功能定义了设备的通信、控制和假脱机行为。设备必须提供处理状态模型。但是,定义出一个适用于所有设备的工艺状态的状态机是不可能的。本标准规定了所有设备应具有相同的加工行为。每个状态模型都必须用状态模型图、转换表和每个状态的文本描述来记录归档。关于每个状态模型的一致和详细信息使工厂能够在得到GEM手册之后立即开始编写主机应用程序。


警报、收集事件、设备常数、数据变量和状态变量

设备收集数据的一大部分都是警报、收集事件和变量。所以需要将他们包含在GEM手册中并不意外。设备上的每个警报都应该在GEM手册中有其ID、名称、描述和相关的Set/Clear事件。每个集合事件的文档应该包括ID、名称、描述和关联变量列表。所有变量的文档将包括ID、名称、描述和数据类型。还应该在适当的时候提供变量默认值或值范围的信息。虽然不是必需的,但通常将所有这些信息显示在五个容易找到的表中。对于以下每一类都有一个表: 警报、收集事件、设备常量、数据变量和状态变量。参见下面的示例。


远程控制

一旦工厂能够从设备中收集数据,他们就开始研究如何控制设备。远程控制是GEM功能,它允许主机应用程序请求设备执行一个操作。所有远程命令都应该包含在手册中,包括它的名称、描述以及可能随命令一起发送的每个命令参数的详细信息。命令参数的详细信息应该包括名称、格式和描述。下面显示了一个示例。


SMN 和SEDD

GEM手册很少采用易于在软件中解析的格式。这通常会导致重复代码,并进行一些小的更改,以便与其他设备通信。SEMI E172 SECS设备数据字典(SEDD)和E173 SECS消息表示法(SMN)是两个标准,它们可以极大地提高主机应用程序的灵活性和可重用性。SEDD是一个易于在软件中分布和解析的xml文件。SEDD可以被认为是一个现代化的GEM手册,因为它包含了与GEM手册中相同的信息。例如,SEDD文件包含关于每个变量、收集事件、警报和受支持的SECS-II消息的详细信息。SEDD文件使用SMN表示数据项、变量和SECS-II消息。SMN也是XML格式,它是第一个定义表达数据项和SECS-II消息的表示法的标准。这意味着单个应用程序可以读取SEDD文件,进行一个简短的配置过程,然后立即开始使用设备的GEM接口。这些特性允许单个应用程序用于多个设备,而不是为每个设备创建略有不同的变体。

总结

GEM手册是GEM标准所要求的与每个设备一起提供的重要文档。当遇到关于设备的GEM接口的问题时,GEM手册应该是寻找答案的首选。SEMI也在通过更新现有标准和创建新标准,继续改进GEM手册的内容和灵活性。

第八章 设备终端服务

在本系列的几篇文章讨论了数据收集、事件、警报、配方管理和文档之后,本文重点讨论GEM标准的Twitter - 设备终端服务(Terminal Services)。我们将研究什么是终端服务(Terminal Services),为什么需要它们,以及它们的工作机制。

什么是终端服务(Terminal Services)?

设备终端服务允许工厂操作员从设备工作站与主机交换信息。主机可以在设备的显示设备上显示信息。它还允许设备的操作员向主机发送信息。设备必须能够显示主机传递给它的信息,供操作员注意。

为什么需要这个特性?

使用终端服务的例子如下:

  1. FDC软件通知主机进程模块有偏移需要处理。

  2. 主机打开信号灯塔上的操作员通知灯。通知灯亮起时需要说明灯亮起的原因。

  3. 主机发送一条终端消息说FDC软件检测到偏移,操作员应该解决这个问题。

  4. 与信号塔灯一起,终端服务通知在工具上处于活动状态。

  5. 操作员看到并确认消息。

  6. 可选:有不同的恢复方法,但是操作员可以在问题解决后向主机发送终端消息。


终端服务功能如何工作?

当主机向设备发送终端消息时,需要设备向操作员显示该消息。该显示器必须能够显示最多160个字符(甚至比使用Twitter在一条tweet中发送的字符还要多),但也有可能会显示更多字符。设备的显示设备必须具有一种机制,用于通知操作员一条消息已被接收,但尚未被操作员确认。该消息将继续显示,直到操作员确认该消息为止。设备必须提供一个方法,例如一个按钮,让操作员确认消息。操作员的消息识别将导致一个收集事件,该事件会通知主机操作员已接收到信息。设备应用程序不需要翻译从主机发送的数据。它只是为操作员提供信息显示。

如果主机发送的新消息是在操作员确认前一条消息之前发送的,则新消息将覆盖前一条消息。主机可以通过发送零长度的消息清除未确认消息(包括指示符)。零长度的消息不会被认为是待确定的消息。设备还必须允许操作员将输入的信息从操作员的设备控制台发送到主机。

使用哪些消息?

消息ID方向描述
S10F3H->E主机向设备发送文本信息,以供显示。
S10F1H<-E操作员向主机发送文本信息。
S10F5H->E(可选)主机发送多块显示的消息。如果不支持多区块,设备将回复S10F7表示不允许多区块消息。
S6F11H<-E设备向主机发送收集事件通知终端服务消息已被确认。

第九章 用户界面

我记得作为一个新的童子军,我们计划去我家附近的一个原始山区远足。我们从地图上学到的第一件事就是在哪里可以找到图例。地图图例包含了阅读地图所需的重要信息,比如指出哪个方向是北。既然我们知道在哪里可以找到图例,我们就可以确定地图的方向,这样在我们计划徒步旅行时就能找到它了。

在典型的半导体或电子装配工厂中,大多数设备都有一个用户界面,其中包含许多关于设备的信息。大多数设备还包含许多用于控制或操作设备的屏幕。利用GEM,一个工厂主机系统可以对设备进行控制,以及采集工艺过程中生成的重要数据。

就像地图一样,在一个设备的用户界面上有很多可用的信息。有时很难找到那些主机系统需要的,用来控制和与设备通信的重要信息。GEM标准提供了关于如何将这些关键项目在用户界面上呈现和控制的指南。例如,如果主机向设备操作员发送关于他们需要执行的任务的信息,GEM终端消息指南规定,这些信息必须保留在设备的用户界面上,直到操作员确认他们已经阅读了它。

SEMI E30标准定义了制造设备通信和控制通用模型(GEM)的规范。除了提供制造自动化所需的通用设备行为和通信功能集的定义外,该标准还提供了关于哪些项必须出现在设备用户界面上以及如何表示这些项的要求。用户界面要求由标准定义的通信状态、终端服务新消息指示、终端服务消息确认按钮、通信状态默认值和通信状态选择说明。

这似乎是一件小事,但就像知道地图上找到图例就能理解地图上的线条和符号的一样,GEM为如何理解设备界面上所展示的那些对与工厂主机之间通信尤为重要的信息提供了帮助。

第十章 GEM消息假脱机功能

假脱机消息的目的

即使是最健壮的计算机网络也会经历通信失败。不管原因是什么,一个小故障都可能导致大量的关键任务数据丢失。GEM通过提供消息假脱机功能来调停数据的丢失

假脱机的定义

假脱机是这样一种功能,设备可以在通信失败时对发送给主机的消息进行排队缓存,然后在通信恢复时发送这些消息。

假脱机的好处

自动化工厂是数据驱动的。对数据进行提取和分析,以做出影响工程和管理团队如何应对的决策,以确保产品产量高而废品率低。

这些数据的缺失可能导致错误的判断甚至猜测。假脱机是一种备份系统,它可以确保存储和恢复这些数据,从而降低丢失有价值数据的风险。

GEM功能需求

然而,假脱机并不是GEM的要求,如果要实现这个附加的功能,就必须正确地实现。下面是实现兼容假脱机接口的一些要求。

设备必须通过设备常量“EnableSpooling”给主机提供启用和禁用假脱机的能力。该EC由设备发布,主机可以选择所需的状态。

在实现假脱机时,它必须对所有相关的主要消息都有效,并且能够使用S2、F43/F44交互进行访问。Stream 1消息要被排除在外。主机试图为Stream 1 “设置spool”的指令将被拒绝。

非易失性存储(NVS)

设备负责分配足够的非易失性存储器,可以存储该设备的至少一个工艺周期需要假脱机的所有消息。NVS还将包含所有与假脱机相关的状态变量。NVS用于此数据,因此,如果发生断电,数据将被持久化。

假脱机实现中主机端的责任

消息假脱机功能也需要主机的参与,以在通信中断后成功恢复。在主机程序能够正确的处理整个状态机中可能发生的所有情况之前,最好将假脱机设置为禁用状态。禁用假脱机比管理不当的假脱机要好。

一旦重新建立了通信,主机必须管理对假脱机消息的请求。主机还可以在必要时从设备中清除假脱机消息文件。

结论

虽然假脱机不是GEM的基本需求,但是如果实现了它,就必须正确地执行。当启用假脱机时,主机和设备软件都有责任确保遵守GEM。GEM假脱机避免了潜在的有价值数据丢失,并为设备和主机软件提供了一个易于遵守的标准。

第十一章 协议层

协议层的用途

协议层封装数据,并在工厂主机和设备GEM接口之间可靠地传输数据。

协议层定义

协议层实现了通过工厂主机和设备GEM接口之间的连线发送消息所用到的传输技术和数据打包算法,。

SEMI E5标准,半导体设备通信标准II 消息内容(SECSII), 定义了用作数据的SECS消息,以及如何将它们打包到二进制缓冲区中进行传输。

SEMI E37和E37.1标准高速SECS消息服务(HSMS)定义了一种协议,用于在TCP/IP连接上交换SECS消息。这是SECS/GEM中使用最多的传输技术。


HSMS协议栈

SEMI E4标准,即半导体设备通信协议标准I 消息传输 (SECS- I),定义了在RS-232上交换SECS消息的机制。这通常用于较旧的设备或设备内部的某些硬件,例如EFEM控制器。

本文的其余部分将重点讨论通过HSMS传递的SECS消息。

协议层的好处

GEM中的协议层维护连接并检测连接丢失,因此任何一方都可以采取适当的操作,比如激活假脱机。
协议层定义握手机制,以确保在需要时传递消息。

协议层连接是工厂主机和设备之间的点对点连接。它是一个没有广播功能的专用连接。这使得预测网络负载变得更加容易。

数据密度

SECS/GEM传输数据开销小、密度高。这意味着给定数据集的网络带宽使用更少。
为了便于说明,我们来看一个典型的事件报告示例,并将SECS/GEM消息传递与某种程度上等价的XML和JSON消息进行比较。

以一个典型的GEM接口为例,该接口为id使用无符号的4字节整数,以及一个包含8字节浮点数和4字节整数的事件报告。下表以SECS/GEM E5格式以及等效的JSON和XML格式显示了此消息的一个示例。


和XML数字可以根据键/元素名称进行一些更改,上面的只是许多可能的表示之一。


下图显示了示例消息的数据密度比较。实际数据大小为2个4字节整数+ 2个8字节浮点数+ 1个4字节事件id + 1个4字节报告id = 32字节的实际数据。开销是通过从消息的总字节数中减去实际数据大小来计算的。


对于示例消息SECS的数据密度,数据密度百分比如下图所示。数据密度百分比由(实际数据)/开销*100计算。


现在,如果我们将示例消息更改为包含100个8字节浮点数,则数据密度百分比图将改变为如下图。注意JSON和XML相对相同,但是SECS/GEM数据密度增加到78%。数据密度百分比由(实际数据)/开销*100计算。


SECS/GEM编码的开销非常小。消息的开销是描述消息的头部的10个字节,加上消息体大小的1到4个字节。对于SECS消息中的任何4字节整数或浮点数,都将通过网络发送6个字节,4个字节表示整数值+ 1个字节表示类型+ 1个字节表示数据的长度(以字节为单位)。同样,对于任何8字节的整数或浮点数,都将发送10字节。对于字符串值,长度将是字符数加上2到4字节。在SECS消息中出现列表(上面可读示例中的L)时,将向消息添加2到4个字节。

在SECS/GEM数据中,数字数组尤为高效。数组的开销是类型为1字节,数组长度为1到4字节,加上数据的本身大小。例如:一个由10个4字节整数组成的数组将占用42字节,即数据密度为95%!

在JSON示例中,一个4字节的整数需要16个字节加上表示该整数所需的字符数,因此需要17到28个字节。浮点数的开销相同,但可能需要更多字符来表示值。

在XML中,开销基于XML元素名称的大小。使用上面示例中的元素名,对于任何4字节整数,跨连接的字节数将是9 +表示该整数所需的字符数,所以是10到21字节。浮点数取决于用来表示值的字符串格式。

总而言之,通过查看每项数据所需字节大小,SECS/GEM非常密集。以4字节整数为例,其中SECS/GEM是6个字节,JSON示例是17到28个字节,XML示例是10到21个字节,随着参数数量的增加,您会发现开销确实很重要。300mm半导体设备预计每秒每个工艺模块向主机传输1000个参数。对于2个模块的设备,这将导致仅用于数据的字节数如下: SECS/GEM 12K字节, JSON 34K-56K, 如实例的XML 需要20K-42K。这些数字不考虑消息其余部分的大小,只考虑与参数值相关的实际部分。如果数据在大量消息中传输,而每个消息的值很少,那么网络负载就更糟了。在所有情况下,更少、更大的消息总是更好。

根据使用的传输协议,XML和JSON也可能增加开销。例如,XML通常使用SOAP通过HTTP传输,这就为每个消息增加了额外的两层开销和更多的字节。SECS/GEM所显示的字节数是实际通过TCP/IP上的网络传输的。

无数据翻译

在SECS/GEM中传输数值数据时不需要转换。数字以其原始格式传输。例如:8字节浮点数以其8字节表示形式传输,没有经过任何转换、截断或舍入。

任何协议,如JSON或XML,都必须将这些8字节浮点数转换为文本表示形式。这需要计算用于编码和解码的资源,并且需要更多的字节。IEEE754要求17位十进制数字将8字节浮点数精确地表示为字符串。将符号、小数点、指数和指数符号的字符相加,得到21个字符。这是SECS/GEM通过网络发送的两倍多。

环路保证

HSMS定义了一种称为Link Test的环路保证机制。如果没有活动的消息交换,协议层将启动一个计时器。每次计时器过期时,都会交换一条协议消息以确保连接仍然是打开的。

安全

HSMS没有定义安全性。没有连接方的验证,连接不需要凭证或证书。数据未使用任何普通加密算法加密; 然而,数据在数据打包过程中是模糊的,通常是人类无法读懂的。由于工厂网络与外部世界隔离,安全通常不会被视为一个问题。

结论

使用HSMS的SECS/GEM协议层提供了在工厂主机和设备之间交换准确数据的非常有效的方法。

第十二章 消息日志

1977年,经典电影《第三类接触》上映。在电影的最后,有一段外星人和人类之间的戏剧性的 “对话”。其中一位科学家说:“我希望有人把这一切都记下来。”

他们真正想要的是消息日志!

就像软件日志对于应用程序的故障诊断很重要一样,记录工厂主机和生产设备之间的详细消息交互对于故障诊断也很重要。

例如,主机发送一个命令,设备根据消息进行操作,但是有些事情并没有如预期的那样工作。将发送给设备的消息和设备的回复的消息与来自设备的其他日志一起查看,非常有助于确定问题位于在哪儿。

用于显示/表示已记录消息的格式也非常重要。SECS消息格式的最新行业标准是SEMI - E173,即XML SECS- ii消息符号规范(SMN)。

举个例子:

<?xml version="1.0" encoding="utf-8"?>
<SECSMessageScenario xmlns="urn:semi-org:xsd.SMN">
<Comment time="2018-02-05T18:19:20.365Z">State Change NotConnected</Comment>
<Comment time="2018-02-05T18:19:20.400Z">State Change NotSelected</Comment>
<HSMSMessage time="2018-02-05T18:19:20.394Z" sType="Select.req" direction="H to E" txid="1">
<Header>FFFF0000000100000001</Header>
</HSMSMessage>
<HSMSMessage time="2018-02-05T18:19:20.417Z" sType="Select.rsp" direction="E to H" txid="1">
<Header>FFFF0000000200000001</Header>
<Description>Communication Established</Description>
</HSMSMessage>

这是一个S5,F5的例子:

<SECSMessage s="5" f="5" direction="H to E" replyBit="true" txid="7" time="2018-02-05T18:19:20.507Z">
<SECSData>
<UI4 />
</SECSData>
</SECSMessage>
<SECSMessage s="5" f="6" direction="E to H" replyBit="false" txid="7" time="2018-02-05T18:19:20.507Z">
<SECSData>
<LST>
<LST>
<BIN>0</BIN>
<UI4>1</UI4>
<ASC>Alarm 1 Text</ASC>
</LST>
</LST>
</SECSData>
</SECSMessage>

SMN格式非常适合:

  • 以清晰的方式捕获HSMS头信息

  • 以精确的二进制格式记录消息

  • 使用软件读取日志

  • 创建主机或设备模拟器,因为很容易从软件应用程序读取日志并回放

  • 从SMN日志中提取数据

日志可以被设备、主机甚至像Cimetrix的CIMSniffer实用程序这样的“网络嗅探器”捕获。

Cimetrix的Logviewer实用程序也支持SMN日志:


有了这些标准和工具,就没有理由像《亲密接触》中的科学家那样,希望这些信息被记录下来。去打开日志!

Cimetrix的CIMConnect、HostConnect和SECSConnect都提供SMN格式的消息日志记录。

第十三章GEM 控制状态

什么是GEM 控制状态?

GEM板的控制状态是E30 GEM的基本要求之一。它定义了主机和设备之间的协作级别,并指定了操作员如何在不同级别的主机控制状态下进行交互。

在半导体工厂中,主机或操作员可以控制设备的加工。双方同时控制设备会带来问题。所以当一方控制设备时,另一方所能进行的操作将受到限制。例如,如果操作员暂停了工艺处理,则不应允许主机发送恢复处理或启动新作业的命令。GEM控制状态就是为了防止此类问题的发生而被建立的。


控制状态如何工作?

控制状态提供三个基本级别的控制。每个级别都描述了主机和设备端可以执行哪些操作。

远程

  • 主机可以最大限度地控制设备。

  • 设备可能会限制当地操作员控制设备的能力,但这不是标准的要求。主机必须能够处理操作员在设备上调用的意外命令。

  • 主机使用GEM远程命令来调用设备上的命令。
    本地

本地

  • 操作者可以尽可能地控制设备。

  • 主机可以完全访问信息。主机可以使用其他GEM特性(如收集事件、跟踪和状态数据收集)收集数据。

  • 限制主机如何影响设备操作:

    • 禁止启动处理(例如START)或导致物理移动的远程命令。在处理期间,还禁止影响处理的远程命令(停止、中止、暂停、恢复)。

    • 允许使用其他不启动处理、不会导致物理移动或影响处理的远程命令。

    • 在处理期间,禁止主机修改任何影响该进程的设备常数。

    • 不影响当前运行进程的设备常数可以更改。

    • 当不处理时,所有的设备常数都是可变的。

离线

  • 操作者对设备有完全的控制。

  • 主机对设备操作没有控制,信息收集能力非常有限。

  • 设备将从主机接收的唯一消息是:

    • 用于建立GEM通信的消息(S1F13/F14)。

    • 请求激活联机控制状态(S1F17),但仅限于当前活动状态为主机脱机时(控件状态模型上的转换#11)。

    • 在尝试在线时收到的S1F2“Are You There Response”

  • 设备可能发送给主机的唯一主要消息是:

    • 用于建立通信的消息(S1F13)。

    • S9Fx消息,但仅响应设备离线时通常响应的消息(即S1F13和S1F17)。

    • 当进入“Attempt ON-LINE”子状态时,S1F1 “Are You There Request” 会被发送到主机。此消息用于从主机获得进入在线状态的权限(转换#5)。

  • 离线时没有不会对消息做假脱机处理。

控制状态模型的设计使设备操作员对状态机的控制多于对主机的控制。这将保护操作员不被主机发起的意料之外的状态更改影响。

  • 设备操作员可以通过操作界面选择哪个在线子状态处于活动状态。主机端不能选择哪个在线子状态是活动的。

  • 设备端可以将控制状态模型放入设备离线状态(转换#6)。当处于这种状态时,主机无法请求设备进入在线状态。

  • 主机端可以将控制状态放入主机离线状态(转换#10),但是设备端可以拒绝此请求。当处于主机离线状态时,设备端总是可以通过先切换到设备离线状态(转换#12),然后尝试在线(转换#3),来进入在线状态。

操作界面需求

设备必须提供一种显示当前控制状态的方法,以便操作者知道谁控制着设备。

设备必须提供一个瞬时开关来启动到设备离线状态的转换,另一个开关来尝试从设备离线状态切换到在线状态。这可以是前面板上的一个硬件开关,但通常在软件中使用按钮控件实现。

设备必须提供一个离散的双位置开关,操作员可以使用该开关指示所需的在线子状态(本地或远程)。这可以是前面板上的一个硬件开关,但通常在软件中使用按钮控件实现。如果在软件中实现,该设置必须保存在非易失性存储中。

有条件的状态转换

在控件状态模型中,转换#1、#2、#4和#7是有条件状态转换。设备应用程序必须提供一种方法来配置要转换到哪种状态。设备常量可以用于该配置。

条件转换#1和#2决定了启动期间控制状态模型的初始状态。控制这些转换的配置可以设置为以下状态之一:

  • 在线

  • 设备离线

  • 尝试在线

  • 主机离线

条件转换#4用于决定设备尝试在线失败后要转换到哪个状态。该配置可以设置为以下状态之一:

  • 设备离线

  • 主机离线

条件转换#7用于确定当控件状态变为在线时,应该进入哪个在线子状态(本地或远程)。该配置可以设置为以下在线子状态之一:

  • 当地的

  • 远程

控制状态功能用会用到的消息

消息编号方向描述
S1F1主机 <- 设备当设备尝试在线时(处于“尝试在现在”状态),此消息被发送到主机。主机通过发送S1F2应答消息授予权限。主机可以通过发送S1F0或允许消息事务超时来拒绝权限。
S1F15主机 -> 设备主机发送此消息请求从“主机离线”到在线的转换(转换#11)。
S1F17主机 -> 设备主机发送此消息请求从在线到“主机离线”的转换(转换#10)。

第十四章 总结

我们希望您能喜欢这一系列与GEM标准相关的主题。

显然,GEM标准是最适合工厂自动化各个方面的行业标准,具有广泛的特性,支持智能制造和工业4.0。GEM标准可以在最简单和最复杂的设备上实现。GEM将继续在未来许多行业的制造业中发挥关键作用。


22款受欢迎的计算机取证工具

机算机取证是与计算机和网络犯罪有关的,一门非常重要的计算机学科分支。在早前,计算机只用于生成数据,但现在已扩展到与数字数据相关的所有设备。计算机取证的目标是通过使用数字资料的证据来进行犯罪调查,以找出网络相关罪行的主要责任人。

为了更好的用于研究和调查,开发人员创建了多样的计算机取证工具。公安部门和调查机构可以根据自身情况,如预算和现有专家队伍等因素,来选取合适的取证工具。

这些电脑取证工具,也被分为了不同的类别:

  • 磁盘和数据捕获工具

  • 文件查看器

  • 文件分析工具

  • 注册表分析工具

  • 互联网分析工具

  • 电子邮件分析工具

  • 移动设备分析工具

  • Mac OS分析工具

  • 网络取证工具

  • 数据库取证工具

在本文中,我将为大家罗列一些当前流行的计算机取证工具。这里需要说明的是,本文中工具是以随机顺序添加的,并不代表工具的排名。

1. Digital Forensics Framework

数字取证框架是另一个专门用于数字取证的流行平台。该工具是开源的,并具有GPL许可证。它同时适用于专业或非专业人员,简单易用。它可以用于数字监管链,访问远程或本地设备,Windows或Linux操作系统的取证,恢复隐藏已删除的文件,快速搜索文件的元数据以及其他各种功能。

下载:http://www.digital-forensic.org/

2. Open Computer Forensics Architecture

开放式计算机取证架构(OCFA)是另一种流行的分布式开源计算机取证框架。该框架建立在Linux平台上,并使用postgreSQL数据库存储数据。

它由荷兰国家警察局创建,用于自动化数字取证过程。它可以根据GPL许可证下载。

下载:http://sourceforge.net/projects/ocfa/

3. CAINE

CAINE(计算机辅助调查环境)是用于数字取证的Linux发行版。它提供了一种以用户友好的方式将现有软件工具集成为软件模块的环境。这个工具是开源的。

阅读更多:http://www.caine-live.net/

4. X-Ways Forensics

X-ways Forensics是由德国X-ways出品的一个法证分析软件,它其实是Winhex的一个法证授权版,跟Winhex界面完全一样。它可以运行在所有可用的Windows版本上。下面是它的一些主要功能:

  • 磁盘克隆和镜像功能,进行完整数据获取

  • 可分析 RAW/dd/ISO/VHD/VMDK 格式原始数据镜像文件中的完整目录结构,支持分段保存的镜像文件

  • 支持磁盘,RAID,扇区大小为8KB最大2TB的镜像的完全访问

  • 支持对JBOD、RAID0、RAID 5、RAID 5EE, RAID 6, Linux软RAID, Windows动态磁盘和LVM2等磁盘阵列

  • 自动识别丢失/删除的分区

  • 支持FAT12, FAT16, FAT32, exFAT, TFAT, NTFS, Ext2, Ext3, Ext4, Next3, CDFS/ISO9660/Joliet, UDF文件系统

  • 无需修改原始硬盘或镜像纠正分区表或文件系统数据结构来解析文件系统

  • 察看并获取 RAM和虚拟内存中的运行进程

  • 多种数据恢复功能,可对特定文件类型恢复

  • 基于GREP符号维护文件头签名数据库

  • 支持20种数据类型解释

  • 使用模板查看和编辑二进制数据结构

  • 数据擦除功能,可彻底清除存储介质中残留数据

  • 可从磁盘或镜像文件中收集残留空间、空余空间、分区空隙中信息

  • 创建证据文件中的文件和目录列表

  • 能够非常简单地发现并分析ADS数据(NTFS交换数据流)

  • 支持多种哈希计算方法 (CRC32, MD4, ed2k, MD5,SHA-1, SHA-256, RipeMD…)

  • 强大的物理搜索和逻辑搜索功能,可同时搜索多个关键词

  • 在NTFS卷中为文件记录数据结构自动加色

  • 书签和注释

  • 可以运行在Windows FE中等Windows环境

  • 配合F-Response可进行远程计算机分析等

完整介绍请点击:http://www.x-ways.net/forensics/

5. SANS数字取证工具包 – SIFT

SIFT是SANS推出的数字取证工具包,SIFT以VMware虚拟映像的形式发布,里面集成了数字取证分析所有必须的工具。适用于Expert Witness Format (E01), Advanced Forensic Format (AFF),和 raw (dd) evidence formats。 今年早些时候,SIFT 3.0发布。

在resource.infosecinstitute.com上的一篇文章中,我们已经详细介绍了SIFT。你可以阅读关于SIFT的这些帖子,以了解更多有关SIFT取证平台的信息。

下载:http://digital-forensics.sans.org/community/downloads

6. EnCase

EnCase是另一款流行的多用途取证平台,具有许多不错的取证工具。该工具可以快速收集各种设备的数据,挖掘潜在的证据。它还会根据收集的证据生成相应的报告。

该工具并不免费。 授权费用为995美元。

阅读更多关于EnCase的信息:https://www.guidancesoftware.com/products/Pages/encase-forensic/overview.aspx

7. Registry Recon

Registry Recon是一款流行的注册表分析工具。它可以从证据中提取注册表信息,然后重建注册表。它还可以从当前和之前的Windows安装重建注册表。

阅读更多:http://arsenalrecon.com/apps/recon/

8. The Sleuth Kit

Sleuth Kit是一个基于Unix和Windows的工具,可帮助你对计算机进行取证分析。它配备了各种有助于数字取证的工具。这些工具有助于分析磁盘映像,对文件系统进行深入分析以及其他各种功能。

阅读更多:http://www.sleuthkit.org/

9. Llibforensics

Libforensics是一个是专门用于获取和分析数字取证的数字取证应用程序库。它是由Python开发的,并附带各种演示工具以便从各种类型的证据中提取信息。

阅读更多:http://code.google.com/p/libforensics/

10. Volatility

Volatility是一个内存取证框架。主要用于事件响应和恶意软件分析。使用此工具,你可以从正在运行的进程,网络套接字,网络连接,DLL和注册表蜂巢提取信息。它还支持从Windows故障转储文件和休眠文件中提取信息。此工具根据GPL许可证免费提供。

阅读更多:http://code.google.com/p/volatility/

11. WindowsSCOPE

WindowsSCOPE是用于分析易失性存储器的另一种内存取证和逆向工程工具。它主要用于恶意软件的逆向工程。它提供了分析Windows内核,驱动程序,DLL,虚拟和物理内存的功能。

阅读更多:http://www.windowsscope.com/index.php?page=shop.product_details&flypage=flypage.tpl&product_id=35&category_id=3&option=com_virtuemart

12. The Coroner’s Toolkit

Coroner工具包或TCT也是一个非常好用的数字取证分析工具。它运行在几个与Unix相关的操作系统下。它可用于计算机灾难分析和数据恢复。

阅读更多:http://www.porcupine.org/forensics/tct.html

13. Oxygen Forensic Suite

Oxygen取证套件主要用于手机上的证据收集。Oxygen会为我们收集设备的各种信息(包括制造商,操作系统,IMEI号码,序列号),联系人,消息(电子邮件,短信,彩信),还可以恢复已删除的消息,通话记录和日历信息。

阅读更多:http://www.oxygen-forensic.com/en/features

14. Bulk Extractor

Bulk Extractor(批量提取器)也是一款重要和流行的取证工具。它会扫描文件的磁盘映像,文件或目录以提取有用的信息。由于在这个过程中,它忽略了文件系统结构,所以它比其他同类型的工具执行速度要快许多。情报和执法机构基本上都会用这款工具,来解决一些网络犯罪问题。

下载:http://digitalcorpora.org/downloads/bulk_extractor/

15. Xplico

Xplico是一款开源的网络取证分析工具。主要用于,从使用Internet和网络协议的应用程序中提取有用的数据。它支持大多数流行的协议,包括HTTP,IMAP,POP,SMTP,SIP,TCP,UDP,TCP等。该工具的输出数据,会被存储在MySQL数据库的SQLite数据库中。同时,它也支持IPv4和IPv6。

阅读更多:http://www.xplico.org/about

16. Mandiant RedLine

Mandiant RedLine是一款流行的,用于内存和文件分析的工具。Mandiant RedLine主要收集有关在主机上运行的进程信息,内存中的驱动程序,并收集其他数据,如元数据,注册表数据,任务,服务,网络信息和Internet历史记录,并最终构建适当的报告。

阅读更多:https://www.mandiant.com/resources/download/redline

17. Computer Online Forensic Evidence Extractor (COFEE)

计算机在线法庭科学证据提取器,是专为计算机取证专家开发设计的一款工具包。该工具由Microsoft开发,用于从Windows系统收集证据。它可以被安装在USB驱动器或外部硬盘上。取证人员只需将USB插入目标计算机中,即可进行实时的分析。COFEE包含了超过150个信息收集、密码破解、网络嗅探等工具。而且它的分析速度也非常的快,大概在20分钟左右就可以完成对目标系统的完整分析。对于执法机构,此外,Microsoft还为使用该工具的执法机构,提供免费的技术支持。

官方站点:https://cofee.nw3c.org/

18. P2 eXplorer

P2 eXplorer 这款取证图像挂载工具的设计旨在帮助调查员管理和调查证据。利用 P2 eXplorer,您可以将取证图像作为只读的本地逻辑磁盘和物理磁盘进行挂载。一旦挂载完毕,您可以使用 Windows Explorer 浏览图像内容,或将其加载到您的取证调查分析工具中。因为将图像作为物理磁盘挂载,您可以查看已删除的数据、以及未分配的图像空间。

它可以一次安装多个图像。 它支持大多数图像格式,包括EnCasem,safeBack,PFR,FTK DD,WinImage,以及来自Linux DD的RAW图像,和VMWare图像。

此工具有收费和免费版本,收费版本需要支付$199,免费版本的部分功能将无法使用。

阅读更多:https://www.paraben.com/p2-explorer.html

19. PlainSight

PlainSight是一个基于Knoppix(Linux发行版)的Live CD,它允许用户执行数字取证任务,如查看互联网历史记录,数据刻画,USB设备使用信息收集,检查物理内存转储,提取哈希密码等。

此工具是免费的。

阅读更多:http://www.plainsight.info/index.html

20. XRY

XRY是Micro Systemation开发的移动取证工具。它用于分析和恢复来自移动设备的关键信息。该工具附带硬件设备和软件。硬件将手机连接到PC,软件对设备进行分析并提取数据。它旨在恢复数据以用于取证分析。

该工具的最新版本可以恢复来自Android,iPhone和BlackBerry等各种智能手机的数据。它还可以收集已删除的数据,如通话记录,图像,短信和短信。

阅读更多:http://www.msab.com/xry/what-is-xry

21. HELIX3

HELIX3是一个基于Linux的Live CD,用于事件响应构建,计算机取证和电子发现方案。它包含了一堆开源工具,从十六进制编辑器到数据刻画软件到密码破解工具等。

注意:你需要的HELIX3版本是2009R1。此版本是HELIX由商业供应商接管之前可用的最后一个免费版本。HELIX3 2009R1今天仍然有效,并为数字取证工具包提供有用的补充。

当使用HELIX3向导时,会询问是要加载GUI环境还是将HELIX3安装到磁盘。如果选择直接加载GUI环境(推荐),将出现一个基于Linux的屏幕,你可以选择运行捆绑工具的图形化版本。

Helix3 2008R1可以在这里下载到:https://e-fenseinc.sharefile.com/d/sda4309a624d48b88

企业版下载:http://www.e-fense.com/h3-enterprise.php

22. Cellebrite UFED

Cellebrite UFED取证产品是一款独立的既适合在犯罪现场也适合在实验室使用的设备。Cellebrite UFED能够从全球1200多款手机中提取重要数据如电话簿、图片、视频、文本短信息、通话记录、ESN和IMEI信息。UFED支持CDMA, GSM, IDEN和TDMA技术,并兼容所有的无线载波信号。Cellebrite UFED支持目前市场上95%的掌中设备,包括手机和PDA(Palm OS,Microsoft, Blackberry, Symbian)。不需要计算机的配合,方便在现场使用,通过简单操作就可以存储上百条电话簿和联系人信息到一张SD卡或者USB 中。

Cellebrite UFED支持所有已知手机设备的接口,包括串口、USB接口、红外和蓝牙。提取的数据可以带回实验室利用报告/分析工具进行查看和校验。现场提取数据保证在犯罪分子有机会毁坏手机或清除数据之前,保存和查看手机里的信息。

更多信息:http://www.cellebrite.com/Mobile-Forensics

总结

以上列举的都是些执法机构在进行网络犯罪调查时,常用到的数字取证工具。本文我为大家介绍了各种类型的工具,如如高级,免费,开源类的,针对计算机的取证,以及针对手机的取证等。如果你想学习或正在学习取证相关的知识,我建议大家可以下载以上列举的这些工具,进行深入的研究与学习。这将会有助于提高你的学习效率。

除了本文列举的这些工具,其实市面上还有很多类似的优秀的工具。这需要大家自己去试验和挖掘。

进一步阅读数字取证的相关内容:

http://www.forensics.nl/

http://en.wikipedia.org/wiki/Digital_forensics

http://www.cio.com/archive/030101/autopsy.html


常见文件文件头汇总

在日常生活中我们接触到很多软件,如QQ和微信等,这些软件都会对一些文件加密如图片加密成dat文件,这其中多数是利用文件的16进制编码进行异或运算进行加密。此处我们具体介绍一些常见的文件未进行加密前的文件头进行列举:


扩展名 文件头标识(HEX) 文件描述
123 00001A00051004 Lotus1-2-3spreadsheet(v9)file
3gg;3gp;3g2 000000nn66747970336770 3rdGenerationPartnershipProject3GPP(nn=0x14)and3GPP2(nn=0x20)multimediafiles
7z 377ABCAF271C 7-ZIPcompressedfile
aba 00014241 PalmAddressBookArchivefile
abi 414F4C494E444558 AOLaddressbookindexfile
aby;idx 414F4C4442 AOLdatabasefiles:addressbook(ABY)anduserconfigurationdata(MAIN.IDX)
accdb 000100005374616E6461726420414345204442 MicrosoftAccess2007file
ACM 4D5A MSaudiocompressionmanagerdriver
ADF 444F53 Amigadiskfile
adx 0300000041505052 LotusApproachADXfile
AIFF 464F524D00 AudioInterchangeFile
ain 2112 AINCompressedArchiveFile
ami 5B7665725D LotusAmiPro
amr 2321414D52 AdaptiveMulti-RateACELP(AlgebraicCodeExcitedLinearPrediction)Codec,commonlyaudioformatwithGSMcellphones
ANI 52494646
API 4D5A900003000000 Acrobatplug-in
arc 1A0x LHarchivefile,oldversion(wherex=0x2,0x3,0x4,0x8or0x9fortypes1-5,respectively)
arc 41724301 FreeArccompressedfile
arj 60EA ARJCompressedArchive
ARJ 60EA27
ART 4A47030E000000 AOLARTfile
ART 4A47040E000000 AOLARTfile
asf 3026B2758E66CF11 WindowsMedia
asf;wma;wmv 3026B2758E66CF11A6D900AA0062CE6C MicrosoftWindowsMediaAudio/VideoFile(AdvancedStreamingFormat)
asx 3C AdvancedStreamredirectorfile
au 2E736E64 SoundMachineAudioFile
NeXT/SunMicrosystemsμ-Lawaudiofile
avi 41564920 AudioVideoInterleave(AVI)
AX 4D5A Librarycachefile
AX 4D5A900003000000 DirectShowfilter
bag 414F4C2046656564626167 AOLandAIMbuddylistfile
BAS 202020
bin 424C4932323351 ThomsonSpeedtouchseriesWLANrouterfirmware
bmp 424D WindowsBitmap
BMP 424D3E
bz;bz2 425A68 BZIPArchive
BZ2;TAR.BZ2;TBZ2;TB2 425A68 bzip2compressedarchive
CAB 495363
CAB;HDR 49536328 InstallShieldv5.xor6.xcompressedfile
CAB 4D534346 MicrosoftCABFileFormat
cat 30 Microsoftsecuritycatalogfile
CBD 434246494C45 WordPerfectdictionaryfile(unconfirmed)
CCD 5B436C
cdr CDR CorelDraw
CDR 454C49544520436F6D6D616E64657220 ElitePlusCommandersavedgamefile
CDR,DVF 4D535F564F494345 SonyCompressedVoiceFile
CHI;CHM 49545346 MicrosoftCompiledHTMLHelpFile
CHM 495453
CLB 434D5831 CorelBinarymetafile
CLB 434F4D2B COM+Catalogfile
cnt 3A42617365
COM,DLL,DRV,EXE,PIF,QTS,QTX,SYS 4D5A Windows/DOSexecutablefile
COM 4D5AEE
COM E93B03
CPE 464158434F5645522D564552 MicrosoftFaxCoverSheet
CPL 4D5A Controlpanelapplication
CPT 4350543746494C45 CorelPhotopaintfile
CPT 43505446494C45 CorelPhotopaintfile
CPX 5B5769
cru;crush 4352555348 CRUSHArchiveFile
CRU 43525553482076 Crushcompressedarchive
CRW 49491A00000048454150434344520200 CanondigitalcameraRAWfile
CTF 436174616C6F6720332E303000 WhereIsItCatalogfile
CUR 0000020001002020 Windowscursorfile
dat 3 MapInfoNativeDataFormat
dat 1A52545320434F4D5052455353454420494D4147452056312E301A RuntimeSoftwarediskimage
dat 415647365F496E746567726974795F4461746162617365 AVG6Integritydatabasefile
DAT 43524547 Windows9xregistryhive
DAT 436C69656E742055726C4361636865204D4D462056657220 IEHistoryDATfile
DAT 45524653534156454441544146494C45 KrollEasyRecoverySavedRecoveryStatefile
DAT 496E6E6F20536574757020556E696E7374616C6C204C6F6720286229 InnoSetupUninstallLogfile
db 0006156100000002000004D200001000 NetscapeNavigator(v4)databasefile
DB 44424648 PalmZirephotodatabase
db 8 dBASEIVordBFastconfigurationfile
db3 3 dBASEIIIfile
db4 4 dBASEIVdatafile
dba 00014244 PalmDateBookArchivefile
dbx CFAD12FE
dbx CFAD12FEC5FD746F OutlookExpress
dci 3C21646F63747970 AOLHTMLmailfile
dcx 3ADE68B1 DCXGraphicFile
DDB 000100
dib 424D device-independentbitmapimage
DLL 4D5A90
DMP 4D444D5093A7 Windowsminidumpfile
DMS 444D5321 AmigaDiskMashercompressedarchive
doc 0D444F43 DeskMateDocumentfile
doc 1234567890FF MSWord6.0
doc 31BE000000AB0000 MSWordforDOS6.0
doc 7FFE340A MSWord
dot;ppt;xla;ppa;pps;pot;msi;sdw;db D0CF11E0 MSOffice/OLE2
doc;dot;xls;xlt;xla;ppt;apr;ppa;pps;pot;msi;sdw;db D0CF11E0A1B11AE1 MSCompoundDocumentv1orLotusApproachAPRfile
DPL 4D5A50
DRV 4D5A16
drw 7 Acommonsignatureandfileextensionformanydrawingprograms.
drw 01FF02040302 Micrografxvectorgraphicfile
ds4 4D47582069747064 MicrografixDesigner4
DSN 4D56 CDStomperProlabelfile
dsp 23204D6963726F736F667420446576656C6F7065722053747564696F MicrosoftDeveloperStudioprojectfile
dss 02647373 DigitalSpeechStandard(Olympus,Grundig,&Phillips)
dtd 0764743264647464 DesignTools2DDesignfile
dtd 3C21454E54495459 XMLDTD
DVR 445644 DVR-Studiostreamfile
dwg 414331
41433130 GenericAutoCADdrawing
NOTESonAutoCADfileheaders:The0x41-43-31-30(AC10)isagenericheader,occupyingthefirstfourbytesinthefile.Thenexttwobytesgivefurtherindicationabouttheversionorsubtype:
0x30-32(02)—AutoCADR2.5
0x30-33(03)—AutoCADR2.6
0x30-34(04)—AutoCADR9
0x30-36(06)—AutoCADR10
0x30-39(09)—AutoCADR11/R12
0x31-30(10)—AutoCADR13(subtype10)
0x31-31(11)—AutoCADR13(subtype11)
0x31-32(12)—AutoCADR13(subtype12)
0x31-33(13)—AutoCADR14(subtype13)
0x31-34(14)—AutoCADR14(subtype14)
0x31-35(15)—AutoCADR2000
0x31-38(18)—AutoCADR2004
0x32-31(21)—AutoCADR2007
Enn(wherennarenumbers) 455646 EnCaseevidencefile
ECO 2A5052
elf 7F454C4601010100 ELFExecutable
emf 0100000058000000 Extended(Enhanced)WindowsMetafileFormat,printerspoolfile
eml 44656C69766572792D646174653A Email
EML 46726F6D202020 Acommmonfileextensionfore-mailfiles.SignaturesshownhereareforNetscape,Eudora,andagenericsignature,respectively.EMLisalsousedbyOutlookExpressandQuickMail.
EML 46726F6D203F3F3F Acommmonfileextensionfore-mailfiles.SignaturesshownhereareforNetscape,Eudora,andagenericsignature,respectively.EMLisalsousedbyOutlookExpressandQuickMail.
EML 46726F6D3A20 Acommmonfileextensionfore-mailfiles.SignaturesshownhereareforNetscape,Eudora,andagenericsignature,respectively.EMLisalsousedbyOutlookExpressandQuickMail.
EML 526563
enc 005C41B1FF MujahideenSecrets2encryptedfile
 "enl"  "[32byteoffset] 40   40 40 20 00 00 40 40 40 40"  "EndNote Library   File"
eps 25215053 AdobeEPSFile
eps 252150532D41646F6265 Postscript
eps 252150532D41646F62652D332E3020455053462D332030 AdobeencapsulatedPostScriptfile(Ifthissignatureisnotattheimmediatebeginningofthefile,itwilloccurearlyinthefile,commonlyatbyteoffset30)
EPS C5D0D3
eth 1A350100 GNNettestWinPharoahcapturefile
evt 300000004C664C65 WindowsEventViewerfile
evt 03000000C466C456
EVTX 456C6646696C6500 WindowsVistaeventlogfile
exe;dll;drv;vxd;sys;ocx;vbx 4D5A Win32Executable
exe;dll;drv;vxd;sys;ocx;vbx 4D5A Win16Executable
exe;com;386;ax;acm;sys;dll;drv;flt;fon;ocx;scr;lrc;vxd;cpl;x32 4D5A ExecutableFile
EXE,DLL,OCX,OLB,IMM,IME 4D5A90
fli 0011AF FLICAnimationfile
flt 000101 OpenFlight3Dfile
FLT 4D5A900003000000 Auditiongraphicfilterfile(Adobe)
FLV 464C5601 Flashvideofile
fm 3C4D616B657246696C6520 AdobeFrameMakerfile
fm3 00001A0007800100 Lotus123v3FMTfile
fmt 20006800200 Lotus123v4FMTfile
FNT 434841
FON 4D5A Fontfile
GBC 87F53E
gid 3F5F0300 WindowsHelpIndexFile
GID 4C4E0200 WindowsHelpindexfile
GIF 47494638
gif 474946383761 Graphicsinterchangeformatfile(GIF87A)
gif 474946383961 Graphicsinterchangeformatfile(GIF89A)
GTD 7B5072
GX2 475832 ShowPartnergraphicsfile(notconfirmed)
gz;tar;tgz 1F8B GzipArchiveFile
gz;tgz 1F8B08 GZCompressedFile
hap 91334846 HAPArchiveFile
HDMP 4D444D5093A7 Windowsheapdumpfile
hdr 233F52414449414E43450A adianceHighDynamicRangeimagefile
HLP 3F5F03
hlp 3F5F0300 WindowsHelpfile
HLP 4C4E0200 WindowsHelpfile
 "hlp"  "[7byteoffset] 00   00 FF FF FF FF"  "Windows Help   file"
hqx 28546869732066696C65 MacintoshBinHex4CompressedArchive
hqx 28546869732066696C65206D75737420626520636F6E76657274656420776974682042696E48657820 MacintoshBinHex4CompressedArchive
HTM 3C2144
htm;html 3C21444F4354 HyperTextMarkupLanguage3
htm;html 3C48544D4C3E HyperTextMarkupLanguage2
htm;html 3C68746D6C3E HyperTextMarkupLanguage1
html 68746D6C3E HTML
ico 0000010000 IconFile
ico 0000010001002020 IconFile
IFF 464F524D
IFO 445644 DVDinfofile
IME 4D5A90
img 000100080001000101 VenturaPublisher/GEMVDIImageFormatBitmapfile
IMG 00FFFF
IMM 4D5A90
ind 414F4C494458 AOLclientpreferences/settingsfile(MAIN.IND)
ISO 4344303031 ISO-9660CDDiscImage(Thissignatureusuallyoccursatbyte8001,8801,or9001.)
ivr 2E524543 RealPlayervideofile(V11andlater)
JAR 4A4152435300 JARCScompressedarchive
jar 5F27A889 JARArchiveFile
jpg;jpeg FFD8FF
jpg;jpe;jpeg FFD8FFE000 JPGGraphicFile
jpg;jpe;jpeg FFD8FFFE00 JPGGraphicFile
KGB 4B47425F61726368202D KGBarchive
KOZ 49443303000000 SprintMusicStoreaudiofile(formobiledevices)
LDB 42494C
lha 2D6C68352D LHACompressed
 "lha; lzh"  "[2byteoffset] 2D   6C 68"  "Compressed   archive file"
LHP 3F5F03
lhp 3F5F0300 WindowsHelpFile
lib 213C617263683E0A Unixarchiver(ar)filesandMicrosoftProgramLibraryCommonObjectFileFormat(COFF)
LIB 2A2420
LIT 49544F4C49544C53 MicrosoftReadereBookfile
LNK 4C0000
lnk 4C000000 WindowsShortcut(LinkFile)
lnk 4C000000011402 WindowsLinkFile
LNK 4C00000001140200 Windowsshortcutfile
log 2A2A2A2020496E7374616C6C6174696F6E205374617274656420 SymantecWiseInstallerlogfile
lzh lh Lzcompressionfile
lwp 576F726450726F LotusWordProv9
m3u 234558
m4a 00000020667479704D34412000000000 AppleLosslessAudioCodecfile
m4a;m4v 00000020667479704D34412000000000 QuickTimeM4A/M4Vfile
manifest 3C3F786D6C2076657273696F6E3D WindowsVisualStylesheetXMLfile
MAR 4D41523100 Mozillaarchive
MAR 4D415243 Microsoft/MSNMARCarchive
MAR 4D41723000 MArcompressedarchive
max D0CF11
mdb 000100005374616E64617264204A6574204442 MicrosoftAccessfile
mdb;mda;mde;mdt 5374616E64617264204A MSAccess
MDF 00FFFF
mdf 00FFFFFFFFFFFFFFFFFFFF0000020001 Alcohol120%CDimage
mdf 010F0000 MicrosoftSQLServer2000database
MDI 4550 MicrosoftDocumentImagingfile
MDS 4D4544
MID;MIDI 4D546864 MusicalInstrumentDigitalInterface(MIDI)soundfile
mkv 1A45DFA3934282886D6174726F736B61 Matroskastreamfile
MLS 4D494C4553 Milestonesv1.0projectmanagementandschedulingsoftware(Alsosee\MV2C\"and\"MV214\"signatures)"
MLS 4D4C5357 Skypelocalizationdatafile
MLS 4D56323134 Milestonesv2.1bprojectmanagementandschedulingsoftware(Alsosee\MILES\"and\"MV2C\"signatures)"
MLS 4D563243 Milestonesv2.1aprojectmanagementandschedulingsoftware(Alsosee\MILES\"and\"MV214\"signatures)"
MMF 4D4D4D440000 YamahaCorp.SyntheticmusicMobileApplicationFormat(SMAF)formultimediafilesthatcanbeplayedonhand-helddevices.
mny 000100004D534953414D204461746162617365 MicrosoftMoneyfile
MOV 00000F
MOV 000077
mov 6D6F6F76 Quicktime
mov 6D646174 QuickTimeMovie
mp 0CED MonochromePictureTIFFbitmapfile(unconfirmed)
MP3 494433 MPEG-1AudioLayer3(MP3)audiofile
MP3 FFFB50
mp4 000000186674797033677035 MPEG-4videofiles
MPA 000001
mpg;mpeg 000001B3 MPEGMovie
mpg 000001BA MPEG
MSC 3C3F78
msc 3C3F786D6C2076657273696F6E3D22312E30223F3E0D0A3C4D4D435F436F6E736F6C6546696C6520436F6E736F6C6556657273696F6E3D22 MicrosoftManagementConsoleSnap-inControlfile
msi 2320 Cerius2file
MSV 4D535F564F494345 SonyMemoryStickCompressedVoicefile
NES 4E4553
NLS C22020
nri 0E4E65726F49534F NeroCDCompilation
ntf 1A0000 LotusNotesdatabasetemplate
nsf;ntf 1A0000030000 LotusNotesDatabase/Template
nsf 1A00000300001100 NotesDatabase
nsf 1A0000040000 LotusNotesdatabase
ntf 30314F52444E414E43452053555256455920202020202020 NationalTransferFormatMapFile
obj 4C01 MicrosoftCommonObjectFileFormat(COFF)relocatableobjectcodefileforanIntel386orlater/compatibleprocessors
OCX 4D5A ActiveXorOLECustomControl
OCX 4D5A90
OLB 4D5A OLEobjectlibrary
OLB 4D5A90
org;pfc 414F4C564D313030 AOLpersonalfilecabinet(PFC)file
pak 1A0B Compressedarchivefile
PAT 4746315041544348 AdvancedGravisUltrasoundpatchfile
PAT 47504154 GIMP(GNUImageManipulationProgram)patternfile
PBK 5B4144
PCB 17A150
PCS 0A0501
pcx 0Ann0101 ZSOFTPaintbrushfile(wherenn=0x02,0x03,or0x05)
pcx 0A050108 PCPaintbrush(oftenassociatedwithQuakeEnginegames)
 "pdb"  "[11byteoffset] 00   00 00 00 00 00 00 00 00 00 00 00 00 00 00 00 00 00 00 00 00 00 00 00"  "Palmpilot   Database/Document File"
PDF 255044
pdf;fdf 25504446 AdobePortableDocumentFormatandFormsDocumentfile
pdf 255044462D312E AdobeAcrobat
PDG 484802
pf 1100000053434341 Windowsprefetchfile
pic 0100000001 Unknowntypepicturefile
PJT 000007
PLL 24536F
PNG 89504E
PNG 89504E47
png 89504E470D0A PNGImageFile
png 89504E470D0A1A0A PNGImageFile
PPC 526563
PPT D0CF11
 "ppt"  "[512byteoffset]   00 6E 1E F0"  "PowerPoint   presentation subheader (MS Office)"
 "ppt"  "[512byteoffset]   0F 00 E8 03"  "PowerPoint   presentation subheader (MS Office)"
PPZ 4D534346 PowerpointPackagedPresentation
prc 424F4F4B4D4F4249 Palmpilotresourcefile
PRG 234445
ps 252150532D41646F6265 Postscript
PSD 384250
psd 38425053 AdobePhotoshopimagefile
psp 7E424B00 PaintShopProImageFile
pst 2142444E MicrosoftOutlookPersonalFolderfile
pwl E3828596 WindowsPassword
qbb 458600000600 IntuitQuickBooksBackupfile
qdf AC9EBD8F Quicken
qph 03000000 Quickenpricehistoryfile
qt 6D646174 QuicktimeMovieFile
qxd 00004949585052 QuarkExpressdocument(Intel&Motorola,respectively)
qxd 00004D4D585052
ra 2E524D460000001200 RealAudiofile
ra;ram 2E7261FD RealAudioFile
ra 2E7261FD00 RealAudiostreamingmediafile
RAR 526172
rar 52617221 RARArchiveFile
RAW 060500
reg 5245474544495434
rgb 01DA01010003 SiliconGraphicsRGBBitmap
RM 2E524D
rm;rmvb 2E524D46 RealMediastreamingmediafile
rpm EDABEEDB RPMArchiveFile
RTD 43232B44A4434DA5486472 RagTimedocumentfile
RTF 7B5C72
rtf 7B5C727466 RichTextFormatFile
sav 24464C3240282329205350535320444154412046494C45 SPSSDatafile
SBV 46454446 (Unknownfiletype)
SCH 2A7665
scm 805343
SH3 4848474231 HarvardGraphicspresentationfile
SHD 4B490000 Windows9xprinterspoolfile
sit 53495421 Stuffitv1ArchiveFile
sit 53747566664974 Stuffitv5ArchiveFile
sle 3A56455253494F4E Surfplankiteprojectfile
sle 414376 teganosSecuritySuitevirtualsecuredrive
sly;srt;slt 53520100 Sagesly.or.srt.or.slt
SMD 00FFFF
snm 001E849000000000 NetscapeCommunicator(v4)mailfolder
SNP 4D534346 MicrosoftAccessSnapshotViewerfile
sol 00BF AdobeFlashsharedobjectfile(e.g.,Flashcookies)
spl 00000100 WindowsNT/2000/XPprinterspoolfile
SCR 4D5A Screensaver
SUB FFFFFF
SWF 435753 ShockwaveFlashfile(v5+)
SWF 465753 MacromediaShockwaveFlashplayerfile
sxc calc OpenOfficeCalc
sxd draw OpenOfficeDraw
sxi impress OpenOfficeImpress
sxm math OpenOfficeMath
sxw writer OpenOfficeWriter
syw 414D594F HarvardGraphicssymbolgraphic
TAG 000002
tar;cpio 303730373037 CPIOArchiveFile
tar.z 1F9D90 Compressedtapearchivefile
tga 0000100000 RLE压缩的前5字节
TGA 000002
tga 0000020000 未压缩的前5字节
TIF;TIFF 492049 TaggedImageFileFormatfile
tif;tiff 49492A TIFF(Intel)
tif;tiff 49492A00 TaggedImageFileFormatfile(littleendian,i.e.,LSBfirstinthebyte;Intel)
TIF;TIFF 4D4D002A TaggedImageFileFormatfile(bigendian,i.e.,LSBlastinthebyte;Motorola)
tif;tiff 4D4D2A TIFF(Motorola)
TIF;TIFF 4D4D002B BigTIFFfiles;TaggedImageFileFormatfiles>4GB
TLB 4D53465402000100 OLE,SPSS,orVisualC++typelibraryfile
tr1 0110 NovellLANalyzercapturefile
TST 000100
TTF 000100
ufa 554641 UFAArchiveFile
VBX 4D5A VisualBASICapplication
VCD 454E5452595643440200000102001858 VideoVCD(GNUVCDImager)file
vcf 424547494E3A56434152440D0A vCardfile
vob 000001BA DVDVideoMovieFile(video/dvd,video/mpeg)
VXD,386 4D5A Windowsvirtualdevicedrivers
WAV 524946
WAV 52494646 Wave
wav 57415645 Wave
wav 57415645666D74 WaveFiles
wb2 00000200 QuattroProforWindowsSpreadsheetfile
 "wb3"  "[24byteoffset] 3E   00 03 00 FE FF 09 00 06"  "Quatro Pro for   Windows 7.0 Notebook file"
wk1;wks 2000604060 Lotus123v1Worksheet
wk1 0000020006040600080000000000 Lotus1-2-3spreadsheet(v1)file
wk3 00001A0000100400 Lotus123spreadsheet(v3)file
wk4;wk5 00001A0002100400 Lotus1-2-3spreadsheet(v4,v5)file
wks 0E574B53 DeskMateWorksheet
WMA 3026B2
wmf 01000900 GraphicsMetafile
wmf 010009000003 WindowsMetadatafile(Win3.xformat)
wmf 02000900 GraphicsMetafile
wmf D7CDC69A WindowsMetaFile
WMV 3026B2
wp FF575043 WordPerfectv5orv6
wpd FF575043 WordPerfect
wpg FF575047 WordPerfectGraphics
wri 31BE MicrosoftWritefile
WRI 31BE00
wri 32BE MicrosoftWritefile
ws 1D7D WordStarVersion5.0/6.0document
XBE 584245
xdr 3C BizTalkXML-DataReducedSchemafile
xls 0902060000001000B9045C00 MSExcelv2
xls 0904060000001000F6055C00 MSExcelv4
XLS D0CF11
xls D0CF11E0 MSExcel
xls  "[512byteoffset]   09 08 10 00 00 06 05 00"  "Excel spreadsheet   subheader (MS Office)"
XML 3C3F78
xml 3C3F786D6C XMLDocument
xml FFFE3C0052004F004F0054005300540055004200 XMLDocument(ROOTSTUB)
XMV 005001
XSL FFFE3C
xul 7273696F6E3D22313C3F786D6C2076652E30223F3E XMLUserInterfaceLanguagefile
z 1F9D TARCompressedArchiveFile
Z 1F9D8C
ZIP 504B03
zip;jar;zipx 504B0304 ZIPArchive
zip 504B3030 ZIPArchive(outdated)
Zip 504B3030504B0304 WINZIPCompressed
zoo 5A4F4F20 ZOOArchiveFile


来自 <https://goyasha.com/post/2d34n9vp/>


23种设计模式全解析

一、设计模式的分类

总体来说设计模式分为三大类:

创建型模式,共五种:工厂方法模式、抽象工厂模式、单例模式、建造者模式、原型模式。

结构型模式,共七种:适配器模式装饰器模式代理模式、外观模式、桥接模式、组合模式、享元模式。

行为型模式,共十一种:策略模式模板方法模式观察者模式、迭代子模式、责任链模式、命令模式、备忘录模式、状态模式、访问者模式、中介者模式、解释器模式。

其实还有两类:并发型模式和线程池模式。用一个图片来整体描述一下:


二、设计模式的六大原则

总原则:开闭原则(Open Close  Principle

开闭原则就是说对扩展开放,对修改关闭。在程序需要进行拓展的时候,不能去修改原有的代码,而是要扩展原有代码,实现一个热插拔的效果。所以一句话概括就是:为了使程序的扩展性好,易于维护和升级。想要达到这样的效果,我们需要使用接口和抽象类等,后面的具体设计中我们会提到这点。

1、单一职责原则

不要存在多于一个导致类变更的原因,也就是说每个类应该实现单一的职责,如若不然,就应该把类拆分。

2、里氏替换原则(Liskov  Substitution Principle

里氏代换原则(Liskov Substitution Principle  LSP)面向对象设计的基本原则之一。里氏代换原则中说,任何基类可以出现的地方,子类一定可以出现。 LSP是继承复用的基石,只有当衍生类可以替换掉基类,软件单位的功能不受到影响时,基类才能真正被复用,而衍生类也能够在基类的基础上增加新的行为。里氏代换原则是对“开-闭”原则的补充。实现“开-闭”原则的关键步骤就是抽象化。而基类与子类的继承关系就是抽象化的具体实现,所以里氏代换原则是对实现抽象化的具体步骤的规范。

里氏替换原则中,子类对父类的方法尽量不要重写和重载。因为父类代表了定义好的结构,通过这个规范的接口与外界交互,子类不应该随便破坏它。

3、依赖倒转原则(Dependence  Inversion Principle

这个是开闭原则的基础,具体内容:面向接口编程,依赖于抽象而不依赖于具体。写代码时用到具体类时,不与具体类交互,而与具体类的上层接口交互。

4、接口隔离原则(Interface  Segregation Principle

这个原则的意思是:每个接口中不存在子类用不到却必须实现的方法,如果不然,就要将接口拆分。使用多个隔离的接口,比使用单个接口(多个接口方法集合到一个的接口)要好。

5、迪米特法则(最少知道原则)(Demeter  Principle

就是说:一个类对自己依赖的类知道的越少越好。也就是说无论被依赖的类多么复杂,都应该将逻辑封装在方法的内部,通过public方法提供给外部。这样当被依赖的类变化时,才能最小的影响该类。

最少知道原则的另一个表达方式是:只与直接的朋友通信。类之间只要有耦合关系,就叫朋友关系。耦合分为依赖、关联、聚合、组合等。我们称出现为成员变量、方法参数、方法返回值中的类为直接朋友。局部变量、临时变量则不是直接的朋友。我们要求陌生的类不要作为局部变量出现在类中。

6、合成复用原则(Composite Reuse  Principle

合成复用原则是尽量首先使用合成/聚合的方式,而不是使用继承。


三、23种设计模式

我们详细介绍Java23种设计模式的概念,应用场景等情况,并结合他们的特点及设计模式的原则进行分析。

A、创建模式

0、简单工厂模式

首先,简单工厂模式不属于23种设计模式,简单工厂一般分为:普通简单工厂、多方法简单工厂、静态方法简单工厂。

01、普通简单工厂

建立一个工厂类,对实现了同一接口的一些类进行实例的创建。首先看下关系图:

举例如下:(我们举一个发送邮件和短信的例子)

首先,创建二者的共同接口:

public interface Sender {
    public void Send();
}

其次,创建实现类:

public class MailSender implements Sender {  
    @Override
    public void Send() {
        System.out.println("This is mail sender!");
    }
}
public class SmsSender implements Sender {
    @Override
    public void Send() {
        System.out.println("This is sms sender!");
    }
}

最后,建工厂类:

public class SendFactory {
    public Sender produce(String type) {
        if ("mail".equals(type)) {
            return new MailSender();
        } else if ("sms".equals(type)) {
            return new SmsSender();
        } else {
            System.out.println("请输入正确的类型!");
            return null;
        }
    }
}

我们来测试下:

public class FactoryTest {
    public static void main(String[] args) {
        SendFactory factory = new SendFactory();
        Sender sender = factory.produce("sms");
        sender.Send();
    }
}

输出:This is sms sender!


02、多个方法

是对普通工厂方法模式的改进,在普通工厂方法模式中,如果传递的字符串出错,则不能正确创建对象,而多个工厂方法模式是提供多个工厂方法,分别创建对象。关系图:

将上面的代码做下修改,改动下SendFactory类就行,如下:

public class SendFactory {
    public Sender produceMail(){
         return new MailSender();
     }
     
     public Sender produceSms(){
         return new SmsSender();
     }
 }

测试类如下:

public class FactoryTest {
    public static void main(String[] args) {
        SendFactory factory = new SendFactory();
        Sender sender = factory.produceMail();
        sender.Send();
    }
}

输出:This is mail sender!


03、多个静态方法

将上面的多个工厂方法模式里的方法置为静态的,不需要创建实例,直接调用即可。

public class SendFactory {
    public static Sender produceMail(){
        return new MailSender();
    }

    public static Sender produceSms(){
        return new SmsSender();
    }
}
public class FactoryTest {
    public static void main(String[] args) {
        Sender sender = SendFactory.produceMail();
        sender.Send();
    }
}

输出:This is mail sender!


总体来说,工厂模式适合:凡是出现了大量的产品需要创建,并且具有共同的接口时,可以通过工厂方法模式进行创建。在以上的三种模式中,第一种如果传入的字符串有误,不能正确创建对象,第三种相对于第二种,不需要实例化工厂类,所以,大多数情况下,我们会选用第三种——静态工厂方法模式。


1、工厂方法模式(Factory Method

简单工厂模式有一个问题就是,类的创建依赖工厂类,也就是说,如果想要拓展程序,必须对工厂类进行修改,这违背了闭包原则,所以,从设计角度考虑,有一定的问题,如何解决?就用到工厂方法模式,创建一个工厂接口和创建多个工厂实现类,这样一旦需要增加新的功能,直接增加新的工厂类就可以了,不需要修改之前的代码。

请看例子:

interface Sender {
    void Send();
}


两个实现类:

public class MailSender implements Sender {
    @Override
    public void Send() {
        System.out.println("This is mail sender");
    }
}
public class SmsSender implements Sender {
    @Override
    public void Send() {
        System.out.println("This is sms sender!");
    }
}

两个工厂类:

public class SendMailFactory implements Provider {
    @Override
    public Sender produce(){
        return new MailSender();
    }
}
public class SendSmsFactory implements Provider{
    @Override
    public Sender produce() {
        return new SmsSender();
    }
}

再提供一个接口:

public interface Provider {
    public Sender produce();
}

测试类:

public class FactoryMethodTest {
    public static void main(String[] args) {
        Provider provider = new SendMailFactory();
        Sender sender = provider.produce();
        sender.Send();
    }
}

输出:This is mail sender!


其实这个模式的好处就是,如果你现在想增加一个功能:发即时信息,则只需做一个实现类,实现Sender接口,同时做一个工厂类,实现Provider接口,就OK了,无需去改动现成的代码。这样做,拓展性较好!


2、抽象工厂模式

抽象工厂是所有形态的工厂模式中最为抽象和最具一般性的一种形态。抽象工厂是指当有多个抽象角色时使用的一种工厂模式。抽象工厂模式可以向客户端提供一个接口,使客户端在不必指定产品的具体情况下,创建多个产品族中的产品对象。

由于业务发展,当前的本地消息发送器无法胜任所有的业务,需要增加了网络发送器,而网络发送器也需要支持Mail和Sms的信息发送。

interface Sender {
    void Send();
}
public class LocalMailSender implements Sender {
    @Override
    public void Send() {
        System.out.println("This is local mail sender");
    }
}
public class LocalSmsSender implements Sender {
    @Override
    public void Send() {
        System.out.println("This is local sms sender!");
    }
}
public class WebMailSender implements Sender {
    @Override
    public void Send() {
        System.out.println("This is web mail sender");
    }
}
public class WebSmsSender implements Sender {
    @Override
    public void Send() {
        System.out.println("This is web sms sender!");
    }
}
public interface Provider {
    public Sender createMailSender();
    public Sender createSmsSender();
}
public class LocalProvider implements Provider {
    public Sender createMailSender() {
        return new LocalMailSender();
    }
    public Sender createSmsSender() {
        return new LocalSmsSender();
    }
}
public class WebProvider implements Provider {
    public Sender createMailSender() {
        return new WebMailSender();
    }
    public Sender createSmsSender() {
        return new WebSmsSender();
    }
}

测试代码:

public class AbstractFactoryTest {
    public static void main(String[] args) {
        Provider localProvider = new LocalProvider();
        Sender mailSender = localProvider.createMailSender();
        mailSender.Send();

        Provider webProvider = new WebProvider();
        Sender smsSender = webProvider.createSmsSender();
        smsSender.Send();
    }
}

输出结果:
This is local mail sender!
This is web sms sender!


工厂方法模式和抽象工厂模式不好分清楚,他们的区别如下:

工厂方法模式:

   一个抽象产品类,可以派生出多个具体产品类。    
   
一个抽象工厂类,可以派生出多个具体工厂类。    
   
每个具体工厂类只能创建一个具体产品类的实例。

抽象工厂模式:
   
多个抽象产品类,每个抽象产品类可以派生出多个具体产品类。    
   
一个抽象工厂类,可以派生出多个具体工厂类。    
   
每个具体工厂类可以创建多个具体产品类的实例,也就是创建的是一个产品线下的多个产品。    
     
区别:
   
工厂方法模式只有一个抽象产品类,而抽象工厂模式有多个。    
   
工厂方法模式的具体工厂类只能创建一个具体产品类的实例,而抽象工厂模式可以创建多个。


工厂方法创建 "一种" 产品,他的着重点在于"怎么创建",也就是说如果你开发,你的大量代码很可能围绕着这种产品的构造,初始化这些细节上面。也因为如此,类似的产品之间有很多可以复用的特征,所以会和模版方法相随。 

抽象工厂需要创建一些列产品,着重点在于"创建哪些"产品上,也就是说,如果你开发,你的主要任务是划分不同差异的产品线,并且尽量保持每条产品线接口一致,从而可以从同一个抽象工厂继承。


对于java来说,你能见到的大部分抽象工厂模式都是这样的:

   它的里面是一堆工厂方法,每个工厂方法返回某种类型的对象。

比如说工厂可以生产鼠标和键盘。那么抽象工厂的实现类(它的某个具体子类)的对象都可以生产鼠标和键盘,但可能工厂A生产的是罗技的键盘和鼠标,工厂B是微软的。

这样AB就是工厂,对应于抽象工厂;
  每个工厂生产的鼠标和键盘就是产品,对应于工厂方法;

用了工厂方法模式,你替换生成键盘的工厂方法,就可以把键盘从罗技换到微软。但是用了抽象工厂模式,你只要换家工厂,就可以同时替换鼠标和键盘一套。如果你要的产品有几十个,当然用抽象工厂模式一次替换全部最方便(这个工厂会替你用相应的工厂方法)

所以说抽象工厂就像工厂,而工厂方法则像是工厂的一种产品生产线


 3、单例模式(Singleton

单例对象(Singleton)是一种常用的设计模式。在Java应用中,单例对象能保证在一个JVM中,该对象只有一个实例存在。这样的模式有几个好处:

1、某些类创建比较频繁,对于一些大型的对象,这是一笔很大的系统开销。

2、省去了new操作符,降低了系统内存的使用频率,减轻GC压力。

3、有些类如交易所的核心交易引擎,控制着交易流程,如果该类可以创建多个的话,系统完全乱了。(比如一个军队出现了多个司令员同时指挥,肯定会乱成一团),所以只有使用单例模式,才能保证核心交易服务器独立控制整个流程。

首先我们写一个简单的单例类:

public class Singleton {  
  
    /* 持有私有静态实例,防止被引用,此处赋值为null,目的是实现延迟加载 */  
    private static Singleton instance = null;  
  
    /* 私有构造方法,防止被实例化 */  
    private Singleton() {  
    }  
  
    /* 静态工程方法,创建实例 */  
    public static Singleton getInstance() {  
        if (instance == null) {  
            instance = new Singleton();  
        }  
        return instance;  
    }  
  
    /* 如果该对象被用于序列化,可以保证对象在序列化前后保持一致 */  
    public Object readResolve() {  
        return instance;  
    }  
}

这个类可以满足基本要求,但是,像这样毫无线程安全保护的类,如果我们把它放入多线程的环境下,肯定就会出现问题了,如何解决?我们首先会想到对getInstance方法加synchronized关键字,如下:

public static synchronized Singleton getInstance() {  
    if (instance == null) {  
        instance = new Singleton();  
    }  
    return instance;  
}

但是,synchronized关键字锁住的是这个对象,这样的用法,在性能上会有所下降,因为每次调用getInstance(),都要对对象上锁,事实上,只有在第一次创建对象的时候需要加锁,之后就不需要了,所以,这个地方需要改进。我们改成下面这个:

public static Singleton getInstance() {  
    if (instance == null) {  
        synchronized (instance) {  
            if (instance == null) {  
                instance = new Singleton();  
            }  
        }  
    }  
    return instance;  
}

似乎解决了之前提到的问题,将synchronized关键字加在了内部,也就是说当调用的时候是不需要加锁的,只有在instancenull,并创建对象的时候才需要加锁,性能有一定的提升。但是,这样的情况,还是有可能有问题的,看下面的情况:在Java指令中创建对象和赋值操作是分开进行的,也就是说instance = new Singleton();语句是分两步执行的。但是JVM并不保证这两个操作的先后顺序,也就是说有可能JVM会为新的Singleton实例分配空间,然后直接赋值给instance成员,然后再去初始化这个Singleton实例。这样就可能出错了,我们以AB两个线程为例:

a>AB线程同时进入了第一个if判断

b>A首先进入synchronized块,由于instancenull,所以它执行instance = new Singleton();

c>由于JVM内部的优化机制,JVM先画出了一些分配给Singleton实例的空白内存,并赋值给instance成员(注意此时JVM没有开始初始化这个实例),然后A离开了synchronized块。

d>B进入synchronized块,由于instance此时不是null,因此它马上离开了synchronized块并将结果返回给调用该方法的程序。

e>此时B线程打算使用Singleton实例,却发现它没有被初始化,于是错误发生了。

所以程序还是有可能发生错误,其实程序在运行过程是很复杂的,从这点我们就可以看出,尤其是在写多线程环境下的程序更有难度,有挑战性。我们对该程序做进一步优化:

private static class SingletonFactory{           
    private static Singleton instance = new Singleton();           
}           
public static Singleton getInstance(){           
    return SingletonFactory.instance;           
}

实际情况是,单例模式使用内部类来维护单例的实现,JVM内部的机制能够保证当一个类被加载的时候,这个类的加载过程是线程互斥的。这样当我们第一次调用getInstance的时候,JVM能够帮我们保证instance只被创建一次,并且会保证把赋值给instance的内存初始化完毕,这样我们就不用担心上面的问题。同时该方法也只会在第一次调用的时候使用互斥机制,这样就解决了低性能问题。这样我们暂时总结一个完美的单例模式:

public class Singleton {  
  
    /* 私有构造方法,防止被实例化 */  
    private Singleton() {  
    }  
  
    /* 此处使用一个内部类来维护单例 */  
    private static class SingletonFactory {  
        private static Singleton instance = new Singleton();  
    }  
  
    /* 获取实例 */  
    public static Singleton getInstance() {  
        return SingletonFactory.instance;  
    }  
  
    /* 如果该对象被用于序列化,可以保证对象在序列化前后保持一致 */  
    public Object readResolve() {  
        return getInstance();  
    }  
}

其实说它完美,也不一定,如果在构造函数中抛出异常,实例将永远得不到创建,也会出错。所以说,十分完美的东西是没有的,我们只能根据实际情况,选择最适合自己应用场景的实现方法。也有人这样实现:因为我们只需要在创建类的时候进行同步,所以只要将创建和getInstance()分开,单独为创建加synchronized关键字,也是可以的:

public class SingletonTest {  
  
    private static SingletonTest instance = null;  
  
    private SingletonTest() {  
    }  
  
    private static synchronized void syncInit() {  
        if (instance == null) {  
            instance = new SingletonTest();  
        }  
    }  
  
    public static SingletonTest getInstance() {  
        if (instance == null) {  
            syncInit();  
        }  
        return instance;  
    }  
}

考虑性能的话,整个程序只需创建一次实例,所以性能也不会有什么影响。

补充:采用"影子实例"的办法为单例对象的属性同步更新

public class SingletonTest {  
  
    private static SingletonTest instance = null;  
    private Vector properties = null;  
  
    public Vector getProperties() {  
        return properties;  
    }  
  
    private SingletonTest() {  
    }  
  
    private static synchronized void syncInit() {  
        if (instance == null) {  
            instance = new SingletonTest();  
        }  
    }  
  
    public static SingletonTest getInstance() {  
        if (instance == null) {  
            syncInit();  
        }  
        return instance;  
    }  
  
    public void updateProperties() {  
        SingletonTest shadow = new SingletonTest();  
        properties = shadow.getProperties();  
    }  
}

通过单例模式的学习告诉我们:

1、单例模式理解起来简单,但是具体实现起来还是有一定的难度。

2synchronized关键字锁定的是对象,在用的时候,一定要在恰当的地方使用(注意需要使用锁的对象和过程,可能有的时候并不是整个对象及整个过程都需要锁)。

到这儿,单例模式基本已经讲完了,结尾处,笔者突然想到另一个问题,就是采用类的静态方法,实现单例模式的效果,也是可行的,此处二者有什么不同?

首先,静态类不能实现接口。(从类的角度说是可以的,但是那样就破坏了静态了。因为接口中不允许有static修饰的方法,所以即使实现了也是非静态的)

其次,单例可以被延迟初始化,静态类一般在第一次加载是初始化。之所以延迟加载,是因为有些类比较庞大,所以延迟加载有助于提升性能。

再次,单例类可以被继承,他的方法可以被覆写。但是静态类内部方法都是static,无法被覆写。

最后一点,单例类比较灵活,毕竟从实现上只是一个普通的Java类,只要满足单例的基本需求,你可以在里面随心所欲的实现一些其它功能,但是静态类不行。从上面这些概括中,基本可以看出二者的区别,但是,从另一方面讲,我们上面最后实现的那个单例模式,内部就是用一个静态类来实现的,所以,二者有很大的关联,只是我们考虑问题的层面不同罢了。两种思想的结合,才能造就出完美的解决方案,就像HashMap采用数组+链表来实现一样,其实生活中很多事情都是这样,单用不同的方法来处理问题,总是有优点也有缺点,最完美的方法是,结合各个方法的优点,才能最好的解决问题!


4、建造者模式(Builder

 将一个复杂对象的构建与它的表示分离,使得同样的构建过程可以创建不同的表示。


四个要素

  • 产品类:一般是一个较为复杂的对象,也就是说创建对象的过程比较复杂,一般会有比较多的代码量。在本类图中,产品类是一个具体的类,而非抽象类。实际编程中,产品类可以是由一个抽象类与它的不同实现组成,也可以是由多个抽象类与他们的实现组成。

  • 抽象建造者:引入抽象建造者的目的,是为了将建造的具体过程交与它的子类来实现。这样更容易扩展。一般至少会有两个抽象方法,一个用来建造产品,一个是用来返回产品。

  • 建造者:实现抽象类的所有未实现的方法,具体来说一般是两项任务:组建产品;返回组建好的产品。

  • 导演类:负责调用适当的建造者来组建产品,导演类一般不与产品类发生依赖关系,与导演类直接交互的是建造者类。一般来说,导演类被用来封装程序中易变的部分。

代码实现

class Product {
    private String name;
    private String type;
    public void showProduct(){
        System.out.println("名称:"+name);
        System.out.println("型号:"+type);
    }
    public void setName(String name) {
        this.name = name;
    }
    public void setType(String type) {
        this.type = type;
    }
}

abstract class Builder {
    public abstract void setPart(String arg1, String arg2);
    public abstract Product getProduct();
}
class ConcreteBuilder extends Builder {
    private Product product = new Product();

    public Product getProduct() {
        return product;
    }

    public void setPart(String arg1, String arg2) {
        product.setName(arg1);
        product.setType(arg2);
    }
}

public class Director {
    private Builder builder = new ConcreteBuilder();
    public Product getAProduct(){
        builder.setPart("宝马汽车","X7");
        return builder.getProduct();
    }
    public Product getBProduct(){
        builder.setPart("奥迪汽车","Q5");
        return builder.getProduct();
    }
}
public class Client {
    public static void main(String[] args){
        Director director = new Director();
        Product product1 = director.getAProduct();
        product1.showProduct();

        Product product2 = director.getBProduct();
        product2.showProduct();
    }
}

建造者模式的优点

首先,建造者模式的封装性很好。使用建造者模式可以有效的封装变化,在使用建造者模式的场景中,一般产品类和建造者类是比较稳定的,因此,将主要的业务逻辑封装在导演类中对整体而言可以取得比较好的稳定性。

其次,建造者模式很容易进行扩展。如果有新的需求,通过实现一个新的建造者类就可以完成,基本上不用修改之前已经测试通过的代码,因此也就不会对原有功能引入风险。

建造者模式与工厂模式的区别

我们可以看到,建造者模式与工厂模式是极为相似的,总体上,建造者模式仅仅只比工厂模式多了一个"导演类"的角色。在建造者模式的类图中,假如把这个导演类看做是最终调用的客户端,那么图中剩余的部分就可以看作是一个简单的工厂模式了。

与工厂模式相比,建造者模式一般用来创建更为复杂的对象,因为对象的创建过程更为复杂,因此将对象的创建过程独立出来组成一个新的类——导演类。也就是说,工厂模式是将对象的全部创建过程封装在工厂类中,由工厂类向客户端提供最终的产品;而建造者模式中,建造者类一般只提供产品类中各个组件的建造,而将具体建造过程交付给导演类。由导演类负责将各个组件按照特定的规则组建为产品,然后将组建好的产品交付给客户端。

总结

建造者模式与工厂模式类似,他们都是建造者模式,适用的场景也很相似。一般来说,如果产品的建造很复杂,那么请用工厂模式;如果产品的建造更复杂,那么请用建造者模式。


5、原型模式(Prototype

原型模式虽然是创建型的模式,但是与工程模式没有关系,从名字即可看出,该模式的思想就是将一个对象作为原型,对其进行复制、克隆,产生一个和原对象类似的新对象。在Java中,复制对象是通过clone()实现的,先创建一个原型类:

public class Prototype implements Cloneable {  
  
    public Object clone() throws CloneNotSupportedException {  
        Prototype proto = (Prototype) super.clone();  
        return proto;  
    }  
}

很简单,一个原型类,只需要实现Cloneable接口,覆写clone方法,此处clone方法可以改成任意的名称,因为Cloneable接口是个空接口,你可以任意定义实现类的方法名,如cloneA或者cloneB,因为此处的重点是super.clone()这句话,super.clone()调用的是Objectclone()方法,而在Object类中,clone()native的,具体怎么实现,此处不再深究。在这儿,将结合对象的浅复制和深复制来说一下,首先需要了解对象深、浅复制的概念:

浅复制:将一个对象复制后,基本数据类型的变量都会重新创建,而引用类型,指向的还是原对象所指向的。

深复制:将一个对象复制后,不论是基本数据类型还有引用类型,都是重新创建的。简单来说,就是深复制进行了完全彻底的复制,而浅复制不彻底。

此处,写一个深浅复制的例子:

public class Prototype implements Cloneable, Serializable {  
  
    private static final long serialVersionUID = 1L;  
    private String string;  
  
    private SerializableObject obj;  
  
    /* 浅复制 */  
    public Object clone() throws CloneNotSupportedException {  
        Prototype proto = (Prototype) super.clone();  
        return proto;  
    }  
  
    /* 深复制 */  
    public Object deepClone() throws IOException, ClassNotFoundException {  
  
        /* 写入当前对象的二进制流 */  
        ByteArrayOutputStream bos = new ByteArrayOutputStream();  
        ObjectOutputStream oos = new ObjectOutputStream(bos);  
        oos.writeObject(this);  
  
        /* 读出二进制流产生的新对象 */  
        ByteArrayInputStream bis = new ByteArrayInputStream(bos.toByteArray());  
        ObjectInputStream ois = new ObjectInputStream(bis);  
        return ois.readObject();  
    }  
  
    public String getString() {  
        return string;  
    }  
  
    public void setString(String string) {  
        this.string = string;  
    }  
  
    public SerializableObject getObj() {  
        return obj;  
    }  
  
    public void setObj(SerializableObject obj) {  
        this.obj = obj;  
    }  
  
}
class SerializableObject implements Serializable {  
    private static final long serialVersionUID = 1L;  
}

要实现深复制,需要采用流的形式读入当前对象的二进制输入,再写出二进制数据对应的对象。


B、结构模式(7种)


结构型模式共有7种模式类型:适配器模式、装饰模式、代理模式、外观模式、桥接模式、组合模式、享元模式。其中对象的适配器模式是各种模式的起源,看下图:

3d7ddf5a521a234d.jpg


6、适配器模式

 适配器模式将某个类的接口转换成客户端期望的另一个接口表示,目的是消除由于接口不匹配所造成的类的兼容性问题。主要分为三类:类的适配器模式、对象的适配器模式、接口的适配器模式。

01、类的适配器模式

核心思想就是:有一个Source类,拥有一个方法,待适配,目标接口是Targetable,通过Adapter类,将Source的功能扩展到Targetable里,看代码:

public class Source {  
    public void method1() {  
        System.out.println("this is original method!");  
    }  
}
public interface Targetable {  
    /* 与原类中的方法相同 */  
    public void method1();  
  
    /* 新类的方法 */  
    public void method2();  
}
public class Adapter extends Source implements Targetable {  
    @Override  
    public void method2() {  
        System.out.println("this is the targetable method!");  
    }  
}

Adapter类继承Source类,实现Targetable接口,下面是测试类:

public class AdapterTest {  
  
    public static void main(String[] args) {  
        Targetable target = new Adapter();  
        target.method1();  
        target.method2();  
    }  
}

输出:

this is original method!

this is the targetable method!

这样Targetable接口的实现类就具有了Source类的功能。

02、对象的适配器模式

基本思路和类的适配器模式相同,只是将Adapter类作修改,这次不继承Source类,而是持有Source类的实例,以达到解决兼容性的问题。看图:


只需要修改Adapter类的源码即可:

public class Wrapper implements Targetable {  
    private Source source;  
      
    public Wrapper(Source source){  
        super();  
        this.source = source;  
    }  
    @Override  
    public void method2() {  
        System.out.println("this is the targetable method!");  
    }  
  
    @Override  
    public void method1() {  
        source.method1();  
    }  
}

测试类:

public class AdapterTest {  
    public static void main(String[] args) {  
        Source source = new Source();  
        Targetable target = new Wrapper(source);  
        target.method1();  
        target.method2();  
    }  
}

输出与第一种一样,只是适配的方法不同而已。

03、接口的适配器模式

第三种适配器模式是接口的适配器模式,接口的适配器是这样的:有时我们写的一个接口中有多个抽象方法,当我们写该接口的实现类时,必须实现该接口的所有方法,这明显有时比较浪费,因为并不是所有的方法都是我们需要的,有时只需要某一些,此处为了解决这个问题,我们引入了接口的适配器模式,借助于一个抽象类,该抽象类实现了该接口,实现了所有的方法,而我们不和原始的接口打交道,只和该抽象类取得联系,所以我们写一个类,继承该抽象类,重写我们需要的方法就行。看一下类图:

这个很好理解,在实际开发中,我们也常会遇到这种接口中定义了太多的方法,以致于有时我们在一些实现类中并不是都需要。看代码:

public interface Sourceable {  
    public void method1();  
    public void method2();  
}

抽象类Wrapper2

public abstract class Wrapper2 implements Sourceable{  
    public void method1(){}  
    public void method2(){}  
}
public class SourceSub1 extends Wrapper2 {  
    public void method1(){  
        System.out.println("the sourceable interface's first Sub1!");  
    }  
}
public class SourceSub2 extends Wrapper2 {  
    public void method2(){  
        System.out.println("the sourceable interface's second Sub2!");  
    }  
}
public class WrapperTest {  
    public static void main(String[] args) {  
        Sourceable source1 = new SourceSub1();  
        Sourceable source2 = new SourceSub2();  
          
        source1.method1();  
        source1.method2();  
        source2.method1();  
        source2.method2();  
    }  
}

测试输出:

the sourceable interface's first Sub1!

the sourceable interface's second Sub2!

达到了我们的效果!

总结一下三种适配器模式的应用场景:

类的适配器模式:当希望将一个类转换成满足另一个新接口的类时,可以使用类的适配器模式,创建一个新类,继承原有的类,实现新的接口即可。

对象的适配器模式:当希望将一个对象转换成满足另一个新接口的对象时,可以创建一个Wrapper类,持有原类的一个实例,在Wrapper类的方法中,调用实例的方法就行。

接口的适配器模式:当不希望实现一个接口中所有的方法时,可以创建一个抽象类Wrapper,实现所有方法,我们写别的类的时候,继承抽象类即可。


7、装饰模式(Decorator

顾名思义,装饰模式就是给一个对象增加一些新的功能,而且是动态的,要求装饰对象和被装饰对象实现同一个接口,装饰对象持有被装饰对象的实例,关系图如下:

Source类是被装饰类,Decorator类是一个装饰类,可以为Source类动态的添加一些功能,代码如下:

public interface Sourceable {  
    public void method();  
}
public class Source implements Sourceable {
    @Override
    public void method() {
        System.out.println("the original method!");
    }
}
public class Decorator implements Sourceable {  
    private Sourceable source;  
      
    public Decorator(Sourceable source){  
        super();  
        this.source = source;  
    }  
    @Override  
    public void method() {  
        System.out.println("before decorator!");  
        source.method();  
        System.out.println("after decorator!");  
    }  
}

测试类:

public class DecoratorTest {
    public static void main(String[] args) {  
        Sourceable source = new Source();  
        Sourceable obj = new Decorator(source);  
        obj.method();  
    }  
}

输出:

before decorator!

the original method!

after decorator!

装饰器模式的应用场景:

1、需要扩展一个类的功能。

2、动态的为一个对象增加功能,而且还能动态撤销。(继承不能做到这一点,继承的功能是静态的,不能动态增删。)

缺点:产生过多相似的对象,不易排错!


8、代理模式(Proxy

代理模式就是多一个代理类出来,替原对象进行一些操作,比如我们在租房子的时候会去找中介,为什么呢?因为你对该地区房屋的信息掌握的不够全面,希望找一个更熟悉的人去帮你做,此处的代理就是这个意思。再如我们有的时候打官司,我们需要请律师,因为律师在法律方面有专长,可以替我们进行操作,表达我们的想法。先来看看关系图:


根据上文的阐述,代理模式就比较容易的理解了,我们看下代码:

public interface Sourceable {  
    public void method();  
}
public class Source implements Sourceable {  
    @Override  
    public void method() {  
        System.out.println("the original method!");  
    }  
}
public class Proxy implements Sourceable {  
    private Source source;  
    public Proxy(){  
        super();  
        this.source = new Source();  
    }  
    @Override  
    public void method() {  
        before();  
        source.method();  
        atfer();  
    }  
    private void atfer() {  
        System.out.println("after proxy!");  
    }  
    private void before() {  
        System.out.println("before proxy!");  
    }  
}

测试类:

public class ProxyTest {  
    public static void main(String[] args) {  
        Sourceable source = new Proxy();  
        source.method();  
    }  
}

输出:

before proxy!

the original method!

after proxy!

代理模式的应用场景:

如果已有的方法在使用的时候需要对原有的方法进行改进,此时有两种办法:

1、修改原有的方法来适应。这样违反了“对扩展开放,对修改关闭”的原则。

2、就是采用一个代理类调用原有的方法,且对产生的结果进行控制。这种方法就是代理模式。

使用代理模式,可以将功能划分的更加清晰,有助于后期维护!


9、外观模式(Facade

外观模式是为了解决类与类之间的依赖关系的,像spring一样,可以将类和类之间的关系配置到配置文件中,而外观模式就是将他们的关系放在一个Facade类中,降低了类与类之间的耦合度,该模式中没有涉及到接口,看下类图:(我们以一个计算机的启动过程为例)

我们先看下实现类:

public class CPU {  
    public void startup(){  
        System.out.println("cpu startup!");  
    }  
      
    public void shutdown(){  
        System.out.println("cpu shutdown!");  
    }  
}
public class Memory {  
    public void startup(){  
        System.out.println("memory startup!");  
    }  
      
    public void shutdown(){  
        System.out.println("memory shutdown!");  
    }  
}
public class Disk {  
    public void startup(){  
        System.out.println("disk startup!");  
    }  
      
    public void shutdown(){  
        System.out.println("disk shutdown!");  
    }  
}
public class Computer {  
    private CPU cpu;  
    private Memory memory;  
    private Disk disk;  
      
    public Computer(){  
        cpu = new CPU();  
        memory = new Memory();  
        disk = new Disk();  
    }  
      
    public void startup(){  
        System.out.println("start the computer!");  
        cpu.startup();  
        memory.startup();  
        disk.startup();  
        System.out.println("start computer finished!");  
    }  
      
    public void shutdown(){  
        System.out.println("begin to close the computer!");  
        cpu.shutdown();  
        memory.shutdown();  
        disk.shutdown();  
        System.out.println("computer closed!");  
    }  
}

User类如下:

public class User {  
    public static void main(String[] args) {  
        Computer computer = new Computer();  
        computer.startup();  
        computer.shutdown();  
    }  
}

输出:

start the computer!

cpu startup!

memory startup!

disk startup!

start computer finished!

begin to close the computer!

cpu shutdown!

memory shutdown!

disk shutdown!

computer closed!

如果我们没有Computer类,那么,CPUMemoryDisk他们之间将会相互持有实例,产生关系,这样会造成严重的依赖,修改一个类,可能会带来其他类的修改,这不是我们想要看到的,有了Computer类,他们之间的关系被放在了Computer类里,这样就起到了解耦的作用,这,就是外观模式!


10、桥接模式(Bridge

桥接模式就是把事物和其具体实现分开,使他们可以各自独立的变化。桥接的用意是:将抽象化与实现化解耦,使得二者可以独立变化,像我们常用的JDBCDriverManager一样,JDBC进行连接数据库的时候,在各个数据库之间进行切换,基本不需要动太多的代码,甚至丝毫不用动,原因就是JDBC提供统一接口,每个数据库提供各自的实现,用一个叫做数据库驱动的程序来桥接就行了。我们来看看关系图:

实现代码:

先定义接口:

public interface Sourceable {  
    public void method();  
}

分别定义两个实现类:

public class SourceSub1 implements Sourceable {  
    @Override  
    public void method() {  
        System.out.println("this is the first sub!");  
    }  
}
public class SourceSub2 implements Sourceable {  
    @Override  
    public void method() {  
        System.out.println("this is the second sub!");  
    }  
}

定义一个桥,持有Sourceable的一个实例:

public abstract class Bridge {  
    private Sourceable source;  
  
    public void method(){  
        source.method();  
    }  
      
    public Sourceable getSource() {  
        return source;  
    }  
  
    public void setSource(Sourceable source) {  
        this.source = source;  
    }  
}
public class MyBridge extends Bridge {  
    public void method(){  
        getSource().method();  
    }  
}

测试类:

public class BridgeTest {  
    public static void main(String[] args) {  
        Bridge bridge = new MyBridge();  
          
        /*调用第一个对象*/  
        Sourceable source1 = new SourceSub1();  
        bridge.setSource(source1);  
        bridge.method();  
          
        /*调用第二个对象*/  
        Sourceable source2 = new SourceSub2();  
        bridge.setSource(source2);  
        bridge.method();  
    }  
}

output

this is the first sub!

this is the second sub!

这样,就通过对Bridge类的调用,实现了对接口Sourceable的实现类SourceSub1SourceSub2的调用。接下来我再画个图,大家就应该明白了,因为这个图是我们JDBC连接的原理,有数据库学习基础的,一结合就都懂了。


11、组合模式(Composite

组合模式有时又叫部分-整体模式在处理类似树形结构的问题时比较方便,看看关系图:

直接来看代码:

public class TreeNode {  
    private String name;  
    private TreeNode parent;  
    private Vector children = new Vector();  
      
    public TreeNode(String name){  
        this.name = name;  
    }  
  
    public String getName() {  
        return name;  
    }  
  
    public void setName(String name) {  
        this.name = name;  
    }  
  
    public TreeNode getParent() {  
        return parent;  
    }  
  
    public void setParent(TreeNode parent) {  
        this.parent = parent;  
    }  
      
    //添加孩子节点  
    public void add(TreeNode node){  
        children.add(node);  
    }  
      
    //删除孩子节点  
    public void remove(TreeNode node){  
        children.remove(node);  
    }  
      
    //取得孩子节点  
    public Enumeration getChildren(){  
        return children.elements();  
    }  
}
public class Tree {  
    TreeNode root = null;  
  
    public Tree(String name) {  
        root = new TreeNode(name);  
    }  
  
    public static void main(String[] args) {  
        Tree tree = new Tree("A");  
        TreeNode nodeB = new TreeNode("B");  
        TreeNode nodeC = new TreeNode("C");  
          
        nodeB.add(nodeC);  
        tree.root.add(nodeB);  
        System.out.println("build the tree finished!");  
    }  
}

使用场景:将多个对象组合在一起进行操作,常用于表示树形结构中,例如二叉树,树等。


12、享元模式(Flyweight

享元模式的主要目的是实现对象的共享,即共享池,当系统中对象多的时候可以减少内存的开销,通常与工厂模式一起使用。

FlyWeightFactory负责创建和管理享元单元,当一个客户端请求时,工厂需要检查当前对象池中是否有符合条件的对象,如果有,就返回已经存在的对象,如果没有,则创建一个新对象,FlyWeight是超类。一提到共享池,我们很容易联想到Java里面的JDBC连接池,想想每个连接的特点,我们不难总结出:适用于作共享的一些个对象,他们有一些共有的属性,就拿数据库连接池来说,urldriverClassNameusernamepassworddbname,这些属性对于每个连接来说都是一样的,所以就适合用享元模式来处理,建一个工厂类,将上述类似属性作为内部数据,其它的作为外部数据,在方法调用时,当做参数传进来,这样就节省了空间,减少了实例的数量。

看个例子:

看下数据库连接池的代码:

public class ConnectionPool {  
    private Vector pool;  
      
    /*公有属性*/  
    private String url = "jdbc:mysql://localhost:3306/test";  
    private String username = "root";  
    private String password = "root";  
    private String driverClassName = "com.mysql.jdbc.Driver";  
  
    private int poolSize = 100;  
    private static ConnectionPool instance = null;  
    Connection conn = null;  
  
    /*构造方法,做一些初始化工作*/  
    private ConnectionPool() {  
        pool = new Vector(poolSize);  
  
        for (int i = 0; i < poolSize; i++) {  
            try {  
                Class.forName(driverClassName);  
                conn = DriverManager.getConnection(url, username, password);  
                pool.add(conn);  
            } catch (ClassNotFoundException e) {  
                e.printStackTrace();  
            } catch (SQLException e) {  
                e.printStackTrace();  
            }  
        }  
    }  
  
    /* 返回连接到连接池 */  
    public synchronized void release(Connection conn) {  
        pool.add(conn);  
    }  
  
    /* 返回连接池中的一个数据库连接 */  
    public synchronized Connection getConnection() {  
        if (pool.size() > 0) {  
            Connection conn = pool.get(0);  
            pool.remove(conn);  
            return conn;  
        } else {  
            return null;  
        }  
    }  
}

通过连接池的管理,实现了数据库连接的共享,不需要每一次都重新创建连接,节省了数据库重新创建的开销,提升了系统的性能!


 C、关系模式(11种)

先来张图,看看这11中模式的关系:

第一类:通过父类与子类的关系进行实现。

第二类:两个类之间。

第三类:类的状态。

第四类:通过中间类


父类与子类关系

13、策略模式(strategy

策略模式定义了一系列算法,并将每个算法封装起来,使他们可以相互替换,且算法的变化不会影响到使用算法的客户。需要设计一个接口,为一系列实现类提供统一的方法,多个实现类实现该接口,设计一个抽象类(可有可无,属于辅助类),提供辅助函数,关系图如下:

图中ICalculator提供同意的方法,

AbstractCalculator是辅助类,提供辅助方法,接下来,依次实现下每个类:

首先统一接口:

public interface ICalculator {  
    public int calculate(String exp);  
}

辅助类:

public abstract class AbstractCalculator {  
      
    public int[] split(String exp,String opt){  
        String array[] = exp.split(opt);  
        int arrayInt[] = new int[2];  
        arrayInt[0] = Integer.parseInt(array[0]);  
        arrayInt[1] = Integer.parseInt(array[1]);  
        return arrayInt;  
    }  
}

三个实现类:

public class Plus extends AbstractCalculator implements ICalculator {  
  
    @Override  
    public int calculate(String exp) {  
        int arrayInt[] = split(exp,"\\+");  
        return arrayInt[0]+arrayInt[1];  
    }  
}
public class Minus extends AbstractCalculator implements ICalculator {  
  
    @Override  
    public int calculate(String exp) {  
        int arrayInt[] = split(exp,"-");  
        return arrayInt[0]-arrayInt[1];  
    }  
  
}
public class Multiply extends AbstractCalculator implements ICalculator {  
  
    @Override  
    public int calculate(String exp) {  
        int arrayInt[] = split(exp,"\\*");  
        return arrayInt[0]*arrayInt[1];  
    }  
}

简单的测试类:

public class StrategyTest {  
  
    public static void main(String[] args) {  
        String exp = "2+8";  
        ICalculator cal = new Plus();  
        int result = cal.calculate(exp);  
        System.out.println(result);  
    }  
}

输出:10

策略模式的决定权在用户,系统本身提供不同算法的实现,新增或者删除算法,对各种算法做封装。因此,策略模式多用在算法决策系统中,外部用户只需要决定用哪个算法即可。


14、模板方法模式(Template Method

解释一下模板方法模式,就是指:一个抽象类中,有一个主方法,再定义1...n个方法,可以是抽象的,也可以是实际的方法,定义一个类,继承该抽象类,重写抽象方法,通过调用抽象类,实现对子类的调用,先看个关系图:

就是在AbstractCalculator类中定义一个主方法calculatecalculate()调用spilt()等,PlusMinus分别继承AbstractCalculator类,通过对AbstractCalculator的调用实现对子类的调用,看下面的例子:

public abstract class AbstractCalculator {  
      
    /*主方法,实现对本类其它方法的调用*/  
    public final int calculate(String exp,String opt){  
        int array[] = split(exp,opt);  
        return calculate(array[0],array[1]);  
    }  
      
    /*被子类重写的方法*/  
    abstract public int calculate(int num1,int num2);  
      
    public int[] split(String exp,String opt){  
        String array[] = exp.split(opt);  
        int arrayInt[] = new int[2];  
        arrayInt[0] = Integer.parseInt(array[0]);  
        arrayInt[1] = Integer.parseInt(array[1]);  
        return arrayInt;  
    }  
}
public class Plus extends AbstractCalculator {  
  
    @Override  
    public int calculate(int num1,int num2) {  
        return num1 + num2;  
    }  
}

测试类:

public class StrategyTest {  
  
    public static void main(String[] args) {  
        String exp = "8+8";  
        AbstractCalculator cal = new Plus();  
        int result = cal.calculate(exp, "\\+");  
        System.out.println(result);  
    }  
}

我跟踪下这个小程序的执行过程:首先将exp"\\+"做参数,调用AbstractCalculator类里的calculate(String,String)方法,在calculate(String,String)里调用同类的split(),之后再调用calculate(int  ,int)方法,从这个方法进入到子类中,执行完return num1 + num2后,将值返回到AbstractCalculator类,赋给result,打印出来。正好验证了我们开头的思路。


类之间的关系

15、观察者模式(Observer

包括这个模式在内的接下来的四个模式,都是类和类之间的关系,不涉及到继承,学的时候应该  记得归纳,记得本文最开始的那个图。观察者模式很好理解,类似于邮件订阅和RSS订阅,当我们浏览一些博客或wiki时,经常会看到RSS图标,就这的意思是,当你订阅了该文章,如果后续有更新,会及时通知你。其实,简单来讲就一句话:当一个对象变化时,其它依赖该对象的对象都会收到通知,并且随着变化!对象之间是一种一对多的关系。先来看看关系图:

我解释下这些类的作用:MySubject类就是我们的主对象,Observer1Observer2是依赖于MySubject的对象,当MySubject变化时,Observer1Observer2必然变化。AbstractSubject类中定义着需要监控的对象列表,可以对其进行修改:增加或删除被监控对象,且当MySubject变化时,负责通知在列表内存在的对象。我们看实现代码:

一个Observer接口:

public interface Observer {  
    public void update();  
}

两个实现类:

public class Observer1 implements Observer {  
  
    @Override  
    public void update() {  
        System.out.println("observer1 has received!");  
    }  
}
public class Observer2 implements Observer {  
  
    @Override  
    public void update() {  
        System.out.println("observer2 has received!");  
    }  
  
}

Subject接口及实现类:

public interface Subject {  
      
    /*增加观察者*/  
    public void add(Observer observer);  
      
    /*删除观察者*/  
    public void del(Observer observer);  
      
    /*通知所有的观察者*/  
    public void notifyObservers();  
      
    /*自身的操作*/  
    public void operation();  
}
public abstract class AbstractSubject implements Subject {  
  
    private Vector vector = new Vector();  
    @Override  
    public void add(Observer observer) {  
        vector.add(observer);  
    }  
  
    @Override  
    public void del(Observer observer) {  
        vector.remove(observer);  
    }  
  
    @Override  
    public void notifyObservers() {  
        Enumeration enumo = vector.elements();  
        while(enumo.hasMoreElements()){  
            enumo.nextElement().update();  
        }  
    }  
}
public class MySubject extends AbstractSubject {  
  
    @Override  
    public void operation() {  
        System.out.println("update self!");  
        notifyObservers();  
    }  
  
}

测试类:

public class ObserverTest {  
  
    public static void main(String[] args) {  
        Subject sub = new MySubject();  
        sub.add(new Observer1());  
        sub.add(new Observer2());  
          
        sub.operation();  
    }  
  
}

输出:

update self!

observer1 has received!

observer2 has received!

 这些东西,其实不难,只是有些抽象,不太容易整体理解,建议读者:根据关系图,新建项目,自己写代码(或者参考我的代码),按照总体思路走一遍,这样才能体会它的思想,理解起来容易!


16、迭代子模式(Iterator

顾名思义,迭代器模式就是顺序访问聚集中的对象,一般来说,集合中非常常见,如果对集合类比较熟悉的话,理解本模式会十分轻松。这句话包含两层意思:一是需要遍历的对象,即聚集对象,二是迭代器对象,用于对聚集对象进行遍历访问。我们看下关系图:


这个思路和我们常用的一模一样,MyCollection中定义了集合的一些操作,MyIterator中定义了一系列迭代操作,且持有Collection实例,我们来看看实现代码:

两个接口:

public interface Collection {  
      
    public Iterator iterator();  
      
    /*取得集合元素*/  
    public Object get(int i);  
      
    /*取得集合大小*/  
    public int size();  
}
public interface Iterator {  
    //前移  
    public Object previous();  
      
    //后移  
    public Object next();  
    public boolean hasNext();  
      
    //取得第一个元素  
    public Object first();  
}

两个实现:

public class MyCollection implements Collection {  
  
    public String string[] = {"A","B","C","D","E"};  
    @Override  
    public Iterator iterator() {  
        return new MyIterator(this);  
    }  
  
    @Override  
    public Object get(int i) {  
        return string[i];  
    }  
  
    @Override  
    public int size() {  
        return string.length;  
    }  
}
public class MyIterator implements Iterator {  
  
    private Collection collection;  
    private int pos = -1;  
      
    public MyIterator(Collection collection){  
        this.collection = collection;  
    }  
      
    @Override  
    public Object previous() {  
        if(pos > 0){  
            pos--;  
        }  
        return collection.get(pos);  
    }  
  
    @Override  
    public Object next() {  
        if(pos<collection.size()-1){  
            pos++;  
        }  
        return collection.get(pos);  
    }  
  
    @Override  
    public boolean hasNext() {  
        if(pos<collection.size()-1){  
            return true;  
        }else{  
            return false;  
        }  
    }  
  
    @Override  
    public Object first() {  
        pos = 0;  
        return collection.get(pos);  
    }  
  
}

测试类:

public class Test {  
  
    public static void main(String[] args) {  
        Collection collection = new MyCollection();  
        Iterator it = collection.iterator();  
          
        while(it.hasNext()){  
            System.out.println(it.next());  
        }  
    }  
}

输出:A B C D  E

此处我们貌似模拟了一个集合类的过程,感觉是不是很爽?其实JDK中各个类也都是这些基本的东西,加一些设计模式,再加一些优化放到一起的,只要我们把这些东西学会了,掌握好了,我们也可以写出自己的集合类,甚至框架!


17、责任链模式(Chain of Responsibility

接下来我们将要谈谈责任链模式,有多个对象,每个对象持有对下一个对象的引用,这样就会形成一条链,请求在这条链上传递,直到某一对象决定处理该请求。但是发出者并不清楚到底最终那个对象会处理该请求,所以,责任链模式可以实现,在隐瞒客户端的情况下,对系统进行动态的调整。先看看关系图:


Abstracthandler类提供了getset方法,方便MyHandle类设置和修改引用对象,MyHandle类是核心,实例化后生成一系列相互持有的对象,构成一条链。

public interface Handler {  
    public void operator();  
}
public abstract class AbstractHandler {  
      
    private Handler handler;  
  
    public Handler getHandler() {  
        return handler;  
    }  
  
    public void setHandler(Handler handler) {  
        this.handler = handler;  
    }  
      
}
public class MyHandler extends AbstractHandler implements Handler {  
  
    private String name;  
  
    public MyHandler(String name) {  
        this.name = name;  
    }  
  
    @Override  
    public void operator() {  
        System.out.println(name+"deal!");  
        if(getHandler()!=null){  
            getHandler().operator();  
        }  
    }  
}
public class Test {  
  
    public static void main(String[] args) {  
        MyHandler h1 = new MyHandler("h1");  
        MyHandler h2 = new MyHandler("h2");  
        MyHandler h3 = new MyHandler("h3");  
  
        h1.setHandler(h2);  
        h2.setHandler(h3);  
  
        h1.operator();  
    }  
}

输出:

h1deal!

h2deal!

h3deal!

此处强调一点就是,链接上的请求可以是一条链,可以是一个树,还可以是一个环,模式本身不约束这个,需要我们自己去实现,同时,在一个时刻,命令只允许由一个对象传给另一个对象,而不允许传给多个对象。


 18、命令模式(Command

命令模式很好理解,举个例子,司令员下令让士兵去干件事情,从整个事情的角度来考虑,司令员的作用是,发出口令,口令经过传递,传到了士兵耳朵里,士兵去执行。这个过程好在,三者相互解耦,任何一方都不用去依赖其他人,只需要做好自己的事儿就行,司令员要的是结果,不会去关注到底士兵是怎么实现的。我们看看关系图:

Invoker是调用者(司令员),Receiver是被调用者(士兵),MyCommand是命令,实现了Command接口,持有接收对象,看实现代码:

public interface Command {  
    public void exe();  
}
public class MyCommand implements Command {  
  
    private Receiver receiver;  
      
    public MyCommand(Receiver receiver) {  
        this.receiver = receiver;  
    }  
  
    @Override  
    public void exe() {  
        receiver.action();  
    }  
}
public class Receiver {  
    public void action(){  
        System.out.println("command received!");  
    }  
}
public class Invoker {  
      
    private Command command;  
      
    public Invoker(Command command) {  
        this.command = command;  
    }  
  
    public void action(){  
        command.exe();  
    }  
}
public class Test {  
  
    public static void main(String[] args) {  
        Receiver receiver = new Receiver();  
        Command cmd = new MyCommand(receiver);  
        Invoker invoker = new Invoker(cmd);  
        invoker.action();  
    }  
}

输出:command  received!

这个很哈理解,命令模式的目的就是达到命令的发出者和执行者之间解耦,实现请求和执行分开,熟悉Struts的同学应该知道,Struts其实就是一种将请求和呈现分离的技术,其中必然涉及命令模式的思想!

其实每个设计模式都是很重要的一种思想,看上去很熟,其实是因为我们在学到的东西中都有涉及,尽管有时我们并不知道,其实在Java本身的设计之中处处都有体现,像AWTJDBC、集合类、IO管道或者是Web框架,里面设计模式无处不在。因为我们篇幅有限,很难讲每一个设计模式都讲的很详细,不过我会尽我所能,尽量在有限的空间和篇幅内,把意思写清楚了,更好让大家明白。本章不出意外的话,应该是设计模式最后一讲了,首先还是上一下上篇开头的那个图:

本章讲讲第三类和第四类。

类的状态

19、备忘录模式(Memento

主要目的是保存一个对象的某个状态,以便在适当的时候恢复对象,个人觉得叫备份模式更形象些,通俗的讲下:假设有原始类AA中有各种属性,A可以决定需要备份的属性,备忘录类B是用来存储A的一些内部状态,类C呢,就是一个用来存储备忘录的,且只能存储,不能修改等操作。做个图来分析一下:

Original类是原始类,里面有需要保存的属性value及创建一个备忘录类,用来保存value值。Memento类是备忘录类,Storage类是存储备忘录的类,持有Memento类的实例,该模式很好理解。直接看源码:

public class Original {  
      
    private String value;  
      
    public String getValue() {  
        return value;  
    }  
  
    public void setValue(String value) {  
        this.value = value;  
    }  
  
    public Original(String value) {  
        this.value = value;  
    }  
  
    public Memento createMemento(){  
        return new Memento(value);  
    }  
      
    public void restoreMemento(Memento memento){  
        this.value = memento.getValue();  
    }  
}
public class Memento {  
      
    private String value;  
  
    public Memento(String value) {  
        this.value = value;  
    }  
  
    public String getValue() {  
        return value;  
    }  
  
    public void setValue(String value) {  
        this.value = value;  
    }  
}
public class Storage {  
      
    private Memento memento;  
      
    public Storage(Memento memento) {  
        this.memento = memento;  
    }  
  
    public Memento getMemento() {  
        return memento;  
    }  
  
    public void setMemento(Memento memento) {  
        this.memento = memento;  
    }  
}

测试类:

public class Test {  
  
    public static void main(String[] args) {  
          
        // 创建原始类  
        Original origi = new Original("egg");  
  
        // 创建备忘录  
        Storage storage = new Storage(origi.createMemento());  
  
        // 修改原始类的状态  
        System.out.println("初始化状态为:" + origi.getValue());  
        origi.setValue("niu");  
        System.out.println("修改后的状态为:" + origi.getValue());  
  
        // 回复原始类的状态  
        origi.restoreMemento(storage.getMemento());  
        System.out.println("恢复后的状态为:" + origi.getValue());  
    }  
}

输出:

初始化状态为:egg

修改后的状态为:niu

恢复后的状态为:egg

简单描述下:新建原始类时,value被初始化为egg,后经过修改,将value的值置为niu,最后倒数第二行进行恢复状态,结果成功恢复了。其实我觉得这个模式叫“备份-恢复”模式最形象。


20、状态模式(State

核心思想就是:当对象的状态改变时,同时改变其行为,很好理解!就拿QQ来说,有几种状态,在线、隐身、忙碌等,每个状态对应不同的操作,而且你的好友也能看到你的状态,所以,状态模式就两点:1、可以通过改变状态来获得不同的行为。2、你的好友能同时看到你的变化。看图:


State类是个状态类,Context类可以实现切换,我们来看看代码:

package com.xtfggef.dp.state;  
  
/** 
 * 状态类的核心类 
 * 2012-12-1 
 * @author erqing 
 * 
 */  
public class State {  
      
    private String value;  
      
    public String getValue() {  
        return value;  
    }  
  
    public void setValue(String value) {  
        this.value = value;  
    }  
  
    public void method1(){  
        System.out.println("execute the first opt!");  
    }  
      
    public void method2(){  
        System.out.println("execute the second opt!");  
    }  
}
package com.xtfggef.dp.state;  
  
/** 
 * 状态模式的切换类   2012-12-1 
 * @author erqing 
 *  
 */  
public class Context {  
  
    private State state;  
  
    public Context(State state) {  
        this.state = state;  
    }  
  
    public State getState() {  
        return state;  
    }  
  
    public void setState(State state) {  
        this.state = state;  
    }  
  
    public void method() {  
        if (state.getValue().equals("state1")) {  
            state.method1();  
        } else if (state.getValue().equals("state2")) {  
            state.method2();  
        }  
    }  
}

测试类:

public class Test {  
  
    public static void main(String[] args) {  
          
        State state = new State();  
        Context context = new Context(state);  
          
        //设置第一种状态  
        state.setValue("state1");  
        context.method();  
          
        //设置第二种状态  
        state.setValue("state2");  
        context.method();  
    }  
}

输出:

execute the first opt!

execute the second opt!

根据这个特性,状态模式在日常开发中用的挺多的,尤其是做网站的时候,我们有时希望根据对象的某一属性,区别开他们的一些功能,比如说简单的权限控制等。


 通过中间类

21、访问者模式(Visitor


访问者模式把数据结构和作用于结构上的操作解耦合,使得操作集合可相对自由地演化。访问者模式适用于数据结构相对稳定算法又易变化的系统。因为访问者模式使得算法操作增加变得容易。若系统数据结构对象易于变化,经常有新的数据对象增加进来,则不适合使用访问者模式。访问者模式的优点是增加操作很容易,因为增加操作意味着增加新的访问者。访问者模式将有关行为集中到一个访问者对象中,其改变不影响系统数据结构。其缺点就是增加新的数据结构很困难。—— From 百科

简单来说,访问者模式就是一种分离对象数据结构与行为的方法,通过这种分离,可达到为一个被访问者动态添加新的操作而无需做其它的修改的效果。简单关系图:

来看看原码:一个Visitor类,存放要访问的对象,

public interface Visitor {  
    public void visit(Subject sub);  
}
public class MyVisitor implements Visitor {  
  
    @Override  
    public void visit(Subject sub) {  
        System.out.println("visit the subject:"+sub.getSubject());  
    }  
}

Subject类,accept方法,接受将要访问它的对象,getSubject()获取将要被访问的属性,

public interface Subject {  
    public void accept(Visitor visitor);  
    public String getSubject();  
}
public class MySubject implements Subject {  
  
    @Override  
    public void accept(Visitor visitor) {  
        visitor.visit(this);  
    }  
  
    @Override  
    public String getSubject() {  
        return "love";  
    }  
}

测试:

public class Test {  
  
    public static void main(String[] args) {  
          
        Visitor visitor = new MyVisitor();  
        Subject sub = new MySubject();  
        sub.accept(visitor);      
    }  
}

输出:visit the subjectlove


该模式适用场景:如果我们想为一个现有的类增加新功能,不得不考虑几个事情:1、新功能会不会与现有功能出现兼容性问题?2、以后会不会再需要添加?3、如果类不允许修改代码怎么办?面对这些问题,最好的解决方法就是使用访问者模式,访问者模式适用于数据结构相对稳定的系统,把数据结构和算法解耦,


22、中介者模式(Mediator


中介者模式也是用来降低类类之间的耦合的,因为如果类类之间有依赖关系的话,不利于功能的拓展和维护,因为只要修改一个对象,其它关联的对象都得进行修改。如果使用中介者模式,只需关心和Mediator类的关系,具体类类之间的关系及调度交给Mediator就行,这有点像spring容器的作用。先看看图:

User类统一接口,User1User2分别是不同的对象,二者之间有关联,如果不采用中介者模式,则需要二者相互持有引用,这样二者的耦合度很高,为了解耦,引入了Mediator类,提供统一接口,MyMediator为其实现类,里面持有User1User2的实例,用来实现对User1User2的控制。这样User1User2两个对象相互独立,他们只需要保持好和Mediator之间的关系就行,剩下的全由MyMediator类来维护!基本实现:

public interface Mediator {  
    public void createMediator();  
    public void workAll();  
}
public class MyMediator implements Mediator {  
  
    private User user1;  
    private User user2;  
      
    public User getUser1() {  
        return user1;  
    }  
  
    public User getUser2() {  
        return user2;  
    }  
  
    @Override  
    public void createMediator() {  
        user1 = new User1(this);  
        user2 = new User2(this);  
    }  
  
    @Override  
    public void workAll() {  
        user1.work();  
        user2.work();  
    }  
}
public abstract class User {  
      
    private Mediator mediator;  
      
    public Mediator getMediator(){  
        return mediator;  
    }  
      
    public User(Mediator mediator) {  
        this.mediator = mediator;  
    }  
  
    public abstract void work();  
}
public class User1 extends User {  
  
    public User1(Mediator mediator){  
        super(mediator);  
    }  
      
    @Override  
    public void work() {  
        System.out.println("user1 exe!");  
    }  
}
public class User2 extends User {  
  
    public User2(Mediator mediator){  
        super(mediator);  
    }  
      
    @Override  
    public void work() {  
        System.out.println("user2 exe!");  
    }  
}

测试类:

public class Test {  
  
    public static void main(String[] args) {  
        Mediator mediator = new MyMediator();  
        mediator.createMediator();  
        mediator.workAll();  
    }  
}

输出:

user1 exe!

user2 exe!


23、解释器模式(Interpreter

解释器模式是我们暂时的最后一讲,一般主要应用在OOP开发中的编译器的开发中,所以适用面比较窄。


Context类是一个上下文环境类,PlusMinus分别是用来计算的实现,代码如下:

public interface Expression {  
    public int interpret(Context context);  
}
public class Plus implements Expression {  
  
    @Override  
    public int interpret(Context context) {  
        return context.getNum1()+context.getNum2();  
    }  
}
public class Minus implements Expression {  
  
    @Override  
    public int interpret(Context context) {  
        return context.getNum1()-context.getNum2();  
    }  
}
public class Context {  
      
    private int num1;  
    private int num2;  
      
    public Context(int num1, int num2) {  
        this.num1 = num1;  
        this.num2 = num2;  
    }  
      
    public int getNum1() {  
        return num1;  
    }  
    public void setNum1(int num1) {  
        this.num1 = num1;  
    }  
    public int getNum2() {  
        return num2;  
    }  
    public void setNum2(int num2) {  
        this.num2 = num2;  
    } 
}
public class Test {  
  
    public static void main(String[] args) {  
  
        // 计算9+2-8的值  
        int result = new Minus().interpret((new Context(new Plus()  
                .interpret(new Context(9, 2)), 8)));  
        System.out.println(result);  
    }  
}

最后输出正确的结果:3

基本就这样,解释器模式用来做各种各样的解释器,如正则表达式等的解释器等等!


来自 <https://www.cnblogs.com/geek6/p/3951677.html>

里氏代换原则原文

Data Abstraction and Hierarchy

    * This research was supported by the NEC Professorship of Software Science and Engineering.

Barbara Liskov

Affiliation: MIT Laboratory for Computer Science

Cambridge, MA  , 02139


ABSTRACT

Data abstraction is a valuable method for organizing programs to make them easier to modify and maintain.  Inheritance allows one implementation of a data abstraction to be related to another hierarchically. This paper investigates the usefulness of hierarchy in program development, and concludes that although data abstraction is the more important idea, hierarchy does extend its usefulness in some situations.

1.Introduction

An important goal in design is to identify a program structure that simplifies both program maintenance and program modifications made to support changing requirements. Data abstractions are a good way of achieving this goal. They allow us to abstract from the way data structures are implemented to the behavior they provide that other programs can rely on. They permit the representation of data to be changed locally without affecting programs that use the data.  They are particularly important because they hide complicated things (data structures) that are likely to change in the future. They also simplify the structure of programs that use them because they present a higher level interface.  For example, they reduce the number of arguments to procedures because abstract objects are communicated instead of their representations.

Object-oriented programming is primarily a data abstraction technique, and much of its power derives from this.  However, it elaborates this technique with the notion of "inheritance."

Inheritance can be used in a number of ways, some of which enhance the power of data abstraction. In these cases, inheritance provides a useful addition to data abstraction.

This paper discusses the relationship between data abstraction and object-oriented programming. We begin in Section 2 by defining data abstraction and its role in the program development process. Then in Section 3 we discuss inheritance and identify two ways that it is used, for implementation hierarchy and for type hierarchy. Of the two methods, type hierarchy really adds something to data abstraction, so in Section 4 we discuss uses of type hierarchy in program design and development. Next we discuss some issues that arise in implementing type hierarchy. We conclude with a summary of our results.

2.Data Abstraction

The purpose of abstraction in programming is to separate behavior from implementation.  The first programming abstraction mechanism was the procedure. A procedure performs some task or function; other parts of the program call the procedure to accomplish the task. To use the procedure, a programmer cares only about what it does and not how it is implemented. Any implementation that provides the needed function will do, provided it implements the function correctly and is efficient enough.

Procedures are a useful abstraction mechanism, but in the early seventies some researchers realized that they were not enough [15], [16], [7] and proposed a new way of organizing programs around the "connections" between modules. The concept of data abstraction or abstract data type arose from these ideas [5], [12].

Data abstractions provide the same benefits as procedures, but for data. Recall that the main idea is to separate what an abstraction is from how it is implemented so that implementations of the same abstraction can be substituted freely.  The implementation of a data object is concerned with how that object is represented in the memory of a computer; this information is called the representation, or rep for short.  To allow changing implementations without affecting users, we need a way of changing the representation without having to change all using programs.  This is achieved by encapsulating the rep with a set of operations that manipulate it and by restricting using programs so that they cannot manipulate the rep directly, but instead must call the operations. Then, to implement or reimplement the data abstraction, it is necessary to define the rep and implement the operations in terms of it, but using code is not affected by a change.

Thus a data abstraction is a set of objects that can be manipulated directly only by a set of operations. An example of a data abstraction is the integers: the objects are 1, 2, 3, and so on and there are operations to add two integers, to test them for equality, and so on. Programs using integers manipulate them by their operations, and are shielded from implementation details such as whether the representation is 2's complement.  Another example is character strings, with objects such as "a" and "xyz", and operations to select characters from strings and to concatenate strings. A final example is sets of integers, with objects such as { } (the empty set) and {3, 7}, and operations to insert an element in a set, and to test whether an integer is in a set. Note that integers and strings are built-in data types in most programming languages, while sets and other application-oriented data abstractions such as stacks and symbol tables are not. Linguistic mechanisms that permit user-defined abstract data types to be implemented are discussed in Section 2.2.

A data or procedure abstraction is defined by a specification and implemented by a program module coded in some programming language.  The specification describes what the abstraction does, but omits any information about how it is implemented.  By omitting such detail, we permit many different implementations An implementation is correct if it provides the behavior defined by the specification. Correctness can be proved mathematically if the specification is written in a language with precise semantics; otherwise we establish correctness by informal reasoning or by the somewhat unsatisfactory technique of testing.  Correct implementations differ from one another in how they work, i.e., what algorithms they use, and therefore they may have different performance. Any correct implementation is acceptable to the caller provided it meets the caller's performance requirements.  Note that correct implementations need not be identical to one another; the whole point is to allow implementations to differ, while ensuring that they remain the same where this is important. The specification describes what is important.

For abstraction to work, implementations must be encapsulated. If an implementation is encapsulated, then no other module can depend on its implementation details. Encapsulation guarantees that modules can be implemented and reimplemented independently; it is related to the principle of "information hiding" advocated by Parnas [15].

2.1.  Locality

Abstraction when supported by specifications and encapsulation provides locality within a program. Locality allows a program to be implemented, understood, or modified one module at a time:

1.The implementer of an abstraction knows what is needed because this is described in the specification. Therefore, he or she need not interact with programmers of other modules (or at least the interactions can be very limited).

2.Similarly, the implementer of a using module knows what to expect from an abstraction, namely the behavior described by the specification.

3.Only local reasoning is needed to determine what a program does and whether it does the right thing. The program is studied one module at a time.  In each case we are concerned with whether the module does what it is supposed to do, that is, does it meet its specification. However, we can limit our attention to just that module and ignore both modules that use it, and modules that it uses.  Using modules can be ignored because they depend only on the specification of this module, not on its code. Used modules are ignored by reasoning about what they do using their specifications instead of their code. There is a tremendous saving of effort in this way because specifications are much smaller than implementations.  For example, if we had to look at the code of a called abstraction, we would be concerned not only with its code, but also with the code of any modules it uses, and so on.

4.Finally, program modification can be done module by module. If a particular abstraction needs to be reimplemented to provide better performance or correct an error or provide extended facilities, the old implementing module can be replaced by a new one without affecting other modules.

Locality provides a firm basis for fast prototyping.  Typically there is a tradeoff between the performance of an algorithm and the speed with which it is designed and implemented.  The initial implementation can be a simple one that performs poorly.  Later it can be replaced by another implementation with better performance.  Provided both implementations are correct, the calling program's correctness will be unaffected by the change.

Locality also supports program evolution.  Abstractions can be used to encapsulate potential modifications.  For example, suppose we want a program to run on different machines.  We can accomplish this by inventing abstractions that hide the differences between machines so that to move the program to a different machine only those abstractions need be reimplemented. A good move the program to a different machine only those abstractions need be reimplemented. A good design principle is to think about expected modifications and organize the design by using abstractions that encapsulate the changes.

The benefits of locality are particularly important for data abstractions.  Data structures are often complicated and therefore the simpler abstract view provided by the specification allows the rest of the program to be simpler. Also, changes to storage structures are likely as programs evolve; the effects of such changes can be minimized by encapsulating them inside data abstractions.

2.2.  Linguistic Support for Data Abstraction

Data abstractions are supported by linguistic mechanisms in several languages.  The earliest such language was Simula 67 [3]. Two major variations, those in CLU and Smalltalk, are discussed below.

CLU [8][11] provides a mechanism called a cluster for implementing an abstract type. A template for a cluster is shown in Figure 2-1. The header identifies the data type being implemented and also lists the operations of the type; it serves to identify what procedure definitions inside the cluster can be called from the outside. The "rep = " line defines how objects of the type are represented; in the example, we are implementing sets as linked lists.  The rest of the cluster consists of procedures; there must be a procedure for each operation, and in addition, there may be some procedures that can be used only inside the cluster.

int_set = cluster is create, insert, is_in, size,...

    rep = int_list      create = proc ... end create      insert = proc ... end insert      ... end int_set

Figure 2-1: Template of a CLU Cluster.

In Smalltalk [4], data abstractions are implemented by classes. Classes can be arranged hierarchically, but we ignore this for now. A class implements a data abstraction similarly to a cluster. Instead of the "rep =" line, the rep is described by a sequence of variable declarations; these are the instance variables.     * We ignore the class variables here since they are not important for the distinctions

we are trying to make. CLU has an analogous mechanism; a cluster can have some "own" variables [9].  The

remainder of the class consists of methods, which are procedure definitions. There is a method for each operation of the data type implemented by the class.  (There cannot be any internal methods in Smalltalk classes because it is not possible to preclude outside use of a method.) Methods are called by "sending messages," which has the same effect as calling operations in CLU.

Both CLU and Smalltalk enforce encapsulation but CLU uses compile-time type checking, while Smalltalk uses runtime checking. Compile-time checking is better because it allows a class of errors to be caught before the program runs, and it permits more efficient code to be generated by a compiler. (Compile-time checking can limit expressive power unless the programming language has a powerful type system; this issue is discussed further in Section 5.) Other object- oriented languages, e.g., [1], [13], do not enforce encapsulation at all.  It is true that in the absence of language support encapsulation can be guaranteed by manual procedures such as code reading, but these techniques are error-prone, and although the situation may be somewhat manageable for a newly-implemented program, it will degrade rapidly as modifications are made. Automatic checking, at either runtime or compile-time, can be relied on with confidence and without the need to read any code at all.

Another difference between CLU and Smalltalk is found in the semantics of data objects. In Smalltalk, the operations are part of the object and can access the instance variables that make up the object's rep since these variables are part of the object too.  In CLU, operations do not belong to the object but instead belong to a type. This gives them special privileges with respect to their type's objects that no other parts of the program have, namely, they can see the reps of these objects.  (This view was first described by Morris [14].) The CLU view works better for operations that manipulate several objects of the type simultaneously because an operation can see the reps of several objects at once.  Examples of such operations are adding two integers or forming the union of two sets. The Smalltalk view does not support such operations as well, since an operation can be inside of only one object. On the other hand, the Smalltalk view works better when we want to have several implementations of the same type running within the same program. In CLU an operation can see the rep of any object of its type, and therefore must be coded to cope with multiple representations explicitly.  Smalltalk avoids this problem since an operation can see the rep of only one object.

3.Inheritance and Hierarchy

This section discusses inheritance and how it supports hierarchy. We begin by talking about what it means to construct a program using inheritance.  Then we discuss two major uses of inheritance, implementation hierarchy and type hierarchy; see [18] for a similar discussion.  Only one of these, type hierarchy, adds something new to data abstraction.

3.1.  Inheritance

In a language with inheritance, a data abstraction can be implemented in several pieces that are related to one another. Although various languages provide different mechanisms for putting the pieces together, they are all similar.  Thus we can illustrate them by examining a single mechanism, the subclass mechanism in Smalltalk.

In Smalltalk a class can be declared to be a subclass of another class     * We ignore multiple inheritance to simplify the discussion.

mechanism is what code results from such a definition. This question is important for understanding what a subclass does. For example, if we were to reason about its correctness, we would need to look at this code.

From the point of view of the resulting code, saying that one class is a subclass of another is simply a shorthand notation for building programs. The exact program that is constructed depends on the rules of the language, e.g., such things as when methods of the subclass override methods of the superclass. The exact details of these rules are not important for our discussion (although they clearly are important if the language is to be sensible and useful).  The point is that the result is equivalent to directly implementing a class containing the instance variables and methods that result from applying the rules.

For example, suppose class T has operations o1 and o2 and instance variable v1 and class S, which is declared to be a subclass of T, has operations o1 and o3 and instance variable v2.  Then the result in Smalltalk is effectively a class with two instance variables, v1 and v2, and three operations, o1, o2, o3, where the code of o2 is supplied by T, and the code of the other two operations is supplied by S. It is this combined code that must be understood, or modified if S is reimplemented, unless S is restricted as discussed further below.

One problem with almost all inheritance mechanisms is that they compromise data abstraction to an extent. In languages with inheritance, a data abstraction implementation (i.e., a class) has two kinds of users. There are the "outsiders" who simply use the objects by calling the operations. But in addition there are the "insiders." These are the subclasses, which are typically permitted to violate encapsulation. There are three ways that encapsulation can be violated [18]: the subclass might access an instance variable of its superclass, call a private operation of its superclass, or refer directly to superclasses of its superclass. (This last violation is not possible in Smalltalk.)

When encapsulation is not violated, we can reason about operations of the superclass using their specifications and we can ignore the rep of the superclass. When encapsulation is violated, we lose the benefits of locality. We must consider the combined code of the sub- and superclass in reasoning about the subclass, and if the superclass needs to be reimplemented, we may need to reimplement its subclasses too.  For example, this would be necessary if an instance variable of the superclass changed, or if a subclass refers directly to a superclass of its superclass T and then T is reimplemented to no longer have this superclass.

Violating encapsulation can be useful in bringing up a prototype quickly since it allows code to be produced by extension and modification of existing code.  It is unrealistic, however, to expect that modifications to the implementation of the superclass can be propagated automatically to the subclass. Propagation is useful only if the resulting code works, which means that all expectations of the subclass about the superclass must be satisfied by the new implementation. These expectations can be captured by providing another specification for the superclass; this is a different specification from that for outsiders, since it contains additional constraints. Using this additional specification, a programmer can determine whether a proposed change to the superclass can usefully propagate to the subclass. Note that the more specific the additional specification is about details of the previous superclass implementation, the less likely that a new superclass implementation will meet it. Also, the situation will be unmanageable if each subclass relies on a different specification of the superclass. One possible approach is to define a single specification for use by all subclasses that contains more detail than the specification for outsiders but still abstracts from many implementation details. Some work in this direction is described in [17].

3.2.  Implementation Hierarchy

The first way that inheritance is used is simply as a technique for implementing data types that are similar to other existing types. For example, suppose we want to implement integer sets, with operations (among others) to tell whether an element is a member of the set and to determine the current size of the set. Suppose further that a list data type has already been implemented, and that it provides a member operation and a size operation, as well as a convenient way of representing the set.  Then we could implement set as a subclass of list; we might have the list hold the set elements without duplication, i.e., if an element were added to the set twice, it would be appear in the list only once. Then we would not need to provide implementations for member and size, but we would need to implement other operations such as one that inserts a new element into the set. Also, we should suppress certain other operations, such as car, to make them unavailable since they are not meaningful for sets.  (This can be done in Smalltalk by providing implementations in the subclass for the suppressed operations; such an implementation would signal an exception if called.)

Another way of doing the same thing is to use one (abstract) type as the rep of another. For example, we might implement sets by using list as the rep. In this case, we would need to implement the size and member operations; each of these would simply call the corresponding operation on lists. Writing down implementations for these two operations, even though the code is very simple, is more work than not writing anything for them.  On the other hand, we need not do anything to take away undesirable operations such as car.

Since implementation hierarchy does not allow us to do anything that we could not already do with data abstraction, we will not consider it further. It does permit us to violate encapsulation, with both the benefits and problems that ensue. However, this ability could also exist in the rep approach if desired.

3.3.  Type Hierarchy

A type hierarchy is composed of subtypes and supertypes. The intuitive idea of a subtype is one whose objects provide all the behavior of objects of another type (the supertype) plus something extra. What is wanted here is something like the following substitution property [6]: If for each object o1 of type S there is an object o2 of type T such that for all programs P defined in terms of T, the behavior of P is unchanged when o1 is substituted for o2, then S is a subtype of T. (See also [2], [17] for other work in this area.)

We are using the words "subtype" and "supertype" here to emphasize that now we are talking about a semantic distinction.  By contrast, "subclass" and "superclass" are simply linguistic concepts in programming languages that allow programs to be built in a particular way. They can be used to implement subtypes, but also, as mentioned above, in other ways.

We begin with some examples of types that are not subtypes of one another. First, a set is not a subtype of a list nor is the reverse true. If the same element is added to a set twice, the result is the same as if it had been added only once and the element is counted only once in computing the size of the set. However, if the same element is added twice to a list, it occurs in the list twice.  Thus a

program expecting a list might not work if passed a set; similarly a program expecting a set might not work if passed a list.  Another example of non-subtypes are stacks and queues.  Stacks are LIFO; when an element is removed from a stack, the last item added (pushed) is removed. By contrast, queues are FIFO. A using program is likely to notice the difference between these two types.

The above examples ignored a simple difference between the pairs of types, namely related operations. A subtype must have all the operations     * It needs the instance methods but not the class

methods. of its supertype since otherwise the using program could not use an operation it depends on. However, simply having operations of the right names and signatures is not enough. (A operation's signature defines the numbers and types of its input and output arguments.) The operations must also do the same things. For example, stacks and queues might have operations of the same names, e.g., add_ el to push or enqueue and rem_el to pop or dequeue, but they still are not subtypes of one another because the meanings of the operations are different for them.

Now we give some examples of subtype hierarchies.  The first is indexed collections, which have operations to access elements by index; e.g., there would be a fetch operation to fetch the ith element of the collection.  All subtypes have these operations too, but, in addition, each would provide extra operations.  Examples of subtypes are arrays, sequences, and indexed sets; e.g., sequences can be concatenated, and arrays can be modified by storing new objects in the elements.

The second example is abstract devices, which unify a number of different kinds of input and output devices. Particular devices might provide extra operations. In this case, abstract device operations would be those that all devices support, e.g., the end-of-file test, while subtype operations would be device specific. For example, a printer would have modification operations such as put_char but not reading operations such as get_char.  Another possibility is that abstract devices would have all possible operations, e.g., both put_char and get_char, and thus all subtypes would have the same set of operations.  In this case, operations that not all real devices can do must be specified in a general way that allows exceptions to be signalled. For example, get_char would signal an exception when called on a printer.

An inheritance mechanism can be used to implement a subtype hierarchy. There would be a class to implement the supertype and another class to implement each subtype. The class implementing a subtype would declare the supertype's class as its superclass.

4.Benefits of Type Hierarchy

Data abstraction is a powerful tool in its own right. Type hierarchy is a useful adjunct to data abstraction.  This section discusses how subtypes can be used in the development of the design for a program.  (A detailed discussion of design based on data abstraction can be found in [11].) It also discusses their use in organizing a program library.

4.1.  Incremental Design

Data abstractions are usually developed incrementally as a design progresses. In early stages of a design, we only know some of a data abstraction's operations and a part of its behavior. Such a stage of design is depicted in Figure 4-1a.  The design is depicted by a graph that illustrates how a program is subdivided into modules.  There are two kinds of nodes; a node with a single bar on top represents a procedure abstraction, and a node with a double bar on top represents a data abstraction.  An arrow pointing from one node to another means that the abstraction of the first node will be implemented using the abstraction of the second node.  Thus the figure shows two procedures, P and Q, and one data abstraction, T. P will be implemented using Q (i.e., its code calls Q) and T (i.e., its code uses objects of type T). (Recursion is indicated by cycles in the graph. Thus if we expected the implementation of P to call P, there would be an arrow from P to P.)

This figure represents an early stage of design, in which the designer has thought about how to implement P and has invented Q and T. At this point, some operations of T have been identified, and the designer has decided that an object of type T will be used to communicate between P and Q.

The next stage of design is to investigate how to implement Q. (It would not make sense to look at T's implementation at this point, because we do not know all its operations yet.) In studying Q we are likely to define additional operations for T. This can be viewed as refining T to a subtype S as is shown in Figure 4-2. Here a double arrow points from a supertype to a subtype; double arrows can only connect data abstractions (and there can be no cycles involving only double arrows).


图片1.png

Figure 4-1: The Start of a Design.

图片2.png


The kind of refinement illustrated in the figures may happen several times; e.g., S in turn may have a subtype R and so on. Also, a single type may have several subtypes, representing the needs of different subparts of the program.

Keeping track of these distinctions as subtypes is better than treating the group of types as a single type, for several reasons.  First it can limit the effect of design errors.  For example, suppose further investigation indicates a problem with S's interface. When a problem of this sort occurs, it is necessary to look at every abstraction that uses the changed abstraction. For the figure, this means we must look at Q. However, provided T's interface is unaffected, we need not look at P. If S and T had been treated as one type, then P would have had to be examined too.

Another advantage of distinguishing the types is that it may help in organizing the design rationale. The design rationale describes the decisions made at particular points in the design, and discusses why they were made and what alternatives exist. By maintaining the hierarchy to represent the decisions as they are made over time, we can avoid confusion and be more precise. If an error is discovered later, we can identify precisely at what point in the design it occurred.

Finally, the distinction may help during implementation, for example, if S, but not T, needs to be reimplemented.  However, it may be that the hierarchy is not maintained in the implementation.

Frequently, the end of the design is just a single type, the last subtype invented, because implementing a single module is more convenient than having separate modules for the supertype and subtypes. Even so, however, the distinction remains useful after implementation, because the effects of specification changes can still be localized, even if implementation changes cannot. For example, a change to the specification of S but not T means that we need to reimplement Q but not P. However, if S and T are implemented as a single module, we must reimplement both of them, instead of just reimplementing S.

4.2.  Related Types

The second use of subtypes is for related types. The designer may recognize that a program will use several data abstractions that are similar but different.  The differences represent variants of the same general idea, where the subtypes may all have the same set of operations, or some of them may extend the supertype. An example is the generalized abstract device mentioned earlier.  To accommodate related types in design, the designer introduces the supertype at the time the whole set of types is conceived, and then introduces the subtypes as they are needed later in design.

Related types arise in two different ways. Sometimes the relationship is defined in advance, before any types are invented; this is the situation discussed above.  Alternatively, the relationship may not be recognized until several related types already exist. This happens because of the desire to define a module that works on each of the related types but depends on only some small common part of them.  For example, the module might be a sort routine that relies on its argument "collection" to allow it to fetch elements, and relies on the element type itself to provide a "<" operation.

When the relationship is defined in advance, hierarchy is a good way to describe it, and we probably do want to use inheritance as an implementation mechanism. This permits us to implement just once (in the supertype) whatever can be done in a subtype-independent way. The module for a subtype is concerned only with the specific behavior of that subtype, and is independent of modules implementing other subtypes.  Having separate modules for the super- and subtypes gives better modularity than using a single module to implement them all. Also, if a new subtype is added later, none of the existing code need be changed.

When the relationship is recognized after the types have been defined, hierarchy may not be the right way to organize the program. This issue is discussed in Section 5.1.

4.3.  Organizing a Type Library

There is one other way in which hierarchy is useful, and this is to aid in the organization of a type library.  It has long been recognized that programming is more effective if it can be done in a context that encourages the reuse of program modules implemented by others. However, for such a context to be usable, it must be possible to navigate it easily to determine whether the desired modules exists. Hierarchy is useful as a way of organizing a program library to make searching easier, especially when combined with the kind of browsing tools present, e.g., in the Smalltalk environment.

Hierarchy allows similar types to be grouped together.  Thus, if a user want a particular kind of "collection" abstraction, there is a good chance that the desired one, if it exists at all, can be found with the other collections. The hierarchy in use is a either a subtype hierarchy, or almost a subtype hierarchy a subtype differs from an extension of the supertype in a fairly minor way). The point is that types are grouped based on their behavior rather than how they are used to implement one another.

The search for collection types, or numeric types, or whatever, is aided by two things: The first is considering the entire library as growing from a single root or roots, and providing a browsing tool that allows the user to move around in the hierarchy.  The second is a wise choice of names for the major categories, so that a user can recognize that "collection" is the part of the hierarchy of interest.

Using hierarchy as a way of organizing a library is a good idea, but need not be coupled with a subclass mechanism in a programming language.  Instead, an interactive system that supports construction and browsing of the library could organize the library in this way.

5.Type Hierarchy and Inheritance

Not all uses of type hierarchy require language support. No support is needed for the program library; instead all that is needed is to use the notion of type hierarchy as an organizing principle. Support is also usually not needed for hierarchy introduced as a refinement technique. As mentioned earlier, the most likely outcome of this design technique is a single type at the end (the last subtype introduced), which is most conveniently implemented as a unit.  Therefore any language that supports data abstraction is adequate here, although inheritance can be useful for introducing additional operations discovered later.

Special language support may be needed for related types, however. This support is discussed in Section 5.1. Section 5.2 discusses the relationship of inheritance to multiple implementations of a type.

5.1.  Polymorphism

A polymorphic procedure or data abstraction is one that works for many different types. For example, consider a procedure that does sorting. In many languages, such a procedure would be implemented to work on an array of integers; later, if we needed to sort an array of strings, another procedure would be needed. This is unfortunate. The idea of sorting is independent of the particular type of element in the array, provided that it is possible to compare the elements to determine which ones are smaller than which other ones. We ought to be able to implement one sort procedure that works for all such types. Such a procedure would be polymorphic.

Whenever there are related types in a program there is likely to be polymorphism. This is certainly the case when the relationship is indicated by the need for a polymorphic module.  Even when the relationship is identified in advance, however, polymorphism is likely.  In such a case the supertype is often virtual: it has no objects of its own, but is simply a placeholder in the hierarchy for the family of related types. In this case, any module that uses the supertype is polymorphic. On the other hand, if the supertype has objects of its own, some modules might use just it and none of its subtypes.

Using hierarchy to support polymorphism means that a polymorphic module is conceived of as using a supertype, and every type that is intended to be used by that module is made a subtype of the supertype. When supertypes are introduced before subtypes, hierarchy is a good way to capture the relationships. The supertype is added to the type universe when it is invented, and subtypes are added below it later.

If the types exist before the relationship, hierarchy does not work as well. In this case, introducing the supertype complicates the type universe: a new type (the supertype) must be added, all types used by the polymorphic module must be made its subordinates, and classes implementing the subtypes must be changed to reflect the hierarchy (and recompiled in a system that does compilation). For example, we would have to add a new type, "sortable," to the universe and make every element type be a subtype of it.  Note that each such supertype must be considered whenever a new type is invented: each new type must be made a subtype of the supertype if there is any chance that we may want to use its objects in the polymorphic module.  Furthermore, the supertype may be useless as far as code sharing is concerned, since there may be nothing that can be implemented in it.

An alternative approach is to simply allow the polymorphic module to use any type that supplies the needed operations. In this case no attempt is made to relate the types. Instead, an object belonging to any of the related types can be passed as an argument to the polymorphic module. Thus we get the same effect, but without the need to complicate the type universe.  We will refer to this approach as the grouping approach.

The two approaches differ in what is required to reason about program correctness. In either case we require the argument objects to have operations with the right signature and behavior. Signature requirements can be checked by type-checking, which can happen at runtime or compile time. Runtime checking requires no special mechanism; objects are simply passed to the polymorphic module, and type errors will be found if a needed operation is not present. Compile-time checking requires an adequate type system.  If the hierarchy approach is used, then the language must combine compile-time type checking with inheritance; an example of such a language is discussed in [17]. If the grouping approach is used, then we need a way to express constraints on operations at compile-time. For example, both CLU and Ada [19] can do this. In CLU, the header of a sort procedure might be

    sort = proc [T: type] (a: array[T])

            where T has lt: proctype (T, T) returns (bool)

This header constrains parameter T to be a type with an operation named lt with the indicated signature; the specification of sort would explain that lt must be a "less than" test. An example of a

call of sort is

    sort [int] (x)

In compiling such a call, the compiler checks that the type of x is array[int] and furthermore that int has an operation named lt with the required signature. We could even define a more polymorphic sorting routine in CLU that would work for all collections that are "array-like," i.e., whose elements can be fetched and stored by index.

The behavior requirements must be checked by some form of program verification.  The required behavior must be part of the specification, and the specification goes in different places in the two methods. With hierarchy, the specification belongs to the supertype; with related types, it is part of the specification of the polymorphic module.  Behavior checking also happens at different times. With hierarchy, checking happens whenever a programmer makes a type a subtype of the supertype; with grouping, it happens whenever a programmer writes code that uses the polymorphic module.

Both grouping and hierarchy have limitations. More flexibility in the use of the polymorphic module is desirable. For example, if sort is called with an operation that does a "greater than" test, this will lead to a different sorting of the array, but that different sorting may be just what is wanted. In addition, there may be conflicts between the types intended for use in the polymorphic module:

1.Not all types provide the required operation.

2.Types use different names for the operation.

3.Some type uses the name of the required operation for some other operation; e.g., the name lt is used in type T to identify the "length" operation.

One way of achieving more generality is to simply pass the needed operations as procedure arguments, e.g., sort actually takes two arguments, the array, and the routine used to determine ordering.     * Of course, this solution would not work well in Smalltalk because procedures cannot conveniently be

defined as individual entities nor treated as objects. This method is general, but can be inconvenient.

Methods that avoid the inconvenience in conjunction with the grouping approach exist in Argus One way of achieving more generality is to simply pass the needed operations as procedure arguments, e.g., sort actually takes two arguments, the array, and the routine used to determine ordering. This method is general, but can be inconvenient. Methods that avoid the inconvenience in conjunction with the grouping approach exist in Argus [10] and Ada.

In summary, when related types are discovered early in design, hierarchy is a good way to express the relationship. Otherwise, either the grouping approach (with suitable language support) or procedures as arguments may be better.

5.2.  Multiple Implementations

It is often useful to have multiple implementations of the same type. For example, for some matrices we use a sparse representation and for others a nonsparse representation. Furthermore, it is sometimes desirable to use objects of the same type but different representations within the same program.

Object-oriented languages appear to allow users to simulate multiple implementations with inheritance. Each implementation would be a subclass of another class that implements the type. This latter class would probably be virtual; for example, there would be a virtual class implementing matrices, and subclasses implementing sparse and nonsparse matrices.

Using inheritance in this way allows us to have several implementations of the same type in use within the same program, but it interferes with type hierarchy. For example, suppose we invent a subtype of matrices called extended-matrices.  We would like to implement extended-matrices with a class that inherits from matrices rather than from a particular implementation of matrices, since this would allow us to combine it with either matrix implementation.  This is not possible, however.  Instead, the extended-matrix class must explicitly state in its program text that it is a subclass of sparse or nonsparse matrices.

The problem arises because inheritance is being used for two different things: to implement a type and to indicate that one type is a subtype of another. These uses should be kept separate. Then we could have what we really want: two types (matrix and extended-matrix), one a subtype of the other, each having several implementations, and the ability to combine the implementations of the subtype with those of the supertype in various ways.

6.Conclusions

Abstraction, and especially data abstraction, is an important technique for developing programs that are reasonably easy to maintain and to modify as requirements change. Data abstractions are particularly important because they hide complicated things (data structures) that are likely to change in the future. They permit the representation of data to be changed locally without affecting programs that use the data.

Inheritance is an implementation mechanism that allows one type to be related to another hierarchically.  It is used in two ways: to implement a type by derivation from the implementation of another type, and to define subtypes.  We argued that the first use is uninteresting because we can achieve the same result by using one type as the rep of the other. Subtypes, on the other hand, do add a new ability. Three uses for subtypes were identified. During incremental design they provide a way to limit the impact of design changes and to organize the design documentation. They also provide a way to group related types, especially in the case where the supertype is invented before any subtypes. When the relationship is discovered after several types have already been defined, other methods, such as grouping or procedure arguments, are probably better than hierarchy.  Finally, hierarchy is a convenient and sensible way of organizing a library of types. The hierarchy is either a subtype hierarchy, or almost one; the subtypes may not match our strict definition, but are similar to the supertype in some intuitive sense.

Inheritance can be used to implement a subtype hierarchy. It is needed primarily in the case of related types when the supertype is invented first, because here it is convenient to implement common features just once in the superclass, and then implement the extensions separately for each subtype.

We conclude that although data abstraction is more important, type hierarchy does extend its usefulness.  Furthermore, inheritance is sometimes needed to express type hierarchy and is therefore a useful mechanism to provide in a programming language.

Acknowledgments

Many people made comments and suggestions that improved the content of this paper.  The author gratefully acknowledges this help, and especially the efforts of Toby Bloom and Gary Leavens.


REFERENCES

1.Bobrow, D., et al. "CommonLoops: Merging Lisp and Object-Oriented Programming". Proc. of the ACM Conference on Object-Oriented Programming Systems, Languages and Applications, SIGPLAN Notices 21, 11 (November 1986).

2.Bruce, K., and Wegner, P. "An Algebraic Model of Subtypes in Object-Oriented Languages (Draft)". SIGPLAN Notices 21, 10 (October 1986).

3.Dahl, O.-J., and Hoare, C.A.R. Hierarchical Program Structures. In Structured Programming, Academic Press, 1972.

4.Goldberg, A., and Robson, D. Smalltalk-80: The Language and its Implementation. Addison-Wesley, Reading, Ma., 1983.

5.Hoare, C. A. R. "Proof of correctness of data representations". Acta Informatica 4 (1972), 271-281.

6.Leavens, G. Subtyping and Generic Invocation: Semantic and Language Design. Ph.D. Th., Massachusetts Institute of Technology, Department of Electrical Engineering and Computer Science, forthcoming.

7.Liskov, B. A Design Methodology for Reliable Software Systems. In Tutorial on Software Design Techniques, P. Freeman and A. Wasserman, Eds., IEEE, 1977. Also published in the Proc. of the Fall Joint Computer Conference, 1972.

8.Liskov, B., Snyder, A., Atkinson, R. R., and Schaffert, J. C. "Abstraction mechanisms in CLU". Comm. of the ACM 20, 8 (August 1977), 564-576.

9.Liskov, B., et al.. CLU Reference Manual. Springer-Verlag, 1984.

10.Liskov, B., et al. Argus Reference Manual. Technical Report MIT/LCS/TR-400, M.I.T. Laboratory for Computer Science, Cambridge, Ma., 1987.

11.Liskov, B., and Guttag, J.. Abstraction and Specification in Program Development. MIT Press and McGraw Hill, 1986.

12.Liskov, B., and Zilles, S. "Programming with abstract data types". Proc. of ACM SIGPLAN Conference on Very High Level Languages, SIGPLAN Notices 9 (1974).

13.Moon, D. "Object-Oriented Programming with Flavors". Proc. of the ACM Conference on Object-Oriented Programming Systems, Languages, and Applications, SIGPLAN Notices 21, 11 (November 1986).

14.Morris, J. H. "Protection in Programming Languages". Comm. of the ACM 16, 1 (January 1973).

15.Parnas, D. Information Distribution Aspects of Design Methodology. In Proceedings of IFIP Congress, North Holland Publishing Co., 1971.

16.Parnas, D. "On the Criteria to be Used in Decomposing Systems into Modules". Comm. of the ACM 15, 12 (December 1972).

17.Schaffert, C., et al. "An Introduction to Trellis/Owl". Proc. of the ACM Conference on Object-Oriented Programming Systems, Languages, and Applications, SIGPLAN Notices 21, 11 (November 1986).

18.Snyder, A. "Encapsulation and Inheritance in Object-Oriented Programming Languages". Proc. of the ACM Conference on Object-Oriented Programming Systems, Languages, and Applications, SIGPLAN Notices 21, 11 (November 1986).

19.19. U. S. Department of Defense. Reference manual for the Ada programming language.  1983. ANSI standard Ada.

49种软件测试方法总结

β测试_Beta测试

β测试,英文是Beta testing。又称Beta测试,用户验收测试(UAT)。

β测试是软件的多个用户在一个或多个用户的实际使用环境下进行的测试。开发者通常不在测试现场,Beta测试不能由程序员或测试员完成。

当开发和测试根本完成时所做的测试,而最终的错误和问题需要在最终发行前找到。这种测试一般由最终用户或其他人员员完成,不能由程序员或测试员完成。

α测试_Alpha测试

α测试,英文是Alpha testing。又称Alpha测试。

Alpha测试是由一个用户在开发环境下进行的测试,也可以是公司内部的用户在模拟实际操作环境下进行的受控测试,Alpha测试不能由该系统的程序员或测试员完成。

在系统开发接近完成时对应用系统的测试;测试后,仍然会有少量的设计变更。这种测试一般由最终用户或其他人员来完成,不能由程序员或测试员完成。

可移植性测试

可移植性测试,英文是Portability testing。又称兼容性测试。可移植性测试是指测试软件是否可以被成功移植到指定的硬件或软件平台上。

用户界面测试-UI测试

用户界面测试,英文是User interface testing。又称UI测试。

用户界面,英文是User interface。是指软件中的可见外观及其底层与用户交互的部分(菜单、对话框、窗口和其它控件)。

用户界面测试是指测试用户界面的风格是否满足客户要求,文字是否正确,页面是否美观,文字,图片组合是否完美,操作是否友好等等。UI 测试的目标是确保用户界面会通过测试对象的功能来为用户提供相应的访问或浏览功能。确保用户界面符合公司或行业的标准。包括用户友好性、人性化、易操作性测试。

用户界面测试用户分析软件用户界面的设计是否合乎用户期望或要求。它常常包括菜单,对话框及对话框上所有按钮,文字,出错提示,帮助信息 (Menu 和Help content)等方面的测试。比如,测试Microsoft Excel中插入符号功能所用的对话框的大小,所有按钮是否对齐,字符串字体大小,出错信息内容和字体大小,工具栏位置/图标等等。


冒烟测试

冒烟测试,英文是Smoke testing。

冒烟测试的名称可以理解为该种测试耗时短,仅用一袋烟功夫足够了。也有人认为是形象地类比新电路板功基本功能检查。任何新电路板焊好后,先通电检查,如果存在设计缺陷,电路板可能会短路,板子冒烟了。

冒烟测试的对象是每一个新编译的需要正式测试的软件版本,目的是确认软件基本功能正常,可以进行后续的正式测试工作。冒烟测试的执行者是版本编译人员。

随机测试

随机测试,英文是Ad hoc testing。

随机测试没有书面测试用例、记录期望结果、检查列表、脚本或指令的测试。主要是根据测试者的经验对软件进行功能和性能抽查。随机测试是根据测试说明书执行用例测试的重要补充手段,是保证测试覆盖完整性的有效方式和过程。

随机测试主要是对被测软件的一些重要功能进行复测,也包括测试那些当前的测试样例(TestCase)没有覆盖到的部分。另外,对于软件更新和新增加的功能要重点测试。重点对一些特殊点情况点、特殊的使用环境、并发性、进行检查。尤其对以前测试发现的重大Bug,进行再次测试,可以结合回归测试 (Regressive testing)一起进行。

本地化测试

本地化测试,英文是Localization testing。

本地化就是将软件版本语言进行更改,比如将英文的windows改成中文的windows就是本地化。本地化测试的对象是软件的本地化版本。本地化测试的目的是测试特定目标区域设置的软件本地化质量。本地化测试的环境是在本地化的操作系统上安装本地化的软件。从测试方法上可以分为基本功能测试,安装/卸载测试,当地区域的软硬件兼容性测试。测试的内容主要包括软件本地化后的界面布局和软件翻译的语言质量,包含软件、文档和联机帮助等部分。

本地化能力测试

本地化能力测试,英文是Localizability testing。

本地化能力测试是指不需要重新设计或修改代码,将程序的用户界面翻译成任何目标语言的能力。为了降低本地化能力测试的成本,提高测试效率,本地化能力侧是通常在软件的伪本地化版本上进行。

本地化能力测试中发现的典型错误包括:字符的硬编码(即软件中需要本地化的字符写在了代码内部),对需要本地化的字符长度设置了国定值,在软件运行时以控件位置定位,图标和位图中包含了需要本地化的文本,软件的用户界面与文档术语不一致等。

国际化测试

国际化测试,英文是International testing。又称国际化支持测试。

国际化测试的目的是测试软件的国际化支持能力,发现软件的国际化的潜在问题,保证软件在世界不同区域都能正常运行。国际化测试使用每种可能的国际输入类型,针对任何区域性或区域设置检查产品的功能是否正常,软件国际化测试的重点在于执行国际字符串的输入/输出功能。国际化测试数据必须包含东亚语言、德语、复杂脚本字符和英语(可选)的混合字符。

国际化支持测试是指验证软件程序在不同国家或区域的平台上也能够如预期的那样运行,而且还可以按照原设计尊重和支持使用当地常用的日期,字体,文字表示,特殊格式等等。比如,用英文版的 Windows XP 和 Microsoft Word 能否展示阿拉伯字符串?用阿拉伯版的 Windows XP 和 阿拉伯版的Microsoft Word 能否展示阿拉伯字符串?又比如,日文版的Microsoft Excel对话框是否显示正确翻译的日语?一旦来说执行国际化支持测试的测试人员往往需要基本上了解这些国家或地区的语言要求和期望行为是什么。

安装测试

安装测试,英文是Installing testing。

安装测试是确保软件在正常情况和异常情况下,例如,进行首次安装、升级、完整的或自定义的安装都能进行安装的测试。异常情况包括磁盘空间不足、缺少目录创建权限等场景。核实软件在安装后可立即正常运行。安装测试包括测试安装代码以及安装手册。安装手册提供如何进行安装,安装代码提供安装一些程序能够运行的基础数据。

白盒测试-结构测试-逻辑驱动测试

白盒测试,英文是White Box Testing。又称结构测试或者逻辑驱动测试。

白盒测试是把测试对象看作一个打开的盒子。利用白盒测试法进行动态测试时,需要测试软件产品的内部结构和处理过程,不需测试软件产品的功能。

白盒测试法的覆盖标准有逻辑覆盖、循环覆盖和基本路径测试。其中逻辑覆盖包括语句覆盖、判定覆盖、条件覆盖、判定/条件覆盖、条件组合覆盖和路径覆盖。

白盒测试是知道产品内部工作过程,可通过测试来检测产品内部动作是否按照规格说明书的规定正常进行,按照程序内部的结构测试程序,检验程序中的每条通路是否都有能按预定要求正确工作,而不顾它的功能,白盒测试的主要方法有逻辑驱动、基路测试等,主要用于软件验证。

白盒测试常用工具有:Jtest、VcSmith、Jcontract、C++ Test、CodeWizard、logiscope。

黑盒测试-功能测试-数据驱动测试

黑盒测试,英文是Black Box Testing。又称功能测试或者数据驱动测试。

黑盒测试是根据软件的规格对软件进行的测试,这类测试不考虑软件内部的运作原理,因此软件对用户来说就像一个黑盒子。软件测试人员以用户的角度,通过各种输入和观察软件的各种输出结果来发现软件存在的缺陷,而不关心程序具体如何实现的一种软件测试方法。

黑盒测试常用工具有:AutoRunner、winrunner、loadrunner。

自动化测试

自动化测试,英文是Automated Testing。

使用自动化测试工具来进行测试,这类测试一般不需要人干预,通常在GUI、性能等测试和功能测试中用得较多。通过录制测试脚本,然后执行这个测试脚本来实现测试过程的自动化。国内领先的自动化测试服务提供商是泽众软件。自动化测试工具有AutoRunner和TAR等。

回归测试

回归测试,英文是Regression testing。

回归测试是指在发生修改之后重新测试先前的测试以保证修改的正确性。理论上,软件产生新版本,都需要进行回归测试,验证以前发现和修复的错误是否在新软件版本上再次出现。

根据修复好了的缺陷再重新进行测试。回归测试的目的在于验证以前出现过但已经修复好的缺陷不再重新出现。一般指对某已知修正的缺陷再次围绕它原来出现时的步骤重新测试。通常确定所需的再测试的范围时是比较困难的,特别当临近产品发布日期时。因为为了修正某缺陷时必需更改源代码,因而就有可能影响这部分源代码所控制的功能。所以在验证修好的缺陷时不仅要服从缺陷原来出现时的步骤重新测试,而且还要测试有可能受影响的所有功能。因此应当鼓励对所有回归测试用例进行自动化测试。

验收测试

验收测试,英文是Acceptance testing。

验收测试是指系统开发生命周期方法论的一个阶段,这时相关的用户或独立测试人员根据测试计划和结果对系统进行测试和接收。它让系统用户决定是否接收系统。它是一项确定产品是否能够满足合同或用户所规定需求的测试。

验收测试一般有三种策略:正式验收、非正式验收活Alpha 测试、Beta 测试。

动态测试

动态测试,英文是Moment Testing。

动态测试是指通过运行软件来检验软件的动态行为和运行结果的正确性。根据动态测试在软件开发过程中所处的阶段和作用,动态测试可分为如下几个步骤:

1、单元测试

2、集成测试

3、系统测试

4、验收测试

5、回归测试

探索测试

探索测试,英文是Exploratory Testing。

探索测试是指通常用于没有产品说明书的测试,这需要把软件当作产品说明书来看待,分步骤逐项探索软件特性,记录软件执行情况,详细描述功能,综合利用静态和动态技术来进行测试。探索测试人员只靠智能、洞察力和经验来对bug的位置进行判断,所以探索测试又被称为自由形式测试。

单元测试

单元测试,英文是Unit Testing。

单元测试是最微小规模的测试;以测试某个功能或代码块。典型地由程序员而非测试员来做,因为它需要知道内部程序设计和编码的细节知识。这个工作不容易做好,除非应用系统有一个设计很好的体系结构; 还可能需要开发测试驱动器模块或测试套具。

集成测试

集成测试,英文是Integration Testing。

集成测试是指一个应用系统的各个部件的联合测试,以决定他们能否在一起共同工作并没有冲突。部件可以是代码块、独立的应用、网络上的客户端或服务器端程序。这种类型的测试尤其与客户服务器和分布式系统有关。一般集成测试以前,单元测试需要完成。

集成测试是单元测试的逻辑扩展。它的最简单的形式是:两个已经测试过的单元组合成一个组件,并且测试它们之间的接口。从这一层意义上讲,组件是指多个单元的集成聚合。在现实方案中,许多单元组合成组件,而这些组件又聚合成程序的更大部分。方法是测试片段的组合,并最终扩展进程,将您的模块与其他组的模块一起测试。最后,将构成进程的所有模块一起测试。此外,如果程序由多个进程组成,应该成对测试它们,而不是同时测试所有进程。

集成测试识别组合单元时出现的问题。通过使用要求在组合单元前测试每个单元,并确保每个单元的生存能力的测试计划,可以知道在组合单元时所发现的任何错误很可能与单元之间的接口有关。这种方法将可能发生的情况数量减少到更简单的分析级别。

系统测试

系统测试,英文是System Testing。

系统测试是基于系统整体需求说明书的黑盒类测试,应覆盖系统所有联合的部件。系统测试是针对整个产品系统进行的测试,目的是验证系统是否满足了需求规格的定义,找出与需求规格不相符合或与之矛盾的地方。

系统测试的对象不仅仅包括需要测试的产品系统的软件,还要包含软件所依赖的硬件、外设甚至包括某些数据、某些支持软件及其接口等。因此,必须将系统中的软件与各种依赖的资源结合起来,在系统实际运行环境下来进行测试。

端到端测试

端到端测试,英文是End to End Testing。

端到端测试类似于系统测试,测试级的“宏大”的端点,涉及整个应用系统环境在一个现实世界使用时的模拟情形的所有测试。例如与数据库对话,用网络通讯,或与外部硬件、应用系统或适当的系统对话。端到端架构测试包含所有访问点的功能测试及性能测试。端到端架构测试实质上是一种"灰盒"测试,一种集合了白盒测试和黑盒测试的优点的测试方法。

健全测试

健全测试,英文是Sanity testing。

健全测试是指一个初始化的测试工作,以决定一个新的软件版本测试是否足以执行下一步大的测试努力。例如,如果一个新版软件每5分钟与系统冲突,使系统陷于泥潭,说明该软件不够“健全”,目前不具备进一步测试的条件。

衰竭测试

衰竭测试,英文是Failure Testing。

衰竭测试是指软件或环境的修复或更正后的“再测试”。可能很难确定需要多少遍再次测试。尤其在接近开发周期结束时。自动测试工具对这类测试尤其有用。

接受测试

接受测试,英文是Accept Testing。

接受测试是基于客户或最终用户的规格书的最终测试,或基于用户一段时间的使用后,看软件是否满足客户要求。一般从功能、用户界面、性能、业务关联性进行测试。

负载测试

负载测试,英文是Load testing。

负载测试是测试一个应用在重负荷下的表现。例如测试一个 Web 站点在大量的负荷下,何时系统的响应会退化或失败,以发现设计上的错误或验证系统的负载能力。在这种测试中,将使测试对象承担不同的工作量,以评测和评估测试对象在不同工作量条件下的性能行为,以及持续正常运行的能力。

负载测试的目标是确定并确保系统在超出最大预期工作量的情况下仍能正常运行。此外,负载测试还要评估性能特征,例如,响应时间、事务处理速率和其他与时间相关的方面。

强迫测试

强迫测试,英文是Force Testing。

强迫测试是在交替进行负荷和性能测试时常用的术语。也用于描述象在异乎寻常的重载下的系统功能测试之类的测试,如某个动作或输入大量的重复,大量数据的输入,对一个数据库系统大量的复杂查询等。

压力测试

压力测试,英文是Stress Testing。和负载测试差不多。

压力测试是一种基本的质量保证行为,它是每个重要软件测试工作的一部分。压力测试的基本思路很简单:不是在常规条件下运行手动或自动测试,而是在计算机数量较少或系统资源匮乏的条件下运行测试。通常要进行压力测试的资源包括内部内存、CPU 可用性、磁盘空间和网络带宽等。一般用并发来做压力测试。

性能测试

性能测试,英文是Performance Testing。

性能测试是在交替进行负荷和强迫测试时常用的术语。理想的“性能测试”(和其他类型的测试)应在需求文档或质量保证、测试计划中定义。性能测试一般包括负载测试和压力测试。

通常验证软件的性能在正常环境和系统条件下重复使用是否还能满足性能指标。或者执行同样任务时新版本不比旧版本慢。一般还检查系统记忆容量在运行程序时会不会流失(memory leak)。比如,验证程序保存一个巨大的文件新版本不比旧版本慢。

可用性测试

可用性测试,英文是Practical Usability Testing。

可用性测试是对“用户友好性”的测试。显然这是主观的,且将取决于目标最终用户或客户。用户面谈、调查、用户对话的录象和其他一些技术都可使用。程序员和测试员通常都不宜作可用性测试员。

卸载测试

卸载测试,英文是Uninstall Testing。

卸载测试是对软件的全部、部分或升级卸载处理过程的测试。主要是测试软件能否卸载,卸载是否干净,对系统有无更改,在系统中的残留与后来的生成文件如何处理等。还有原来更改的系统值是否修改回去。

恢复测试

恢复测试,英文是Recovery testing。

恢复测试是测试一个系统从如下灾难中能否很好地恢复,如遇到系统崩溃、硬件损坏或其他灾难性问题。恢复测试指通过人为的让软件(或者硬件)出现故障来检测系统是否能正确的恢复,通常关注恢复所需的时间以及恢复的程度。

恢复测试主要检查系统的容错能力。当系统出错时,能否在指定时间间隔内修正错误并重新启动系统。恢复测试首先要采用各种办法强迫系统失败,然后验证系统是否能尽快恢复。对于自动恢复需验证重新初始化(reinitialization)、检查点(checkpointing mechanisms)、数据恢复(data recovery)和重新启动 (restart)等机制的正确性;对于人工干预的恢复系统,还需估测平均修复时间,确定其是否在可接受的范围内。


安全测试

安全测试,英文是Security Testing。

安全测试是测试系统在防止非授权的内部或外部用户的访问或故意破坏等情况时怎么样。这可能需要复杂的测试技术。安全测试检查系统对非法侵入的防范能力。安全测试期间,测试人员假扮非法入侵者,采用各种办法试图突破防线。例如:

①想方设法截取或破译口令;

②专门定做软件破坏系统的保护机制;

③故意导致系统失败,企图趁恢复之机非法进入;

④试图通过浏览非保密数据,推导所需信息,等等。理论上讲,只要有足够的时间和资源,没有不可进入的系统。因此系统安全设计的准则是,使非法侵入的代价超过被保护信息的价值。此时非法侵入者已无利可图。

兼容性测试

兼容测试,英文是Compatibility Testing。

兼容测试是测试软件在一个特定的硬件/软件/操作系统/网络等环境下的性能如何。向上兼容向下兼容,软件兼容硬件兼容。软件的兼容性有很多需要考虑的地方。

比较测试

比较测试,英文是Compare Testing。

比较测试是指与竞争伙伴的产品的比较测试,如软件的弱点、优点或实力。来取长补短,以增强产品的竞争力。

可接受性测试

可接受性测试,英文是Acceptability Testing。

可接受性测试是在把测试的版本交付测试部门大范围测试以前进行的对最基本功能的简单测试。因为在把测试的版本交付测试部门大范围测试以前应该先验证该版本对于所测试的功能基本上比较稳定。必须满足一些最低要求。比如不会很容易程序就挂起或崩溃。如果一个新版本没通过可测试性的验证,就应该阻拦测试部门花时间在该测试版本上测试。同时还要找到造成该版本不稳定的主要缺陷并督促尽快加以修正。

边界条件测试

边界条件测试,英文是Boudary Testing。又称边界值测试。

一种黑盒测试方法,适度等价类分析方法的一种补充,由长期的测试工作经验得知,大量的错误是发生在输入或输出的边界上。因此针对各种边界情况设计测试用例,可以查出更多的错误。

边界条件测试是环绕边界值的测试。通常意味着测试软件各功能是否能正确处理最大值,最小值或者所设计软件能够处理的最长的字符串等等。

强力测试

强力测试,英文是Mightiness Testing。

强力测试通常验证软件的性能在各种极端的环境和系统条件下是否还能正常工作。或者说是验证软件的性能在各种极端环境和系统条件下的承受能力。比如,在最低的硬盘驱动器空间或系统记忆容量条件下,验证程序重复执行打开和保存一个巨大的文件1000次后也不会崩溃或死机。

装配/安装/配置测试

装配/安装/配置测试是验证软件程序在不同厂家的硬件上,所支持的不同语言的新旧版本平台上,和不同方式安装的软件都能够如预期的那样正确运行。比如,把英文版的 Microsoft Office 2003安装在韩文版 的Windows Me 上,再验证所有功能都正常运行。

静态测试

静态测试,英文是Static Testing。

静态测试指测试不运行的部分,例如测试产品说明书,对此进行检查和审阅。静态方法是指不运行被测程序本身,仅通过分析或检查源程序的文法、结构、过程、接口等来检查程序的正确性。静态方法通过程序静态特性的分析,找出欠缺和可疑之处,例如不匹配的参数、不适当的循环嵌套和分支嵌套、不允许的递归、未使用过的变量、空指针的引用和可疑的计算等。静态测试结果可用于进一步的查错,并为测试用例选取提供指导。

静态测试常用工具有:Logiscope、PRQA。

隐藏数据测试

隐藏数据测试在软件验收和确认阶段是十分必要和重要的一部分。程序的质量不仅仅通过用户界面的可视化数据来验证,而且必须包括遍历系统的所有数据。

假设一个应用程序要求用户两条信息-----用户名和密码来创建帐户。这个用户输入这两条数据后保存。最后,一个确认窗口将通过数据库中找到这条数据来显示用户名和密码给用户。为了验证所有的数据保存是否正确,一个QA测试人员会在这个确认窗口简单的查看下用户名和密码。如果他们成功了?假设数据库记录了第三条信息----创建日期,它可能不会出现在确认窗口,而只在存档中才出现。如果创建日期保留的不正确,而QA测试人员只验证屏幕上的数据,那么这个问题就不可能被发现。创建日期可能就是一个bug,由于一个用户帐户保存了一个错误的日期到数据库中,这个问题也不可能会被引起注意,因为它被用户界面所隐藏。这只是一个简单的例子,但是它却演化出了一点:隐藏数据测试的重要性。

等价划分测试

等价划分测试的英文是equivalence partition testing。

等价划分测试是根据等价类设计测试用例的一种技术。是黑盒测试的典型方法之一,通过把被测试程序所有可能的输入数据域划分成若干部分。从每一部分中选取少数有代表性的数据作为测试用例,可有效减少测试次数,极大提高软件测试效率,缩短软件开发周期.等价类划分测试的目的就是为了在有限的测试资源的情况下,用少量有代表性的数据得到比较好的测试效果。有效等价类盒无效等价类。有效等价类中的数据代表的是一组符合需求文档的正确的有意义数据。无效等价类则正相反。

判定表

判定表的英文是decision table,是指一个表格,用于显示条件和条件导致动作的集合。

定义:判定表是分析和表达多逻辑条件下执行不同操作的情况的工具。

判定表的优点:能够将复杂的问题按照各种可能的情况全部列举出来,简明并避免遗漏。因此,利用判定表能够设计出完整的测试用例集合。

在一些数据处理问题当中,某些操作的实施依赖于多个逻辑条件的组合,即:针对不同逻辑条件的组合值,分别执行不同的操作。判定表很适合于处理这类问题。

深度测试

深度测试的英文Depth test ,是指执行一个产品的一个特性的所有细节,但不测试所有特性。

当比较函数返回真的时候才显示出效果来。必须启用“#深度测试”,才能执行测试。不使用的时候需要关闭。

基于设计的测试

基于设计的测试的英文是design-based testing,是根据软件的构架或详细设计引出测试用例的一种方法。

一种基于设计模型的测试方法(Model Based TestIng System,MATIS).该方法利用用户界面自动生成方法,把设计模型中的类属性定义和实现中的控件属性组织在一起,构建描述界面的逻辑对照表,辅助测试脚本引擎执行自动测试脚本.借助设计模型中扩展的类定义,MATIS方法可以自动生成测试用例和测试数据。

文档测试

文档测试的英文是documentation testing,测试关注于文档的正确性。文档测试有三大类分别是开发文件、用户文件、管理文件。

1.开发文件:可行性研究报告、软件需求说明书、数据要求说明书、概要设计说明书、详细设计说明书、数据库设计说明书、模块开发卷宗。

2.用户文件:用户手册、操作手册。

3.管理文件:项目开发计划、测试计划、测试分析报告、开发进度月报、项目开发总结报告。

软件测试中的文档测试主要是对相关的设计报告和用户使用说明进行测试,对于设计报告主要是测试程序与设计报告中的设计思想是否一致;对于用户使用说明进行测试时,主要是测试用户使用说明书中对程序操作方法的描述是否正确,重点是用户使用说明中提到的操作例子要进行测试,保证采用的例子能够在程序中正确完成操作。

域测试

域测试的英文是domain testing,定义参考等价划分测试(equivalence partition testing);

一般分为单域测试和多域测试,其中单域测试包括设备测试和业务测试,设备测试包括测试某个系统的软交换设备、中继媒体网关设备、信令网关设备、接入媒体网关和IAD等设备。

等价类划分有两种不同的情况:有效等价类和无效等价类。设计时要同时考虑这两种等价类,因为软件不仅要能接收合理的数据,也要能经受意外的考验。

一有效等价类:是指对于程序的规格说明来说是合理的、有意义的输入数据构成的集合。利用有效等价类可检验程序是否实现了规格说明中所规定的功能和性能。

二无效等价类:与有效等价类的定义恰巧相反。

接口测试

接口测试的英文是interface testing,接口测试测试系统组件间接口的一种测试。接口测试的好处:由于接口测试代码本身就是用junit(当然接口的类型不同,不一定是Junit来实现)来实现的,是属于自动化测试的范畴,因此必定也包含自动化测试所固有的优势。

1)提高测试质量

软件开发的过程是一个持续集成和改进的过程,而每一次的改进都可能引进新bug,因此当软件的一部,或者全部修改时,都需要对软件产品重新进行测试。其目的是要验证修改后的产品是符合需求的,而当没有自动化测试代码时,往往会由于各种各样的原因,回归不充分,导致bug遗漏。

2)提高测试效率

软件系统的规模越来越大,功能点越来越多,开发人员的自测或者测试人员的人工测试非常耗时和繁琐,势必导致测试效率的低下,而自动化测试正好解决这些耗时繁琐的任务,在对外接口功能不变的情况下,达到了一次编写,永久使用的效果。

3)提高测试覆盖

通过手工测试很难测试到一些更深层次的异常和安全的问题,通过一些辅助的一些测试工具,能分析出代码的覆盖率,通过覆盖率的提高来提高测试的深度。

4)更好地重现软件缺陷

由于每次执行都是相同的代码,一旦代码出错,必定回归出错;

5)更好定位错误

由于接口测试是一种自下向上的测试,因此一量出错,非常容易定位出错,不向系统测试那样了,一旦有Bug,需要几层验证之后才能确定出错位置;

6)降低修改bug的成本接口测试

基本和开发人员的编码平行工作,因此发现问题会比系统测试早很多,因此减少了修改bug的成本。

7)增进测试人员和开发人员之间的合作关系

测试工程师为了更好地开展工作,需要对开发技术有深入的理解和实践,有了与开发工程师更多的交流。

8)降低了项目不能按时发布的风险

由于接口测试很早就介入,在提交给系统测试前对项目代码的核心模块已经做了详尽的测试,必定加速系统测试的时间,由此来保证项目的按时发布;

9)提升测试人员的技能

做接口测试必须了解开发人员的开发流程和一些开发技能,也需要了解测试工具的一些使用方法和一些测试思想,提升了测试人员的技术附加值,提高了自身的竟争力。

10)促使项目开发过程的规范化

要进行接口,需要完善的文档进行保障,没有测试文档,接口测试将寸步难行,接口测试将增加开发过程规范化产出,而规范化产出也保证了项目质量。

负面测试与正面测试的比较

负面测试(Negative testing)是相对于正面测试(Positive testing)而言的。它们也是测试设计时的两个非常重要的划分。简单点说,正面测试就是测试系统是否完成了它应该完成的工作;而负面测试就是测试系统是否不执行它不应该完成的操作。形象一点,正面测试就象一个毕恭毕敬的小学生,老师叫我做什么,我就做什么;而负面测试就象一个调皮捣蛋的孩子,你叫我这样做,我偏不这样做,而且和你对着干。开发人员也是最讨厌修改此类bug的。

非功能性需求测试

非功能性需求测试的英文是non-functional requirements testing ,是与功能不相关的需求测试,如:性能测试、可用性测试等。

为什么非功能性需求很重要?在您设计解决方案的过程中满足功能性需求当然是很重要的。但是,如果没有考虑非功能性需求,您的解决方案则很难取得实效。

非功能性需求特点:

1.不要脱离实际环境;

2.可靠性;

3.可用性;

4.有效性;

5.可维护性;

6.可移植性